What do you think about this photo?Do you have questions or curiosities about this image? Do you want to ask something to the author, give him suggestions for improvement, or congratulate for a photo that you really like?
You can do it by joining JuzaPhoto, it is easy and free!
There is more: by registering you can create your personal page, publish photos, receive comments and you can use all the features of JuzaPhoto. With more than 242000 members, there is space for everyone, from the beginner to the professional.
| sent on February 02, 2023 (22:18) | This comment has been automatically translated (show/hide original)
Bravo Pardi, nice result! The 6 microns of the sensor of the Z6 can be seen all ! The F3.2 also :D. Bravo Pardi, bel risultato ! I 6 micron del sensore della Z6 si vedono tutti ! Anche gli F3.2 :D. |
| sent on February 03, 2023 (0:16) | This comment has been translated
Fantastic! |
| sent on February 03, 2023 (0:25) | This comment has been automatically translated (show/hide original)
But it won't be a single shot :-o ? Ma non sarà mica uno scatto singolo  ? ? |
| sent on February 03, 2023 (9:11) | This comment has been automatically translated (show/hide original)
Great shot. Hello Corrado Ottimo scatto. Ciao Corrado |
| sent on February 03, 2023 (12:06) | This comment has been automatically translated (show/hide original)
Great result, great job congratulations.
Hello
Roberto Gran bel risultato, ottimo lavoro complimenti.
Ciao
Roberto |
| sent on February 03, 2023 (12:38) | This comment has been automatically translated (show/hide original)
Wonderful, many compliments.
Greetings John Stupenda, tanti complimenti.
Un saluto Giovanni |
| sent on February 03, 2023 (13:25) | This comment has been automatically translated (show/hide original)
Excellent catch. Congratulations. Hello. Magú Ottima cattura. Complimenti. Ciao. Magú |
| sent on February 04, 2023 (8:40) | This comment has been translated
Cool! |
| sent on February 04, 2023 (14:01) | This comment has been automatically translated (show/hide original)
Great image.
Bravo Valerio!
Corrado Ottima immagine.
Bravo Valerio!
Corrado |
| sent on February 07, 2023 (11:03) | This comment has been automatically translated (show/hide original)
Thank you all.
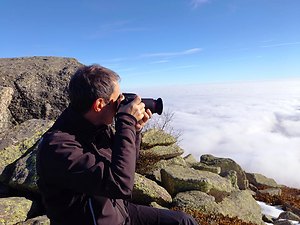
This is the sum of a hundred shots of 30 "each Grazie a tutti.
Si tratta della somma di un centinaio di scatti da 30" l'uno |
| sent on February 07, 2023 (16:18) | This comment has been automatically translated (show/hide original)
If you have time to answer I would like to ask you how you get both the detail of the stars and the comet so well, in the sense that I tried to stack without a star tracker and with Siril first I follow the stars and the stars are good, then I follow the comet and the comet is good (not so well). Then when it comes to merging the 2 levels I can not do a good job because the trail of the stars is quite similar to the trail of the comet and if I mask the stripes of the stars I also erase the trail of the comet. Thank you. Se avrai tempo per rispondere vorrei chiederti come fai ad ottenere sia il dettaglio delle stelle che della cometa così bene, nel senso che io ho provato a fare lo stacking senza astroinseguitore e con Siril prima seguo le stelle e vengono bene le stelle, poi seguo la cometa e viene bene la cometa (non così bene). Poi quando si tratta di fondere i 2 livelli non riesco a fare un bel lavoro perché la scia delle stelle è abbastanza simile alla scia della cometa e se maschero le strisce delle stelle cancello anche la scia della cometa. Grazie. |
| sent on February 09, 2023 (19:05) | This comment has been automatically translated (show/hide original)
Ciao, io parto da dei singoli scatti in cui cometa e stelle sono ben definiti. Io ho usato un astroinseguitore che mi ha permesso di realizzare scatti da 30" ben inseguiti. Poi la procedura in postproduzione l'ho eseguita con Pixinsight, con il plug-in starXterminator e PhotoshopCC. I passaggi sono stati:
- Calibrazione delle singole pose con i flat, dark e bias
- allineamento sulle stelle e somma di tutti gli scatti. si ottiene un campo stellare ben definito e la cometa ovviamente molto mossa
- applico starXterminator a questa immagine e ottengo il campo senza stelle.
- In Photoshop sottraggo alla prima immagine, quella senza stella e ottengo solo le stelle, eliminando del tutto la traccia della cometa mossa. Unisco i livelli e salvo la foto.
- In Pixinsght ora allineo tutti i fotogrammi calibrati in precedenza sulla cometa con il comando cometalignment
- Applico StarXterminator a ogni singola immagine allineata sulla cometa
- sommo i singoli fotogrammi allineati sulla cometa senza stelle, ottengo così una somma con la cometa e il fondo cielo.
- In photoshop applico a questa immagine, quella delle stelle che avevo creato prima, su un livello superiore con il metodo di fusione screen.
Fatto!  |
| sent on February 09, 2023 (22:04) | This comment has been automatically translated (show/hide original)
Well 'thanks and it's not really enough, 2 steps have really opened a world to me:- the first
is definitely this:
“ In Photoshop I subtract the first image, the one without a star and I get only the stars, completely eliminating the trace of the comet moved. I merge the layers and save the photo. „
-the second, which to tell the truth I had guessed and I was trying to achieve with Siril+starnet+bush script, but still without success x various minor problems and with the strong doubt of trying a wrong path because this thing you write is the first time I read it somewhere “
I apply StarXterminator to every single image aligned on the comet „
Thank you very much, A few lines, but very useful! Be' grazie e non è davvero abbastanza, 2 passaggi mi hanno davvero aperto un mondo:
- il primo è sicuramente questo:
" In Photoshop sottraggo alla prima immagine, quella senza stella e ottengo solo le stelle, eliminando del tutto la traccia della cometa mossa. Unisco i livelli e salvo la foto. "
-il secondo, che per la verità avevo intuito, lo stavo cercando di realizzare con Siril+starnet+script di bush, ma ancora senza successo (x vari problemi minori) e soprattutto credendo di tentare una strada sbagliata perché questa cosa che tu scrivi è la prima volta che la leggo da qualche parte
" Applico StarXterminator a ogni singola immagine allineata sulla cometa "
Grazie infinite, poche righe, ma utilissime! |
| sent on February 09, 2023 (22:13) | This comment has been automatically translated (show/hide original)
Glad it helped.
My processing is the result of various attempts, analyzing the various possibilities of which I had read or seen tutorials and then customize it in order to limit any artifacts as much as possible and also simplify the process. process, however, that takes away a lot of resources to the PC and in the case of StarXterminator applied to over 100 images takes away a few hours of processing, unless you enable the ability to take advantage of the video card's GPU. I
relied on the brute force of the processor, but if you have a CPU not very recent, I recommend fiddling a bit 'to activate GPU acceleration, enormously more efficient. Felice che ti sia stato di aiuto.
Il mio processing è frutto di vari tentativi, analizzando le varie possibilità di cui avevo letto o visto tutorial per poi personalizzarlo in modo da limitare il più possibile eventuali artefatti e semplificare anche il processo. processo, comunque, che porta via parecchie risorse al Pc e nel caso di StarXterminator applicato a oltre 100 immagini porta via qualche ora di elaborazione, a meno di non attivare la possibilità di sfruttare la GPU della scheda video.
Io mi sono affidato alal forza bruta del processore, ma se si dispone di una CPU non recentissima, consiglio di smanettare un po' per attivare l'accelerazione da GPU, enormemente più efficiente. |
| sent on February 10, 2023 (21:48) | This comment has been automatically translated (show/hide original)
Thanks also for these further details! Grazie anche per questi ulteriori dettagli! |
|

Publish your advertisement on JuzaPhoto (info) |


 JuzaPhoto contains affiliate links from Amazon and Ebay and JuzaPhoto earn a commission in case of purchase through affiliate links.


 12.7 MEGAPIXEL
 Resize to fit window