What do you think about this photo?Do you have questions or curiosities about this image? Do you want to ask something to the author, give him suggestions for improvement, or congratulate for a photo that you really like?
You can do it by joining JuzaPhoto, it is easy and free!
There is more: by registering you can create your personal page, publish photos, receive comments and you can use all the features of JuzaPhoto. With more than 242000 members, there is space for everyone, from the beginner to the professional.
| sent on August 30, 2020 (23:24) | This comment has been automatically translated (show/hide original)
Congratulations on the good work ! Complimentissimi per il bel lavoro ! |
| sent on August 31, 2020 (8:26) | This comment has been automatically translated (show/hide original)
Congratulations Carlo, great job!! Thank you for sharing. Have a nice day Complimenti Carlo, ottimo lavoro!! Grazie per condividere. Buona giornata |
| sent on August 31, 2020 (8:37) | This comment has been automatically translated (show/hide original)
Jacopo, Alejandro, thank you very much for the welcome passage.
I am "experimenting", I expect opinions and suggestions from the Juza people.
Good day,
Carlo Jacopo, Alejandro, vi ringrazio moltissimo per il gradito passaggio.
Sono "esperimenti", aspetto opinioni e suggerimenti dal popolo Juza.
Buona giornata,
Carlo |
| sent on August 31, 2020 (11:55) | This comment has been automatically translated (show/hide original)
A good, indeed a very good for brilliant work and for driving the DIY method. Your results speak for themselves.
yo
Un bravo, anzi un bravissimo per il brillante lavoro e per la guida al metodo fai da te. I tuoi risultati parlano.
ciao
|
| sent on August 31, 2020 (12:00) | This comment has been automatically translated (show/hide original)
Thank you very much Fabio, too good :-)
I've seen your results and I'd say I'm a spanner ahead! ;-)
Hello,
Carlo
Grazie mille Fabio, troppo buono
Ho visto i tuoi di risultati e direi che sono una spanna avanti! 
Ciao,
Carlo
|
| sent on August 31, 2020 (14:55) | This comment has been automatically translated (show/hide original)
Good job... I'd say from professionals 8-) my system, on the other hand, is much more artisanal, indeed rudimentary, indeed, let's face it, raw!!! ;-) But my result does not seem too bad to me :-) Ottimo lavoro... direi da professionisti  il mio sistema, invece, è molto più artigianale, anzi rudimentale, anzi, diciamolo pure, grezzo!!! Però il mio risultato non mi sembra troppo cattivo il mio sistema, invece, è molto più artigianale, anzi rudimentale, anzi, diciamolo pure, grezzo!!! Però il mio risultato non mi sembra troppo cattivo
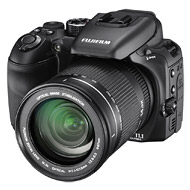
In ogni caso mi hai stuzzicato a provarci anche con le mie Fuji (X-T1 e X-T10) e relativi tubi di prolunga. Credo che utilizzerò il 55-230 che dovrebbe produrre meno distorsione e poi ti farò sapere. Mi intriga il fatto che tu abbia ottenuto immagini a 15 Mpx (e quindi, credo, maggior dettagli e definizione), mentre io con Canon FF e jpeg in camera, al massimo raggiungo i 4 Mpx (50 iso e massima definizione dell'immagine).
Ciao, Carlo |
| sent on August 31, 2020 (15:34)
Superb this camera...bravo at you..bye Jean.. |
| sent on August 31, 2020 (15:56) | This comment has been automatically translated (show/hide original)
good, great job if it works and for sharing it: congratulations bravo, un gran bel lavoro se funziona e per averlo condiviso: complimenti |
| sent on August 31, 2020 (17:21) | This comment has been automatically translated (show/hide original)
Ingenious!
If I can afford advice, I would also like to show black cardboard the part that goes from the viewer or light panel to the machine to avoid dispersion of light in the surrounding environment and since we are in place of the red fabric I would use a black curtain, always to not have interference of dominant light that somehow can contaminate the dia, you know the light bounces and it colors causing dominant not wanting...
I see the effort and effort to calibrate everything...
How many compliments...
Ingegnoso!
Se posso permettermi un consiglio, intuberei con cartone nero anche la parte che dal visore o pannello luminoso va alla macchina per evitare dispersione di luce nell'ambiente circostante e visto che ci siamo al posto del tessuto rosso utilizzerei un tendaggio nero, sempre per non avere interferenze di dominante di luce che in qualche modo possa contaminare la dia, si sa la luce rimbalza e si colora provocando dominanti non desiderate...
Visto l'impegno e la fatica per calibrare il tutto...
Comunque complimenti...
P.S. Piccola aggiunta: Anzichè avere l'asse della macchina che cade nella metà inferiore del pannello luminoso, la farei cadere al centro o alzando la macchina o abbassando il pannello....forse è più facile con un supporto adeguato alzare dal tavolo il piano sul quale è fissata la macchina... |
| sent on August 31, 2020 (18:04) | This comment has been automatically translated (show/hide original)
I thank you all infinitely for the appreciations and valuable advice that I will certainly put into practice.
@Carlo Alfonso: the useful image I get (without the black edges) is 65% of the overall 24Mpx image, or 24x0.65-15.6Mpx, while the output file is obviously compressed into Jpeg and has a weight that for the End mode will be about 4-5 MB. Maybe I didn't explain myself well.
Let me know how it went with the X-T1 and the 55-230 (I unfortunately have limited equipment, especially with regard to the goals)
@Biblos: OK, I will try to shield the back and center the light panel.
Soon, hello
Carlo Ringrazio infinitamente tutti voi per gli apprezzamenti e per i preziosi consigli che metterò sicuramente in pratica.
@Carlo Alfonso: l'immagine utile che ottengo (senza i bordi neri) è il 65% dell'immagine complessiva da 24Mpx ovvero 24x0,65=15,6Mpx, mentre il file di uscita è ovviamente compresso in Jpeg ed ha un peso che per la modalità Fine sarà di circa 4-5 MB. Forse non mi ero spiegato bene.
Fammi poi sapere com'è andata con la X-T1 e il 55-230 (io purtroppo ho un'attrezzatura limitata, soprattutto per quanto riguarda gli obbiettivi)
@Biblos: ok, proverò a schermare anche la parte posteriore e a centrare il pannello luminoso.
A presto, ciao
Carlo |
| sent on September 03, 2020 (8:08) | This comment has been automatically translated (show/hide original)
:-o Congratulations... Very ingenious ;-)  Complimenti...Molto ingegnoso Complimenti...Molto ingegnoso |
| sent on September 03, 2020 (8:20) | This comment has been automatically translated (show/hide original)
Thank you Gaet, I get along ;-)
Hello,
Carlo Grazie Gaet, mi arrangicchio
Ciao,
Carlo |
| sent on September 08, 2020 (15:49) | This comment has been automatically translated (show/hide original)
Ciao, scusami se ritorno sull'argomento, ma ci ho provato pure io: Fujifilm X-T10, Fujinon 16-50 e coppia di tubi di prolunga Meike, su mini stativo Manfrotto Pixi Duo, e ovviamente pannello riflettente a led.
Ho impostato il menù di scatto sulla massima definizione (Sharp +2), (H+2) e (S -2) e i colori a 0 con simulazione pellicola Astia (più morbida).
I primi risultati, con focale impostata a 50 mm. e diaframma 8 sono già abbastanza buoni; ora voglioe solo fare altre prove con altri settaggi di pellicola e bilanciamento dei colori per vedere se riesco ad ottenere di meglio.
Avendo impostato solo jpeg in camera, escludendo i RAF, i files più corposi sono poco più grandi di 6 Mpx, ma in media si attestano sui 6 Mpx.
La didderenza rispetto alle scansioni con Canon è che i colori risultano più brillanti, sopratutto utilizzando la simulazione pellicola Velvia al valore 0 di colore (ma anche a -1 e a -2), mentre a +1 o +2 i colori risultano un po' innaturali.
Poi pubblicherò qualcosa.
Ciao, Carlo
|
| sent on September 08, 2020 (17:57) | This comment has been automatically translated (show/hide original)
Hello Carlo you do not have to apologize indeed I am very pleased that you are back on the subject, we would miss it.
I did some other tests as you suggested, lowering ISOs to 100 and trying to change the film simulation and the color and contrast settings. I also increased the panel light a bit to keep the diaphragm at F8 with not too long times to not increase the noise and overall I got good results.
Dially I concluded that to scan the "most interesting" slides perhaps it is better to shoot in the RAF and develop later with the most suitable profile or with Fuji RAW Studio or directly with Photoshop.
Thank you and I await your scans.
Good evening,
Carlo Ciao Carlo non ti devi scusare anzi mi fa molto piacere che tu sia tornato sull'argomento, ci mancherebbe.
Ho fatto anch'io qualche altra prova come mi hai suggerito, abbassando gli ISO a 100 e provando a modificare la simulazione pellicola ed i settaggi colore e contrasto. Ho anche aumentato un po' la luce del pannello per mantenere il diaframma a F8 con tempi non eccessivamente lunghi per non aumentare il rumore e complessivamente ho ottenuto dei buoni risultati.
Tuttavia alla fine ho concluso che per fare la scansione delle diapositive "più interessanti" forse conviene scattare in RAF e sviluppare successivamente con il profilo più adatto o con Fuji RAW Studio o direttamente con Photoshop.
Ti ringrazio e attendo le tue scansioni.
Buona serata,
Carlo |
| sent on September 08, 2020 (18:22) | This comment has been automatically translated (show/hide original)
Hello, Charles. I'll also try WITH RAW files to see what comes out of it compared to the jpeg in the room. The shooting times at f. 8 with my light panel typically range from 1/10 degrees to 1/30 degrees. Only in a few cases have I dropped to 1/8 degrees or 1/6 degrees or climbed up to 1/80 degrees by intentionally overexposing or underexposing.
I have not seen a significant improve on jpeg in the room, taking into account excessive industriousness to develop RAW files.
Thotho I'm going to publish the most successful scans.
Hello, Carlo Ciao, Carlo. Proverò anche con i files RAW per vedere cosa ne viene fuori rispetto ai jpeg in camera. I tempi di scatto a f. 8 col mio pannello luminoso vanno, in genere, da 1/10° a 1/30°. Solo in pochi casi sono sceso a 1/8° o a 1/6° o salito fino a 1/80° sovraesponendo o sottoesponendo intenzionalmente.
Per quanto concerne Canon non ho riscontrato una miglioria significativa rispetto ai jpeg in camera, tenendo conto anche delle eccessiva laboriosità per sviluppare i files RAW.
Poi pubblicherò le scansioni meglio riuscite.
Ciao, Carlo |
| sent on September 08, 2020 (18:36) | This comment has been automatically translated (show/hide original)
Ok, I actually kept the panel brightness too low (I was afraid of having too high contrasts) and with ISO 100 and f8 I arrived at a few seconds of shooting time. By adjusting things better, I have shooting times similar to yours.
For the rest, as you say, it is likely that by finding the most suitable settings you get with the jpeg in the room practically the same results as the RAW, saving a lot of work.
I'm going to do more evidence.
Heo Ok, io in effetti tenevo la luminosità del pannello troppo bassa (temevo di avere contrasti troppo alti) e con ISO 100 e f8 arrivavo a tempi di scatto di qualche secondo. Regolando meglio le cose ho tempi di scatto simili ai tuoi.
Per il resto, come dici tu, è probabile che trovando i settaggi più adatti si ottengano con i jpeg in camera praticamente gli stessi risultati dei RAW risparmiando parecchio lavoro.
Farò altre prove.
Ciao |
| sent on September 08, 2020 (19:05) | This comment has been automatically translated (show/hide original)
:-D CARLONIIIIIIIIIII |
| sent on September 08, 2020 (19:07) | This comment has been translated
|
|

Publish your advertisement on JuzaPhoto (info) |


 JuzaPhoto contains affiliate links from Amazon and Ebay and JuzaPhoto earn a commission in case of purchase through affiliate links.


 8.8 MEGAPIXEL
 Resize to fit window