What do you think about this photo?
Do you have questions or curiosities about this image? Do you want to ask something to the author, give him suggestions for improvement, or congratulate for a
photo that you really like?
You can do it by joining JuzaPhoto, it is easy and free!
There is more: by registering you can create your personal page, publish photos, receive comments and you can use all the features of JuzaPhoto.
With more than 260000members, there is space for everyone, from the beginner to the professional.
|
|
sent on 01 Febbraio 2014 (22:05) | This comment has been automatically translated (show/hide original)
Always a little 'over-exposed these photos. The composition is nice and a good post-production would improve the picture Sempre un po' sovraesposte queste foto. La composizione è bella e una buona post-produzione migliorerebbe la foto |
|
|
sent on 01 Febbraio 2014 (22:42) | This comment has been automatically translated (show/hide original)
Always load makes me look a bit more overexposed. However, I have to improve a lot in post production.
Thanks for the comment and the transition ;-) ;-) Sempre il caricamento me le fa sembrare un po più sovraesposte. Comunque devo migliorare molto nella post produzione.
Grazie del commento e del passaggio  |
|
|
sent on 20 Giugno 2014 (14:40) | This comment has been automatically translated (show/hide original)
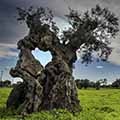
Not bad at all. The sky is a bit 'surreal, but good. The whites on the trulli are off as typical of the backlight, while the high grass. The composition I like, even if hanging a bit 'maybe. Non è affatto male. Il cielo è un po' surreale, ma buono. I bianchi sui trulli sono spenti come tipico dei controluce, mentre sono alti sull'erba. La composizione mi piace, anche se pende un po' forse. |
|
|
sent on 21 Giugno 2014 (14:49) | This comment has been automatically translated (show/hide original)
Thank you very much in-depth review. It would have been a picture to do double exposure, instead it made with one and then I worked on a part in ps where I have a little 'to refine the technique. Thanks again Grazie mille del commento approfondito. Sarebbe stata una foto da fare con doppia esposizione invece lo fatta con una e poi ho lavorato su una parte in ps dove devo un po' affinare la tecnica. Grazie ancora |
|
|
sent on 21 Giugno 2014 (15:00) | This comment has been automatically translated (show/hide original)
Yes you are right, the double exposure would have been fine. I guess you know that if you shoot in RAW you can get a HDR or multiple exposure to single click, what you can not do if you shoot in jpg Sì hai ragione, la doppia esposizione sarebbe andata bene. Immagino che tu sappia che se scatti in raw puoi ottenere un hdr o esposizione multipla da singolo scatto, cosa che non puoi fare se scatti in jpg |
|
|
sent on 22 Giugno 2014 (14:57) | This comment has been automatically translated (show/hide original)
Mmm, I Take unprepared. Shooting in Raw, explain to me the last thing you wrote? Thank you very much Mmm, mi cogli impreparato. Scatto in raw, mi spieghi l'ultima cosa che hai scritto? Grazie mille |
|
|
sent on 22 Giugno 2014 (23:28) | This comment has been automatically translated (show/hide original)
Open a raw file in Camera Raw and changes the exposure to -2, -1, 0, +1 and +2. Save a jpg for each exposure. Use the 5 files to compose a HDR with Photoshop or other programs. This is possible with raw files, retaining a wide dynamic range, while it is not possible with jpg files.
I often to make double exposures I shot with bracketing -1, 0 and +1 and merge them. Then I found that you may very well change the exposure of a raw even down to -2 / +2 recovering enough shadows and highlights. Therefore, perhaps you can avoid the bracketing in this dynamic range and use it if you want to go further.
Greetings.
John Apri un file raw con Camera Raw e cambia l'esposizione a -2, -1, 0, +1 e +2. Salva un jpg per ogni esposizione. Usa i 5 files per comporre un HDR con Photoshop o altri programmi. Questo è possibile con i file raw perchè conservano un'ampia gamma dinamica, mentre non è possibile con i file jpg.
Io per fare le doppie esposizioni spesso scattavo con bracketing -1, 0 e +1 per poi fonderle insieme. Poi ho constatato che si può benissimo variare l'esposizione di un raw anche fino a -2/+2 recuperando abbastanza ombre e luci. Pertanto, forse, si può evitare il bracketing in questo range dinamico e usarlo se si vuole andare oltre.
Saluti.
Giovanni |
|
|
sent on 24 Marzo 2015 (12:50) | This comment has been automatically translated (show/hide original)
Beautiful scenery! Splendido paesaggio! |
|
|
sent on 24 Marzo 2015 (16:55) | This comment has been automatically translated (show/hide original)
“ Beautiful scenery! „
Thanks for the ride “ Splendido paesaggio! „
Grazie del passaggio |
user34391
|
sent on 22 Maggio 2015 (17:05) | This comment has been automatically translated (show/hide original)
nice glance ... soft colors, good depth ... what would I have mentioned others ... a post production more careful ... here you can make a double conversion from raw ... that do the adjustments on Raw for the first time adjusting exposure, high lights, shadows, color etc. just looking as is the sky ... and then convert the file in tiff.
then reopen the raw and this time make adjustments only looking at the ground ... then convert this time in tiff.
you have two files one well exposed to the sky and the other to the ground ...
then open Photoshop or Gimp (if you have not the first) and open the first tiff, then open the second level as TIFF file (as picture).
There you will have two rows on top of each other to merge them ... you have to create (tastor right) a layer mask (with gimp is white) on the first file. I tell you how it works with Gimp (I use, I believe that Photoshop uses just the opposite) white mask on the first file protects the parts you do not want to change the file ... top (ie the sky) at this point, choose a soft brush with opacity to about 30% (not 100% because it is too obvious detachment) and making sure that you're painting with black paint on white mask with black areas of the earth that you want to bring out from under ... as you paint emerge the underlying file ... because the opacity is not 100% you will maybe go over several times on the same point ...
when you're done watching the results ... if you do not have to convince to do is merge the layers and then save ...
This technique allows youto get from raw two files that combined have a much higher dynamic range of a single file ... more manually you can decide where and what to lighten and darken ... is better than working on a single file as a tiff or jpeg you did here because the raw recovery information without causing artifacts or noise ... while the single tiff or jpeg quality cove ...
:-P bel colpo d'occhio... colori delicati, buona profondità... quello che servirebbe lo hanno già detto gli altri... una post produzione più accorta... qui puoi operare una doppia conversione da raw... cioè fai le regolazioni sul raw una prima volta aggiustando esposizione, luci alte, ombre colore ecc guardando solo come viene il cielo... dopodiché converti il file in tiff.
quindi riapri il raw e questa volta fai le regolazioni guardando unicamente al terreno... poi converti anche questa volta in tiff.
avrai due file uno esposto bene per il cielo e l'altro per la terra...
dopodiché apri Photoshop o Gimp ( se non hai il primo) e apri il primo tiff, quindi apri come livello il secondo file tiff ( come immagine).
a questo punto avrai due file uno sopra l'altro... per fonderli devi creare ( tasto destro) una maschera di livello (con gimp è bianca) sul primo file . ti dico come funziona con Gimp ( che uso, credo che Photoshop usi tutto al contrario) la maschera bianca sul primo file protegge le parti che non vuoi cambiare del file superiore... ( quindi il cielo) a questo punto scegli un pennello morbido con opacità a 30% circa (non 100% perché è troppo evidente lo stacco) e assicurandoti che stai dipingendo con il colore nero sulla maschera bianca dipingi con il nero le zone della terra che vuoi fare emergere da sotto... man mano che dipingi emergerà il file sottostante... poiché l'opacità non è al 100% dovrai magari ripassare più volte sullo stesso punto...
quando avrai finito guarda il risultato... se ti convince non devi fare altro che fondere i livelli e poi salvare...
questa tecnica ti permette di ottenere dal raw due file che combinati insieme hanno una gamma dinamica molto più alta di un file solo... in più manualmente tu puoi decidere dove e cosa schiarire e scurire... è meglio che lavorare su un singolo file tiff o jpeg come hai fatto tu qui perchè con il raw recuperi le informazioni senza procurare artefatti o rumore... mentre con il tiff unico o jpeg la qualità cala...
 |
|
|
sent on 22 Maggio 2015 (17:58) | This comment has been automatically translated (show/hide original)
is in fact not a magician of the PP and then I did other tests may come anceh better than this. Now I was feeling a little with the method that you suggested and in fact you get good results. Grazei council.
Returning to the picture outright the scenes was very nice and a little bit for a while due to my inexperience del18-105 that has little quality was not able to grasp it better. Thanks for the ride si in effetti non sono un mago della pp e successivamente ho fatto altre prove forse venute anceh meglio di questa. Ora stavo provando un po con il metodo che mi hai suggerito e in effetti si ottengo degli ottimi risultati. Grazei del consiglio.
Tornando alla foto pura e semplice la scene era molto bella e un pò per mia inesperienza un pò per via del18-105 che ha poca qualità non sono riuscito a coglierla al meglio. Grazie del passaggio |
user34391
|
sent on 22 Maggio 2015 (18:13) | This comment has been automatically translated (show/hide original)
nothing :-P di niente |
|

Publish your advertisement on JuzaPhoto (info) |


 JuzaPhoto contains affiliate links from Amazon and Ebay and JuzaPhoto earn a commission in case of purchase through affiliate links.


 Resize to fit window
 4.0 MEGAPIXEL