
|
| Accept Cookies | Customize | Refuse Cookies |
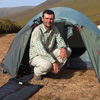 Field Notes from Tajikistan and Kyrgyzstan, 2013 Field Notes from Tajikistan and Kyrgyzstan, 2013 in Discussion Forum January 13, 2014, 18:59 Yesterday I published the report from my last year's photographic trip to Central Asia. Anyone interested in this region or planning own trip may find this information useful: www.nature-images.eu/contents/field/pamir-alai.html 0 comments, 735 views - Show/Reply Still looking for 1 travel partner to Tajikistan in late March 2014 in Discussion Forum December 19, 2013, 13:13 2 travel partners found. 1 is still needed. The trip will be most probably between March 26-27 and April 3-4. Anyone interested has still time till end of January to contact me. Read all details here: tiutenko.wordpress.com/2013/11/20/i-am-looking-for-2-3-travel-partners 0 comments, 757 views - Show/Reply If you are a nature photographer or a na... in Blog EN October 24, 2013, 21:19 I am looking for 3 travel partners to join me on my next trip to Central Asia If you are a nature photographer or a nature photography enthusiast, come with me to one of remote and rarely visited by foreigners corners of Tajikistan. Goal This season is the best for photography of Tien-Shan Brown Bear , and good for Siberian Ibex and Tajik Marhor (a.k.a. Screw-horned Goat - a critically endangered species whose last population still remains only in this area). My main goal will be photography of these subjects. Other participants of the trip will be able to chose photography subjects according to own preferences and priorities.  Photographing the last population of Marhors, or Screw-horned Goats, is my main goal for this trip. Here you see a photograph that I made during my trip in July 2013 when the season wasn't favourable . Destination This short trip goes to an area at Peak Julius Fucik and near Pyanj River at the Tajik-Afghan border (marked with red dot on the map below).  The red circle indicates the destination of the trip I plan in 2014  The place where we are going to stay is situated near Afghan-Tajik border on the mountains at the right bank of Pyanj River, in vicinity of Peak Julius Fucik. Schedule The trip will last for only one week ( 7 days ) - between March 24 and April 6, 2014 . The final dates have to be agreed between the participants. I chose this season because it is optimal for photography of bears, very good for landscapes and good for ungulates. Therefore these three subjects can be covered in this one trip. Cost The trip is going to cost each of us around 1400 USD which is a fixed price requested for local organisation and logistics: around 200$/day x 7 days (are to be payed to local organisers upon arrival). This includes accommodation, meals (full board), transportation on road, services of a highly experienced guide, if necessary, also services of porters and helpers on terrain. This relatively high cost per person per day has the following reasons: *The location we are going to is a private game reserve. The prices for stay and work there are set by its owners. It is one of few places in Tajikistan where it is almost guaranteed that you photograph a bear. It is also the only one place in this country and one of few in the world where opportunities to photograph marhors are guaranteed. * The organisation of activities of every photographer have to be tailored for his needs. There will be no such thing as group of people walking together and photographing the same subjects. Instead everyone will receive personal services. Alcohol drinks, personal expenses (shopping, cigarettes, medicine, etc.), personal preferences (such as special food and drinks), tips are not included and have to be payed extra. Additionally we may need some money on the arrival and departure days (for food, etc.) - not more than 50 or 100$ per day. However, it depends on whether we will spend some time in the city or go directly to the location. In the last case no extra costs have to be expected. A return flight from Europe to Dushanbe or Kulob costs around 360-700€ depending on the city you fly from. A flight from US (East Coast) should cost around 1000$. A tourist visa to Tajikistan costs around 60US$. I expect the total cost of this trip for travellers from Europe (including flight) not to exceed 1800€ . What to expect * Opportunity to photograph the 3 species of mammals mentioned above at a distance of 50-100m. (Note: Of course, as with any wildlife, it is a matter of luck how close you get to the subject: It may be closer or farther than this.) * With some luck, there are chances for sighting or even for photography of Snow Leopard and Asian Porcupines. * Good opportunities for bird photography. * Fantastic scenery - great opportunities for landscape photography.  View at Pianj River and the mountains in Afghanistan  Alpine meadow at Fucik Peak  View at Fucik Peak.  View across Pyanj River at an abandoned village in Afghanistan. What will you need The minimum requirements are the following: * A camera with a telephoto lens (minimum 300-400 mm), if you are interested in wildlife photography, and a wide-angle lens (for landscapes). If you aren't going to photograph but only are interested in watching wildlife, you'll need a binocular. * You have to be reasonably fit but no special physical training or skills (such as mountaineering) are necessary. It will be possible to chose for you personally such daily activities that will meet your preferences and physical condition. However, to get the best results from this trip you should be able to walk for 3-5 hours at altitudes of 1000 - 2500 m above sea level and to climb (by walking) mountains and hills with stony and rocky slopes of 25-45°. * The accommodation and meals will be provided by a local family in their house that they maintain as a base for foreign hunting tourists. It is a stone building, but not a five-stars hotel. You should be open-minded to accept some reduced comfort and tolerant to local customs and traditional way of life. * Good hiking shoes - suitable for walk on rocky terrain. You may also find hiking poles helpful. * Warm cloths - for temperature down to -10°C - and windy weather. * Some knowledge of English or German - to be able to communicate with me and other members of our group. * Insurances: It's up to you which insurances you will have when you go on this trip. I would recommend to get at least a good health insurance. What you will not need The following isn't required for this trip: * Tent. * Sleeping bag and mat. * Camping utilities, such as stove, dishes, etc. * Knowledge of local language. * Own food supplies (except maybe some special food that you would like to have for your own) Safety Although the area this trip goes to is in immediate proximity to Afghanistan, it is absolutely safe. Tajikistan is a very peaceful country inhabited by very friendly and polite people. It is separated from Afghanistan by Pyanj River - a broad and very quick stream that is almost impossible to cross, particularly in this season. Afghanistan is a very big country, and extremist activities and political instability are focused in other parts of its territory than the area at the border to Tajikistan. Please note: This is not a photo tour that I am leading. I organise this trip for my own photography work and finance it for myself with my private money. To reduce its cost for me, I am inviting not more than 3 persons interested in photography or wildlife watching in this region to join me as a partner and to share expenses. No payments in advance will be required. Everyone interested in this trip is welcome to contact me via personal messaging on this site or using contact information on my website: www.nature-images.eu 0 comments, 893 views - Show/Reply Capture One vs. Adobe Photoshop Lightroom comparison in Discussion Forum December 05, 2012, 22:02 Dear friends, I am currently comparing the recent versions of Capture One and Lightroom with each other and reporting the results in a number of articles. One that is dealing with white balance issues in both programmes is ready, and I published an excerpt of it in the blog here: www.juzaphoto.com/topic2.php?f=47&l=en&t=306983&titolo=CAPTURE_ONE_VS_ Hope you find it useful. Cheers Arthur 0 comments, 1328 views - Show/Reply CAPTURE ONE VS. ADOBE PHOTOSHOP LIGHTROO... in Blog EN December 05, 2012, 21:52 CAPTURE ONE VS. ADOBE PHOTOSHOP LIGHTROOM: WHITE BALANCE This is an excerpt from my review that is published on my website www.nature-images.eu under Capture One vs. Adobe Photoshop Lightroom: White Balance White Balance Set to Daylight Since the colour temperature of daylight varies very much, it seems logical that Adobe Photoshop Lightroom (or more precisely Adobe Camera Raw that underlies it) and Capture One may have different default Kelvin settings in daylight mode than Canon. This happens indeed: While the "Daylight" preset in Lightroom has the colour temperature of 5500K, i.e. that of normal daylight, and tint set to +10, in Capture One, these are 5305K and +2.6. The higher the Kelvin value, the "warmer" is the colour, i.e. the greater is the shift of it towards red, yellow, or magenta. Lower values result in dominance of "colder" tones - blue, green, or cyan. Since the temperature value in Capture One is lower, the image tones should be colder than in Lightroom, and they are indeed - as the images shown below demonstrate. 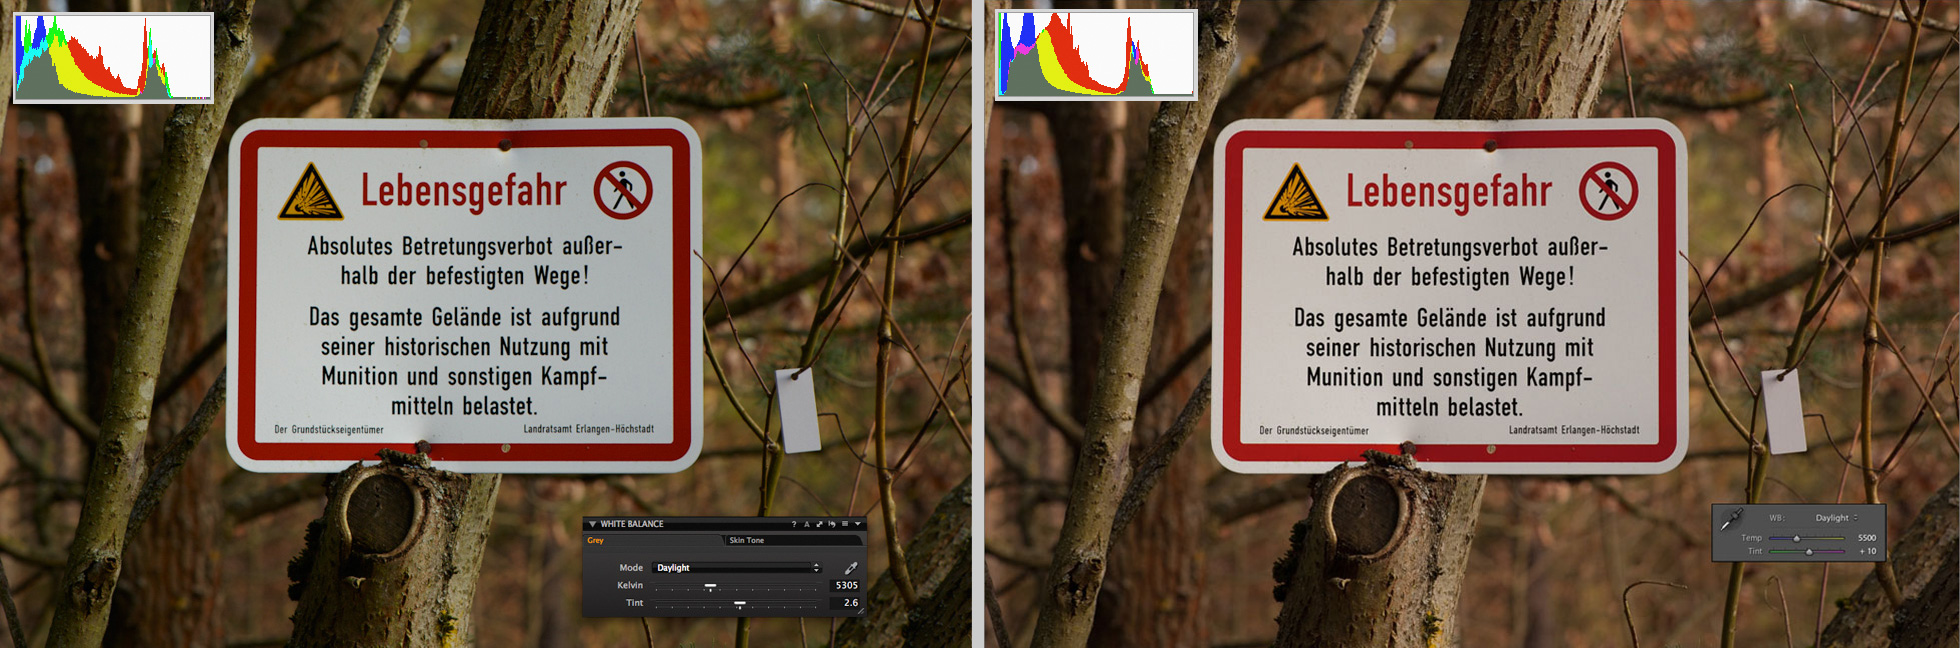 Daylight preset is selected: With 5305K and +2.6 tint, in Capture One the colour temperature is lower than in Lightroom that has normal values. In the same image, the colour in Lightroom looks warmer than in Capture One. This is what actually has to be expected. It becomes strange when the Kelvin and tint values in Capture One were set to the same as in Lightroom. Of course, the same colour temperature values should result in the same white balance, but in Capture One Pro and Lightroom they don't. If you look at comparison below, you would notice that the left image - the one that was produced in Capture One Pro 7 - has pretty strong magenta colour cast.  The white balance in both programmes is set to 5500K with +10 of tint. One could think now that the white balance adjustment in Capture One is faulty, but this issue is not that simple. After I pushed the tilt slider to around +3, i.e. reduced magenta by 7 stops, the colour cast disappeared, and both images were looking similar. Hence, "daylight" has the same meaning in both programmes but the tilt slider has a different scale: For roughly the same colour appearance, the tilt value in Lightroom has to be triple as high as in Capture One. In Lightroom the tilt slider goes to 150 in both directions while in Capture One it is limited to -/+ 50 but allows decimal values. Therefore +3.3 in Capture One is close to +10 in Lightroom. Having the colour temperature of 5200K the images that a Canon camera creates should have a bit colder colour than the standard daylight and even than the daylight preset in Capture One. Tint is another adjustable parameter that influences the look of an image. However, it is absent in cameras though available in raw converters and image editing software where it allows fine tuning of white balance through adjustment of the tones in a range between green and magenta. 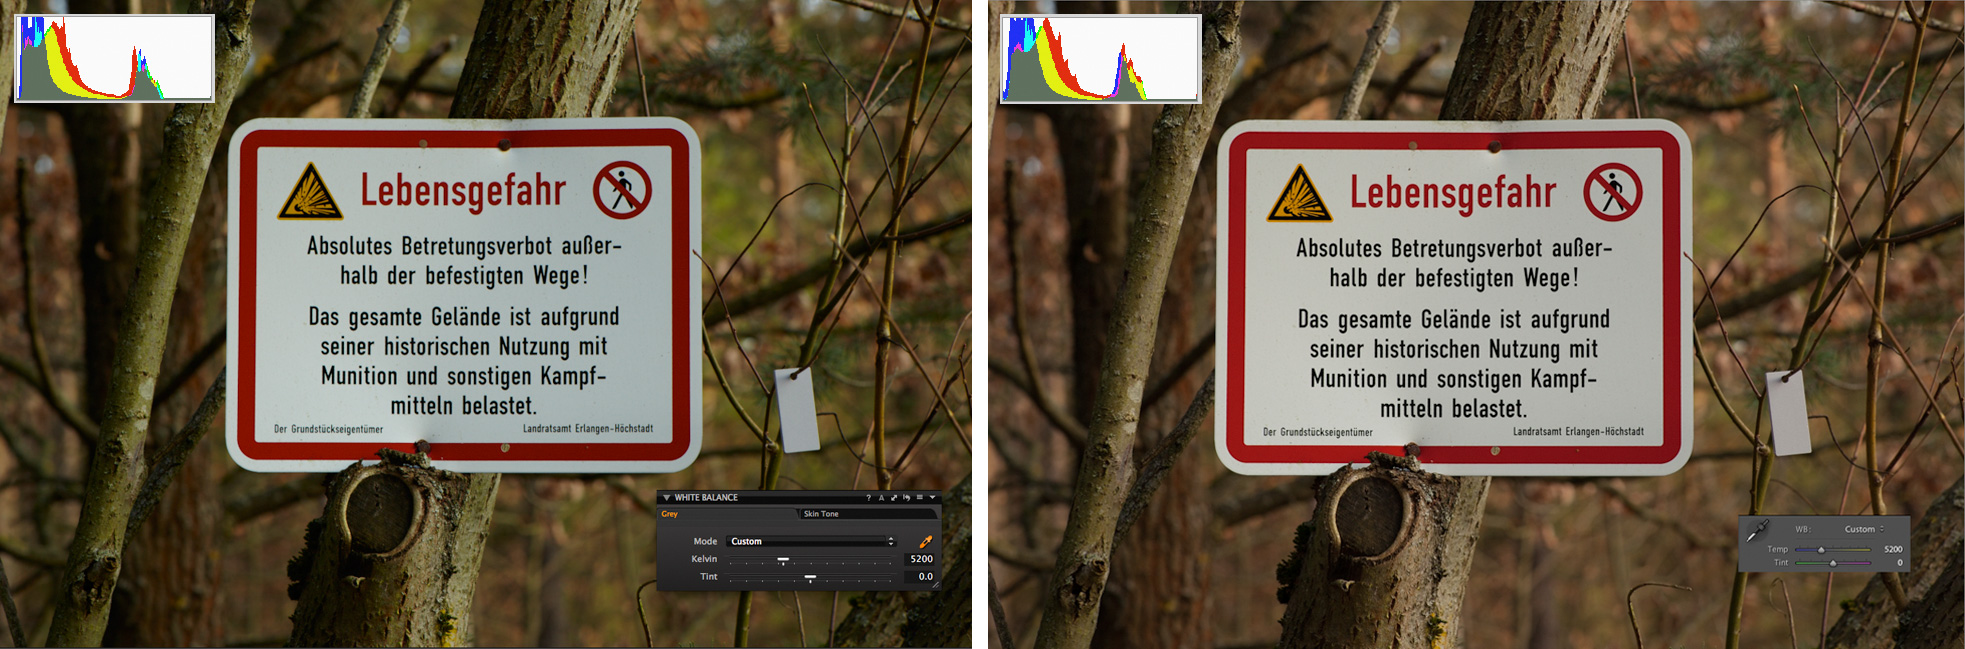 Compare the image in Capture One Pro 7 and Adobe Photoshop Lightroom 4 after the colour temperature was set to the same value of 5200K as in daylight WB preset of a Canon camera The colour temperature scale is universal and absolute, hence the same colour temperature always has the same Kelvin value. Obviously, zero is zero - in other words, zero is nothing. Therefore, if tint was set to "0", it should result in a balance between magenta and green, i.e. no bias towards either should be noticeable. As you see in the above example, it isn't the case: The image in Lightroom has a stronger presence of magenta while the one in Capture One looks a little greenish. Since the experiment with the daylight setting that I described above has proved the correctness of Kelvin scale in both programmes, I assume that here again it is the tilt setting that causes the problem: Either in Lightroom or in Capture One, or in both, zero tilt in fact isn't zero. To me the image in Capture One looks not only more natural but also close to what I was photographing: The shield on it was hanging in bushes ? not in the sun; therefore the light was for sure not as warm as in the image rendered by Lightroom. White Balance "As Shot" The difference in white balance treatment in both programmes is even more evident when an image has just been converted from a raw file and no adjustments were made. Both, Capture One and Photoshop Lightroom always set own white balance values upon import of an image and ignore the camera white balance. The picture below shows the same image shot with 5200K and 0 tilt as it appears in Capture One and Lightroom upon import. 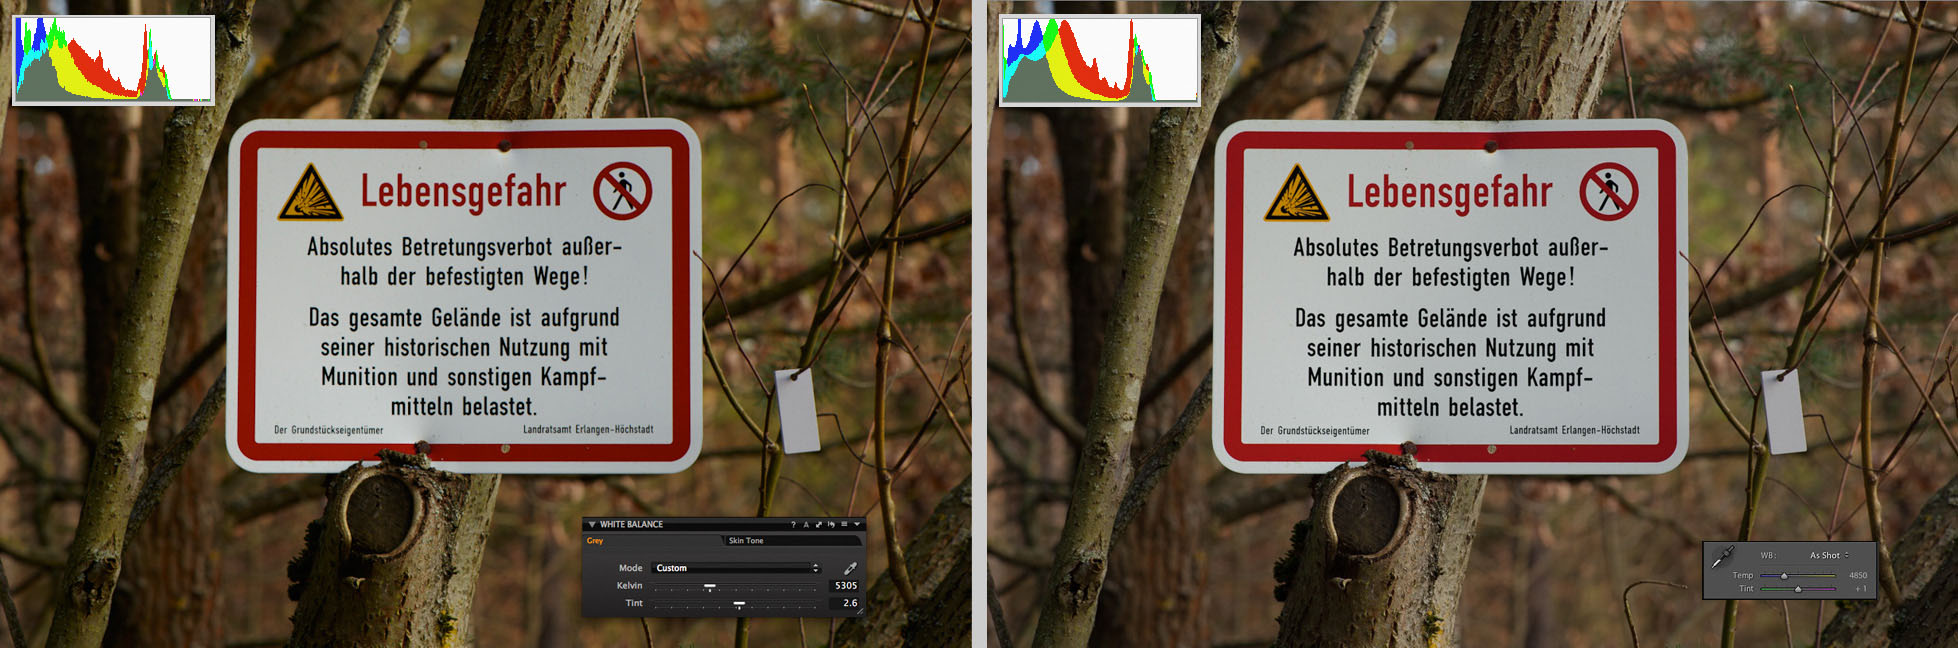 Both, Capture One and Lighroom ignore camera white balance and set their own temperature and tint for imported images. For some reason that probably only developers of Lightroom know it sets the colour temperature to 4850K and tint to +1 in images that originally have 5200K and 0 tint and calls this white balance "As Shot". Surprisingly, the white in the image appears more neutral here compared to its look in the above example - when I set the colour temperature to 5200K. The overall contrast, saturation and colour balance in an image imported to Lightroom are also more neutral than in Capture One. Although the white balance looks okay, the image in Capture One appears to have a little more contrast, and its colour is more vivid. In Capture One, the import WB parameters for images shot with daylight preset are closer to the original and identical to the daylight preset in this programme: 5305K and +2.6. Unlike Lightroom where the import white balance is "As Shot", in Capture One Pro 7 it is called "Custom". However, if you select there "Shot" from the drop-down list, the values will remain the same - as you see in the following sample pictures: 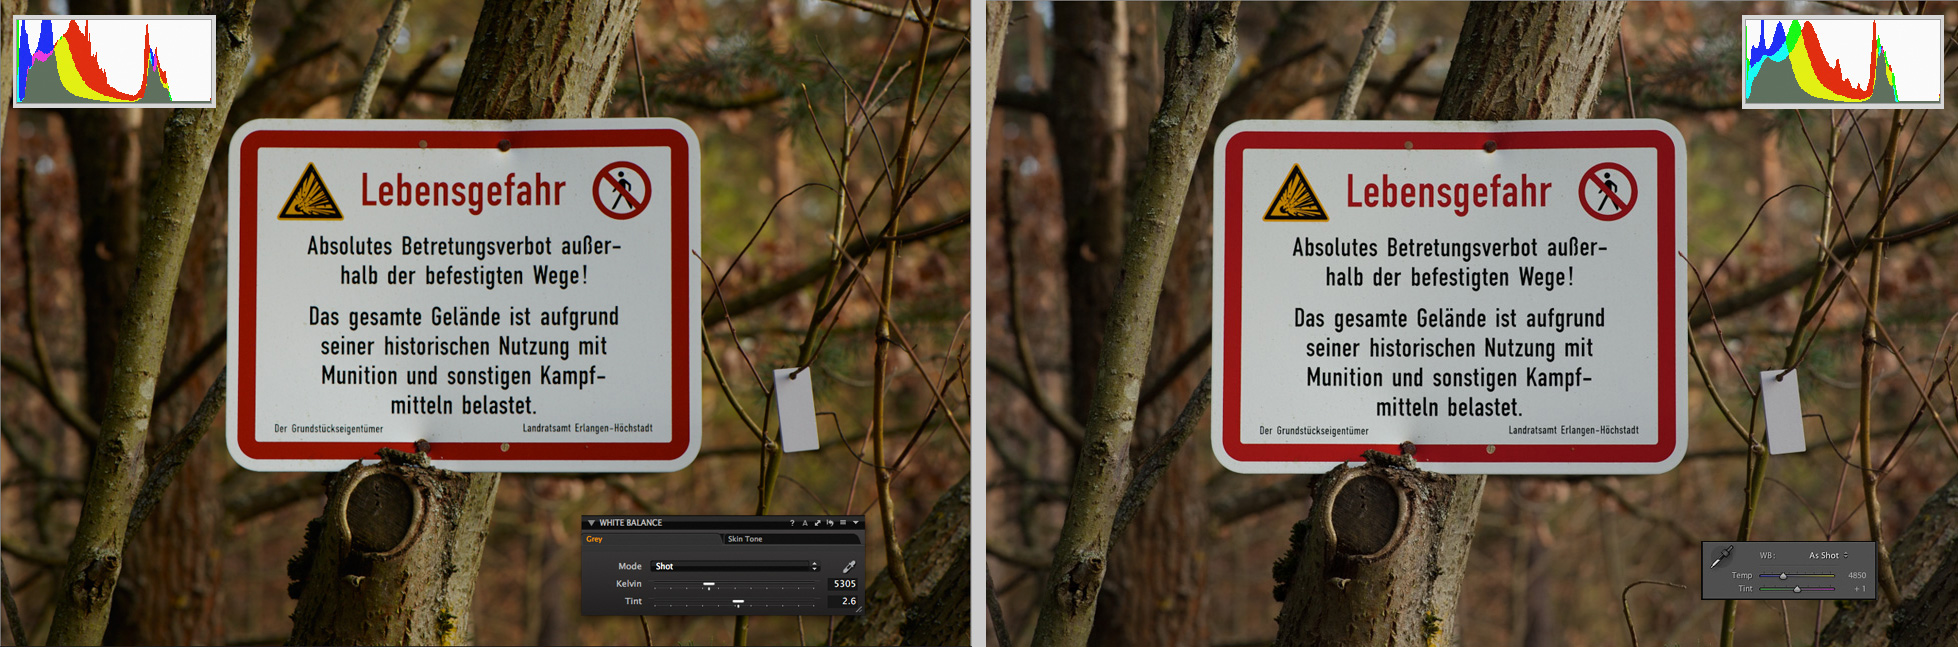 In Adobe Photoshop Lightroom the white balance set at import is called "As Shot". In Capture One it is initially labeled as "Custom", however, the values remain the same when you select "Shot" from the list. Corrected White Balance The discrepancy in Kelvin and tilt values between two programmes becomes even greater after the white balance was corrected. If in-software automatic WB correction was applied in Adobe Photoshop Lightroom, the colour temperature of the image is displayed as 4500K with +2 tint. In Capture One these values are much higher: 5031K and +4.6 tint. However, both programmes decreased the colour temperature of my test image by the same value of about 300K - from 5305K to 5031K and from 4850K to 4500K. (See pictures below.) 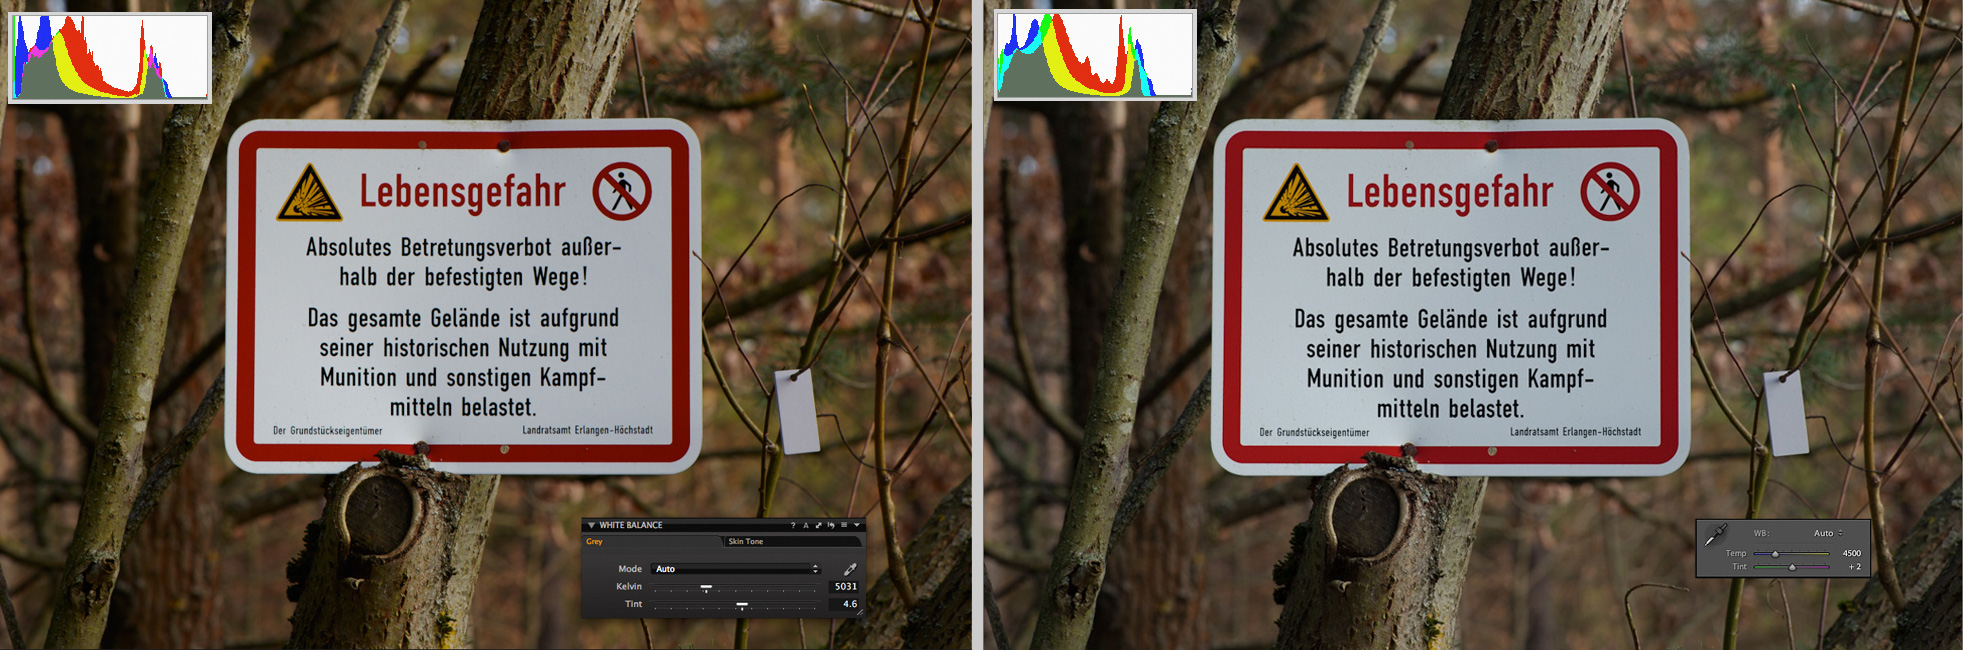 Automatically set white balance by software algorithm: The result looks in Capture One and Adobe Photoshop Lightroom similar but the values defer very much. Visually, the result of correction in both programmes is satisfying though I like the image in Capture One more. The colour tones of the image created in Capture One are closer to the original while he image in Lightroom looks colder. The most reliable and the easiest way to correct white balance is by using a neutral grey reference object. In landscape photography it can be a stone, but better results are achieved with a standard grey object - a grey card or cube. For testing the white balance the reference should, of course, have standard grey colour. In my tests I used a small grey card DGK-M Mini made by Digital Image Flow. In the test image used in this article you see it hanging on a twig near the warning shield. Below you see the test image after correction via a grey card in Capture One Pro 7 and Adobe Photoshop Lightroom 4. The colour temperature and tint set according to grey card are higher in both programmes than the values set by built-in automatic adjustment. 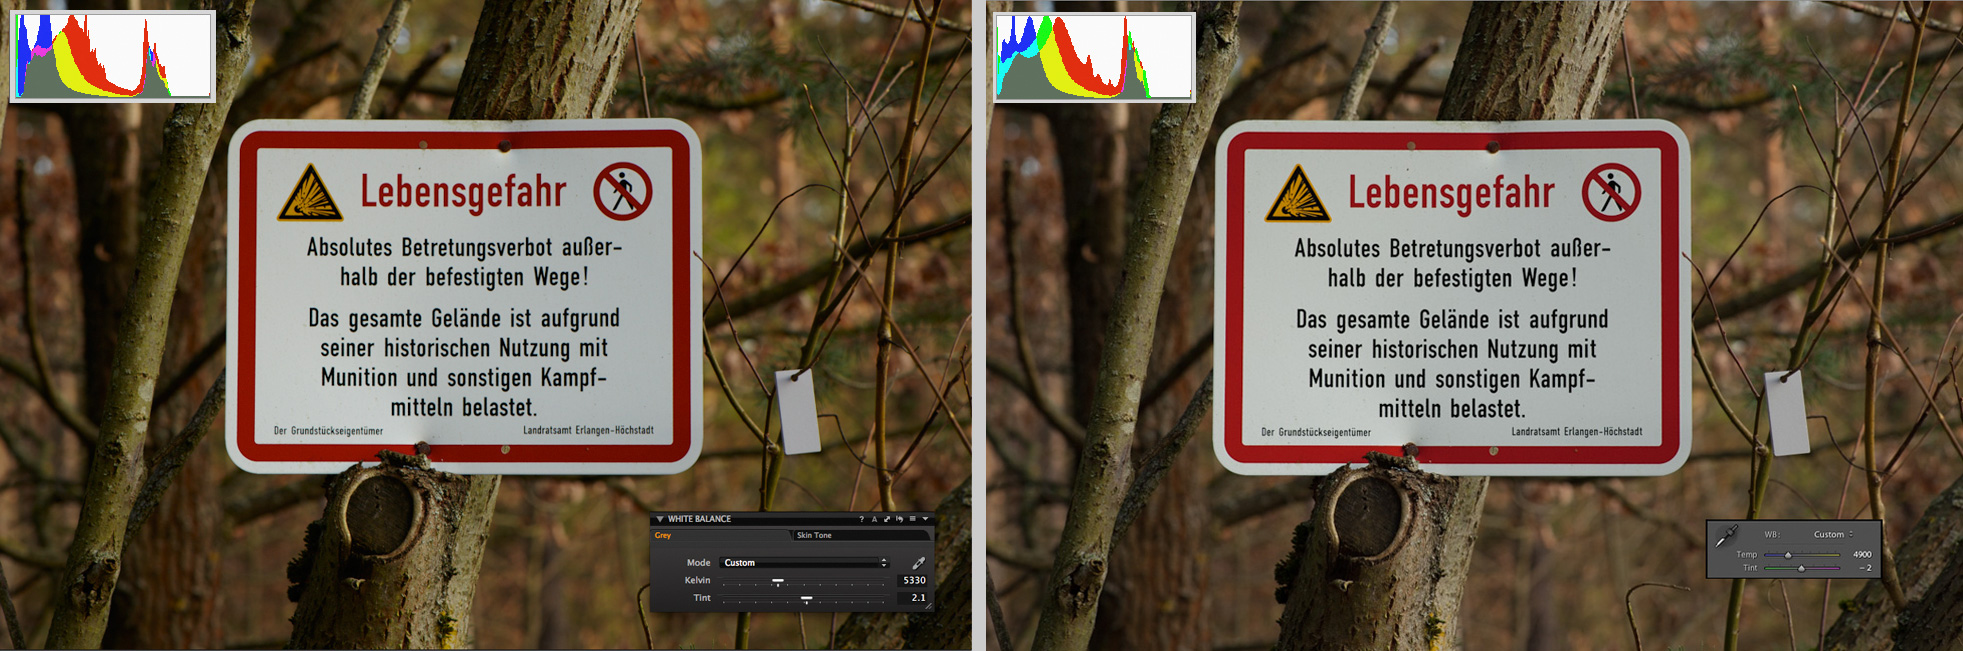 Compare colour temperature/tint values after white balance was automatically corrected via grey card: 5330K/+2.1 (Capture One) vs. 4900K/-2 (Lightroom) For my eyes, the result in Capture One looks better again: The white of the shield is clearer. In Lightroom it has a slight greenish colour cast that is barely noticeable but the diagramme in the top left corner helps to determine it. Conclusion The fact that the colour of an image in Capture One shifts only slightly when WB presets are changed or when white balance is automatically adjusted from grey card lets me assume that this programme does it correctly. Also the appearance of the image in Capture One was quite close to that one that I was seeing through the viewfinder of my camera. In comparison to this, obviously, something is wrong with colour processing in ACR or in Lightroom. It may be a matter of taste, if the picture has more contrast and is more vivid, as it is in Capture One, or with less contrast and desaturated, as in Lightroom, but the colour temperature and tint values in these two programmes do not match at all, and the white balance in Lightroom doesn't even come close to the setting of the camera. The reason is for me a mystery. To me it looks like a flaw that undermines the reliability of Lightroom as of an image processing tool. This is very disappointing since this software is so great in many other aspects. I have a strong hope that Adobe would improve it some day. 1 comments, 3076 views - Show/Reply Review: Acratech GP-s Ballhead in Discussion Forum September 01, 2012, 14:09 Hi everybody, yesterday I completed a review of my new tripod head. I published a small part of it in my blog here: www.juzaphoto.com/topic2.php?f=47&l=en&t=223372&titolo=BReview_Acratec The rest can be found on my website. Regards, Arthur 0 comments, 981 views - Show/Reply [B]Review: Acratech GP-s Ballhead[/B]... in Blog EN September 01, 2012, 13:52 Review: Acratech GP-s Ballhead This is an excerpt from my review that is published on my website www.nature-images.eu under Reviews: Acratech GP-s Ballhead ... 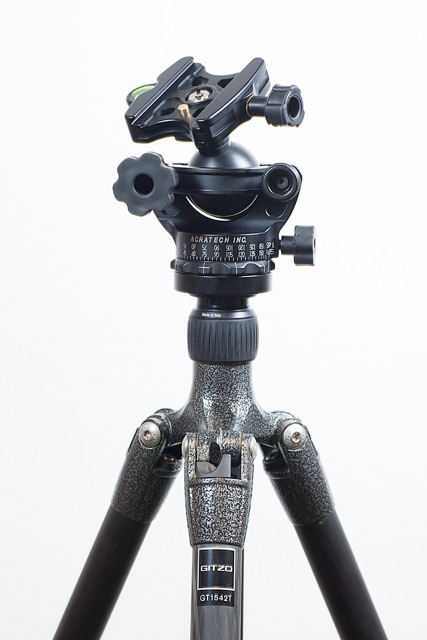 Acratech GP-s on Gitzo 1542T Traveler Series 1 tripod. Performance As far a I can judge for the time of writing this review - having tested the Acratech GP-s at home and used it once outdoors - it meets almost all my expectations that I had when I was ordering it. The Acratech GP-s has a solid construction described above and works accordingly. The ball movements are smooth - though not so smooth as in Novoflex Classic Ball 5 whose ball is much larger - and allow precise positioning of the camera. I didn't expect the GP-s head to support 11.3 kg in tilted position because even the much larger and stronger Classic Ball 5 is capable for this. Acratech claims that their other product - Ultimate Ballhead - can withstand the impact of 13.6 kg (30 lb), and even shows photos of tests. However, the head is shown only under vertical pressure and horizontal tearing. There is no evidence of the same ability when the load is tilted, for instance, at 45 degrees which would better represent a real life use of it. I don't believe that such heads would have it. Anyway, it appears that my Acratech GP-s would barely support 5 kg in that position. I tried it with about 4 kg load, and had to tighten the ball lock very firmly to prevent my camera and lens from falling down immediately. I just can't imagine that the same can be done with over 11 kg. The same applies for friction (or tension) control. In the user's manual we read the following: "Many photographers adjust the Ball Tension Knob tightly enough to keep their camera from flopping over when they le go of i, but loose enough to aloow them to position it for a shot." Yes, this is what friction control is for, and it works fine in Acratech GP-s only with a load up to 2.5-3kg. With heavier gear, the friction control is almost unusable. When I mounted an EOS 5D Mark II body (about 900g) and EF 300 mm F/2.8 L IS USM lens (about 2.5kg), i.e. total of about 3.5kg, the tension of the ball wasn't enough to support this load even for a moment: It was flapping over immediately. How about 11kg? With the same load of about 3.5kg I also did a test of locking precision. Under heavy load many ball heads sag a little when the ball lock was tightened. This is a problem when a macro or super telephoto lens is used that need to be aimed precisely. My setup sagged for at least 2mm. However, it is difficult to say if it was the tripod or the head that was responsible for it. Certainly, such a lightweight tripod is not supposed to provide perfect support for heavy super telephoto lenses. In the same test with a 150 macro lens and the same camera, i.e. with the weight of less than 2kg, I didn't notice any changes of the camera position. The Acratech GP-s fits almost perfectly between the legs of the Gitzo 1542T when it is folded (see the picture below), so that the total transport length doesn't exceed 43cm.  Gitzo 1542T with Acratech GP-s folded to minimum size for transportation. You see that the combined length of the tripod and head doesn't exceed 43cm this is currently the minimum that can be achieved for professional tripods. Deficits and Drawbacks Acratech recommends the quick release plate with screw fixation for use with large lenses. This was my reason to choose this version and not the one with leveler fixation. The plate with lever fixation has a very good scale that makes centering the camera and positioning focusing rails and nodal point adapters easier. Now, I am missing such a scale in my quick release plate. I assume that the scale was absent in the original version (with screw fixation) and the manufacturer added this obviously very useful feature later when the version with leveler was produced. There is no friction limit control in Acratech GP/GP-s. Instead, the available knob adjusts friction gradually. The friction limit control that exists, for instance, in Novoflex Classic Ball or Markins Q-Ball, allows you to choose from several levels of friction. I like this more. The friction control knob is too loose; even tightening it very firmly doesn't help with a 3-4kg load: The camera tilts over as soon as you have removed the hand that was holding it. The ball lock wheel in Acratech GP, when it isn't firmly tightened, performs similarly to friction control: The camera isn't locked in position though their movements are not completely free. If the camera and lens combo is heavy, it will immediately tilt over if you loosen this screw just a little, and the friction control mechanism even tightened for full strength wouldn't prevent it. I wished a leveler instead of this wheel, like in Classic Ball and many other ball heads, that would lock or unlock the ball. In other ball heads, such as Arca Swiss Monoball, that have a wheel for locking, this wheel doesn't need to be tightened completely for the ball to be firmly locked. In Acratech GP you have to tighten it and to double check if your camera doesn't move after that. This is pretty annoying. The head can support a 3.5-4 kg load in tilted position, and only if the ball lock knob is very firmly tightened. This is enough for most applications of outdoor photography but much less than 11.3kg promised by the manufacturer. The ball of the Acratech GP is quite small. For the version GP-s that is intended for lightweight traveler tripods this is good because it reduces weight and size of the head. Since I have a GP-s for use with a Gitzo Traveler tripod, I am not complaining. However, for the version GP that is supposed to be used with larger tripods, it would certainly be a weakness because a ball with larger diameter would allow much smoother movements of the camera and its more precise positioning. Also friction control works better with large balls. ... Read the rest and see more pictures at Reviews: Acratech GP-s Ballhead 3 comments, 4238 views - Show/Reply Using solar energy for charging equipment batteries in the field in Discussion Forum August 11, 2012, 23:15 I just would like to share some experience with those here who are interested in this topic. See my post to the Blog section. Best regards, Arthur 5 comments, 1994 views - Show/Reply [B]Using solar energy for charging equip... in Blog EN August 11, 2012, 22:41 Using solar energy for charging equipment batteries in the field Here is excerpt from my field report from Ethiopia that I am going to published in the next couple of weeks. The report will be available here: Field Notes - Ethiopia, 2012. 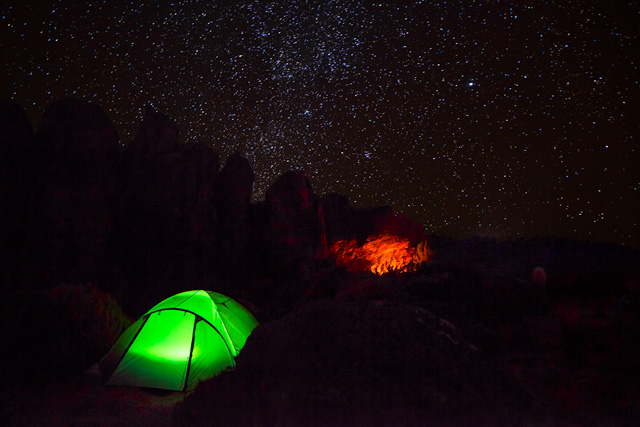 Thanks to a Sunload MultECon solar charger there was light every evening in my tent. In the background on this picture a cave with camp fire is visible. “ There is absolutely no access to electricity while you are in the Bale Mountains. There are neither mains nor a car that you can charge the batteries of your devices from. Therefore, you have either to bring spare batteries for your camera, flashes and other equipment for the whole duration of your trip, or to charge them from a solar panel. I had 8 LP-E6 batteries (for the main camera) and 5 BP-511 (for the second one). I use my cameras only for photography, never for video capturing, thus 8 batteries would be sufficient to power the EOS 5D Mark II for about two weeks, especially if I wouldn't use the Live View. With 2 or 3 batteries more I would have had enough electric power for my main camera for the whole time of trekking. However, powering many other devices, particularly those that need NiMh batteries, such as GPS, flashlights, photographic flashes, etc., is not that easy. I had over 30 AA rechargeable batteries and about a dozen of AAA, but they were still too few. Unlike lithium batteries, NiMh batteries get drained quite quickly. For example, I had to exchange the AAA batteries of my head lamp every two days. I didn't use flashes much during this trip, but if I did, it would most likely require at least 2 sets (i.e. 8) of AAA batteries a day for each of my 2 flashes, i.e. 16 batteries. Certainly, it isn't possible to bring enough batteries for such use. The only possibility to power all necessary devices long enough is to recharge batteries when you are in the field. I had a 30Wp CIGS (Copper Indium Gallium diSelenide) solar panel and a MultiECon Charger M60 battery made by Sunload on this trip. This bundle is not cheap but is one of the best on the market. The foldable solar panel weighs about 1kg. Under African sun it needs as little as 3-4 hours to fully charge the storage battery. With a more powerful, though more expensive, 62Wp version, even less time would be necessary. This higher capacity may be of advantage in rain season or an area with more cloudy weather - when the exposure to sun is reduced and the charging process is slowed down. During dry season in the Ethiopian mountains most days were with bride sunshine, and the 30Wp version worked very well for me. To the MultiECon Charger M60 battery two such panels can be connected when quicker loading is needed. I am planning to get a 62Wp version in future and use it in expeditions to regions with bad weather even together with the 30Wp one. This would be also necessary with equipment that consumes more energy, for instance, a computer, that would more quickly drain the storage battery which would need to be recharged more often. Since my most used devices were 2 cameras (that had many spare batteries), a remote video control for a camera, 2 flashlights, GPS, and a satellite phone, I even used the 30Wp solar panel every couple of days. When the MultiECon charger was full, I could charge from it 2-3 camera batteries, 8 AA or AAA batteries, a lithium battery for a flashlight and the satellite phone in just one night. The total weight of such solar energy equipment is almost 2kg. It is not really lightweight, but also not too heavy. It may not be suitable for a backpacker, but if your luggage is being carried by horses, 2kg less or more don't make much difference. The Sunload kit that I described above did an extremely good service for me during this trip. Therefore I am recommending it here. There are also similar products of other manufacturers that may be as good or better. You may take a look at solar panels and kits by GoalZero, Nature Power, me2solar, Brunton, and others. All such equipment that is suitable for use in harsh environment and will really be able to do the job of powering all your devices is quite pricy, particularly the foldable CIGS panels. To yield enough power from the sun you need a large surface. To be transported outdoors, it has to be foldable. Large foldable CIGS panels with 25Wp capacity and more cost starting from 300-400€, and there are no alternatives that would be cheaper and reliable at the same time. „  Sunload 30Wp solar panel and MultiECon Charger M60 during charging process. Even if I needed fresh batteries immediately, I charged storage charger at every occasion. 1 comments, 1030 views - Show/Reply Yesterday I tried out my new herping len... in Blog EN July 28, 2012, 11:50 Carl Zeiss 2.8/25 T* ZF on Canon as a Herping Lens Yesterday I tried out my new herping lens - Carl Zeiss 2.8/25 T* ZF - with a subject that I actually planned this lens to use for. is a manual-control only lens that exists only for Nikon mount. On Canon it can be used with an adapter, e.g. a Novoflex EOS/NIK. Not being a fisheye lens, the Carl Zeiss 2.8/25 T* ZF has nevertheless that rare ability to focus on a very short distance of only 17 cm. In practice this allows you to make shots of small subjects, such as amphibians, reptiles, insects, flora - from a distance of only several centimeters. Below you see photographs of a Common Frog (Rana temporaria). I had no flash with me this time, and was shooting with high ISO - 1600. Nevertheless the shutter speed was quite slow - 0.8 sec - due to narrow aperture - f/22. Even with this aperture which is maximum for this lens the background blur is quite strong when the subject is so small and so close. The frog was only about 5 cm from the front of the lens and its body size was about 6-7cm. 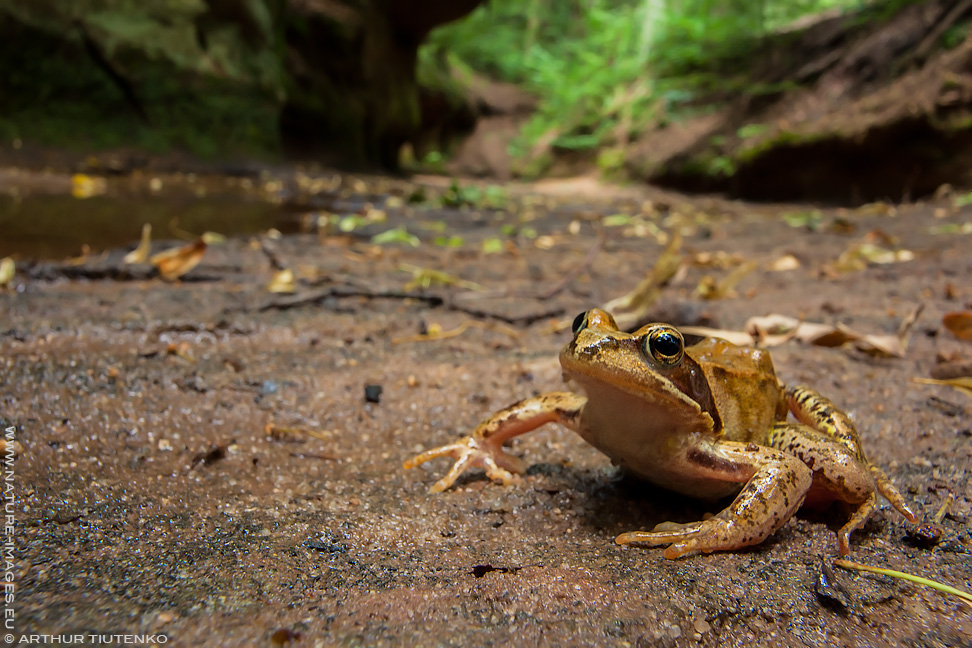  To eliminate the usual for such shots overexposure in the top of the frame, I am using this lens with a B&W gradient filter. The image presented here is a full frame, and with normal processing - gradation curve, saturation and vibrance increase, sharpening. Bottom line: This view angle is not as wide as in fisheye lenses, and with small subjects the background is too much blurred even at maximum aperture. Shooting with f/22 is very difficult because the image in viewfinder is almost black. On positive side, the distortion is virtually absent. The lens provides typical for Zeiss nice realistic colour rendering and contrast. Use of filters is another positive thing. 0 comments, 557 views - Show/Reply Close focus wide-angle lenses for SLR cameras in Blog EN May 15, 2012, 14:53 Close focus wide-angle lenses for SLR cameras For an article on herp photography that I am currently preparing for my site (see it soon here: Articles) I have reviewed all wide-angle lenses with minimum focus distance below 20 cm. Sigma 10mm f2.8 EX DC HSM Fisheye  With only 13.5 cm this lens has the closest focus among SLR wide-angle lenses. As all other Sigma lenses, this one exists for Canon, Nikon/Fujifilm, Sony, Sigma, Olympus, but unfortunately it is for APS-C cameras only, i.e. it would produce a smaller image on full-frame. The Canon version has an EF-S type mount and is not compatible with full-frame cameras. Due to smaller APS-C sensor, the Sigma 10 mm will draw a similar image as a 15 mm fisheye lens would do on full frame. I don't know if the shorter focusing distance would be of advantage. Anyway, if I had an APS-C camera, I would have preferred this lens for small amphibians and reptiles, and for large invertebrates. AF DX Fisheye Nikkor 10.5mm 1:2.8 G ED 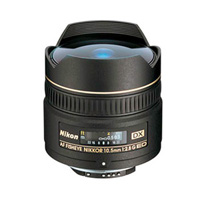 Naturally this lens is available only for Nikon, and for Fujifilm cameras that have the same mount. The focusing distance is remarkably short - 14 cm, but a little greater than on Sigma mentioned above. Like the Sigma 10 mm, it is supposed to be used with APS-C sensors. Unlike Canon's EF-S, Nikon's DX lenses can be used with full-frame cameras but will result in reduced frame. The image captured with this lens would look as if the focal length were about 15 mm in full-frame equivalent, i.e. the field of view would be narrower. Since I use Canon cameras, I can't tell anything concrete about this lens. To me it looks like Nikon's counterpart to Sigma 10 mm fisheye. Sigma 15mm F2.8 EX DG Diagonal Fisheye 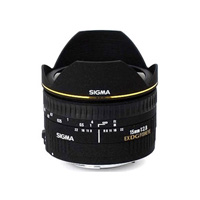 It focuses at 15 cm and is the lens of preference by many herp photographers. I own a copy of it, too, and have used it frequently. It is a great quality lens that provides excellent IQ and is a unique lens for full frame. As of time of writing, it was out of competition: There are no alternatives for Nikon/Fujifilm and Sony because their own fisheye lenses focus minimum at 20 cm. For Canon there is a fisheye zoom lens discussed below, but the Sigma 15 mm is more value for the money unless someone really needs a shorter focal length that the Canon zoom offers. For close-up wide-angle photography of reptiles and amphibians this is the best lens among fisheyes - both for APS and APS-C sensors. Therefore, I have to recommend it without too many reservations to everybody who is interested in herp photography. Personally, I don't like the bokeh of this one and actually of all Sigma lenses that I have seen so far. The other minor problem is that you have to set the exposure manually because cameras tend to overexpose when used with this lens. EF 8-15mm 1:4 L Fisheye USM  The Canon EF 8-15mm 1:4, after it was released in 2011, was a unique lens among lenses SLR cameras because it was the first fisheye zoom ever made for APS sensor. (Note: The Tokina zoom lens that will be described below is supposed to be used with APS-C cameras.) For nature photography, it is usable only at the long end - 15mm. Then it is equal to the Sigma and has the same minimum focusing distance - 15 cm. Obviously, it is a Canon-only lens, unparalleled in other brands, but Sigma fisheye lenses for Canon are less expensive and provide similar or, as primes, even better image quality. Thus, only someone who strongly believes that Canon lenses are the best and for whom money isn't an issue would prefer this lens to Sigma 15mm f2.8 EX DG Diagonal Fisheye. Tokina AT-X 107 DX AF 10-17mm f/3.5~4.5 Fisheye 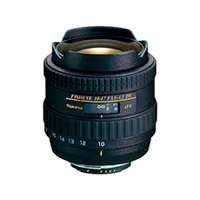 This is currently the only zoom fisheye lens optimized for APS-C sensors. Like Sigma 10 mm it focuses at 14 cm but can provide a narrower view field if set to greater focal length than 10 mm. Setting this lens to 17 mm significantly reduces the huge barrel distortion of a fisheye lens. Like Sigma fisheye lenses the Tokina AT-X 107 is a favourite lens of underwater photographers. For herp photography the greater focal length is more interesting because it helps to reduce the distortion with optics and not through cropping in software. Thus, if I had an APS-C camera and this lens I would use it at 17 mm all the time. The images produced by this lens did not impress me when I saw them in reviews. My impression is that this lens is less sharp than the 10 mm and 15 mm primes made by Sigma. Reviewers also complain about chromatic aberrations that this lens is prune to. The images coming from my Sigma 15 mm are almost free of CA. Carl Zeiss Distagon 2.8/25 T* 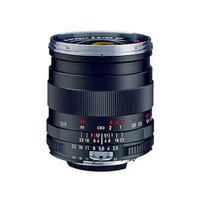 Zeiss Distagon focuses not so close as the fisheye lenses discussed above, but it appears to be a unique lens of its kind because it is a moderate wide-angle lens. Usually such lenses have a minimum focusing distance of 25 cm and more but this one can focus as close as 17 cm - only 2 cm farther than a fisheye lens. As for the time of writing, Carl Zeiss was producing the Distagon 2.8/25 T* only for Nikon, Pentax and M42 (screw) mount. However, any of these versions can be used on Canon with an adapter. The drawback is the need to set the aperture manually on the lens because even the best adapters do not transfer information from the camera. Therefore, I preferred the older version of Distagon 2.8/25 T* which has a separate aperture control ring. The Distagon 2.8/25 T* has at least two advantages over the fisheye lenses: First, the extreme barrel distortion characteristic for fisheye lenses is absent in the images produced by it. Second, this lens is compatible with 58 mm filters, hence graduated and polarizing filters can be used with it. It is a very useful capability in herp photography because the upper 2/3 or 3/4 in an image that was captured with a fisheye lens are often overexposed when the exposure was measured on the subject - a frog or a lizard on the ground. A graduated ND filter may help to solve this problem. As in all Zeiss lenses, the image quality that this lens delivers is superb. The images have typical for Zeiss lenses smooth bokeh, excellent contrast and natural-looking colours. In terms of imaging performance and build quality it is the best lens in the line-up of close focusing lenses presented here. The 2 cm greater focusing distance of Distagon compared to Sigma fisheye lens may be of disadvantage when the photographed subject is very small. However, a greater focal length may compensate this. Like all Zeiss lenses, the Distagon 2.8/25 T* is a manual-focus-only lens. However, it is not an issue when this lens is used for herp photography because for a close-up wide-angle shot of a reptile or amphibian any lens usually has to be focused manually. Sigma 24mm F1.8 EX DG ASP Macro 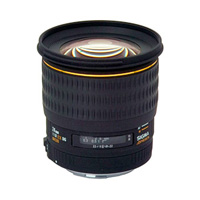 This is the second non-fisheye wide-angle lens that I am aware in the league of lenses with minimum focusing distance of less than 20 cm. Though it focuses at 18 cm, it is still close enough for most subjects in herp photography. As all Sigma lenses this lens is being produced for Canon, Nikon/Fujifilm, Sony, Sigma and Olympus. There appears to be a consensus among reviewers of Sigma 24mm F1.8 EX DG ASP Macro that it is inferior to the rest of lenses in this list both in image and in build quality. Probably the most interesting in this lens is its maximum aperture of f/1.8 that is certainly of advantage if this lens used for low-light - not in herp photography, however, where a greater depth of field is important. I am mentioning the Sigma 24mm F1.8 EX DG ASP Macro here for completeness and not for recommendation as a herping lens. However, it is inexpensive and someone who already has this lens may try to use it for herp photography. Carl Zeiss Distagon 2/24 T* ZA 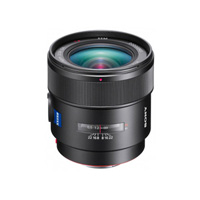 This is a specific lens for Sony Alpha. With 19 cm, it has the biggest focusing distance among the lenses in this line-up, but still it is less than 20 cm. Therefore I mention it here for the sake of completeness. For herp photography with a Sony Alpha camera a Sigma 15mm f2.8 EX DG Diagonal Fisheye should be a more suitable and even less expensive alternative. For the time of writing, the only existing Sony fisheye lens - SAL-16F28 16mm f/2.8 - had the minimum focusing distance of 20 cm and wasn't an option at all. 4 comments, 3814 views - Show/Reply | LATEST 10 POSTED PHOTOS Send Private Message Add Friend Arthurtiutenko has received 27716 views, 73 likes Camera and lenses: (To see the statistics of cameras, lenses and ISO used by Arthurtiutenko, click here) Work: Nature Images by Arthur Tiutenko (www.nature-images.eu) Interests: Almost all areas of nature photography. Favourite subjects are reptiles, amphibians and mammals. Contacts: Website I would describe myself as a "semi pro": I am a professional nature photographer but earn my living with other job. I live in Bavaria, Germany. See my website for more information about my photography. Member of JuzaPhoto from May 14, 2012 |

 JuzaPhoto contains affiliate links from Amazon and Ebay and JuzaPhoto earn a commission in case of purchase through affiliate links.
May Beauty Be Everywhere Around Me

