�
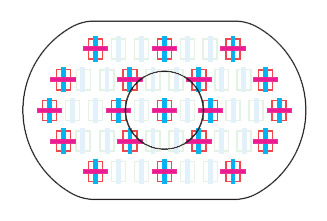
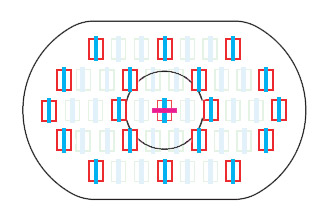
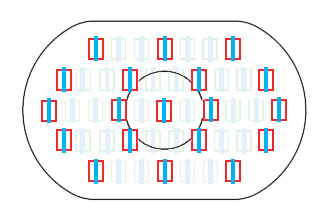
The number and the type of the AF sensors depends by the brightness of the lens. These illustrations show the how new AF module of the Canon 1 Mark III cameras works with lenses of different brightness.
Upgrading from the 7 cross type AF points to 19 cross type points seems a big improvements - it isn't. Cross type sensors are better than linear type sensor, but they are not a guarantee of better AF. On the Canon 40D, for example, Canon has put 9 cross points instead of the single cross point of the previous 20D; nevertheless, the 40D AF is just "a little better" than 20D AF, there is not an huge difference. The same hold true for the 1Ds3/1Ds2 comparision - if you use f/2.8 or brighter lenses the 1Ds3 may be a little better, but I doubt that you would see an huge improvement.
One of the things that really bothered me about the 1 series AF was the AF point selection. With my first consumer cameras, the Nikon D70 and Canon 350D, selecting an AF point on-the-fly was quick and easy, so I often used off-center points; with the 20D it was a little more difficult, but still doable; with 1 series it takes forever - when you finally manages to select the right AF point, it is likely that your subject will already be miles away! The 1Ds3 (sadly) still uses a derivate of the 45 points module, but at least Canon has made some noticeable improvements for AF selection. After pressing the AF point selection button, you can immediately select the center AF point by pressing the Multi-controller; press again the Multi-controller and the camera immediately switches to AFPS (Automatic Focus Point Selection). Since I use either center point or AFPS for all my photos, I really appreciate the possibility to switch quickly between these two options. Still, I'd have liked to see some improvement to make the other user-selectable point truly usable on the fly, let's hope that Canon will improve this aspect in future 1 series cameras.
C. Fn I : Exposure
These custom function allows to fine tune some aspects of the camera that regards the exposure. Here I described the settings that I have customized; the ones that I did not mention had been left on the default values.
-
C.Fn I - 2 ISO Speed Setting Increments : this CF allows to choose if you prefer to set the ISO in a 1 stop or 1/3 stop scale. I never use ISO values at ISO 500, ISO 160, ISO 1250 and so on, so I have set this CF on 1:1 Stop; exclusing the intermediate ISO values makes a little quicker to select the ISO setting that I want to use.
-
C.Fn I - 3 ISO Set ISO Speed Range : by default, the Canon 1Ds3 has a range of ISO settings between 100 and 1600. Through this CF, you can access to the entire ISO range of the camera, from ISO 50 to 3200. These settings are not available by default because they have some drawbacks (at ISO 50 you lose 1 stop of dynamic range, and at ISO 3200 you have strong noise), but sometimes I need these extreme sensitivities, so I have set this CF on Enable and I have set "Hightest ISO Speed" on H (that means 3200 ISO) and "Lowest ISO Speed" on L (that is 50 ISO).
-
C.Fn I - 9 Select Usable Shooting Modes : while consumer cameras have dozen of (useless) shooting modes at "Portrait", "Landscape", "Macro", "Sport", ect, the 1Ds3 has only five shooting modes: P, Tv, Av, M and Bulb. If you don't need one or more of these shooting modes, you can "eliminate" it with this CF. Personally, I never use Tv and P, so I have set this CF on Enable and I have registered only the three shooting modes that I use for my photos - Av, M and Bulb. This CF is useful because it makes a little quicker to select the shooting mode that you want to use, since there are less options, and it reduces the possibilies of selecting the wrong shooting mode. (of course, if you change your mind you can always bring back the shooting modes that you have eliminated with this custom function, they are not permanently deleted!)
-
C.Fn I - 10 Select Usable Metering Modes : the 1Ds3 has four metering modes, Evaluative, Partial, Spot and Center-Weighted. If you don't need one or more of these metering modes, you can eliminate it, to avoid selecting an unwanted metering mode by error. Since I always use Evaluative metering, I have eliminated Partial, Spot and Center-Weighted, and I have set this CF on Enable.
C. Fn II : Image/Flash Exposure/Display
With these CFs, you can adjust some aspects of the images (pay attention to the noise reduction settings, because they have huge "collateral effects" on the camera operation). As always, I described the settings that I have customized; the ones that I did not mention had been left on the default values.
-
C.Fn II - 1 Long Exposure Noise Reduction : if you take very long exposures, as 1 or 2 minutes, you may see a kind of noise called "hot pixels". If is possible to remove the hot pixels with Photoshop, or directly in-camera by setting this CF on 2:On, but I prefer to keep it off (that is the default value), because the camera takes a lot of time to remove the hot pixels (it has to take a second shoot with the shutter closed, so it doubles the exposure time and the battery consumption)
-
C.Fn II - 2 High ISO Speed Noise Reduction : if you try this custom function, you may be tempted to keep it active, because it seems very effective - it makes high ISO images much cleaner and more pleasing to see, without compromising the detail. But this in-camera noise reduction has two serious drawbacks: first, if you shoot in RAW it is completely useless, because it is only "simulated", it is not applied to the real file, so anyway you have to apply the noise reduction with your computer. If you shoot in JPEG, instead, it is useful because it gives cleaner images straight out-of-the camera, so you may not need to apply noise reduction with your computer. The second drawback instead afflicts the camera regardeless of the file format: with noise reduction active, the burst for continuos shooting is greatly reduced! On the 1Ds3, for example, the burst goes from a good 12 shots to a nearly unusable 4 shots! If you shoot RAW, I highly recommend to keep the CF 2-2 on the default value (Off).
-
C.Fn II - 5 Shutter Curtain Sync. : I have set this CF on 1:2nd-curtain synchronization. With this setting, if you use flash with a slow shutter speed, you will get a "trail" behind the subject, while with 1st-curtain synchronization the trail is in front of the subject, very unnatural.
C. Fn III : Auto Focus/Drive
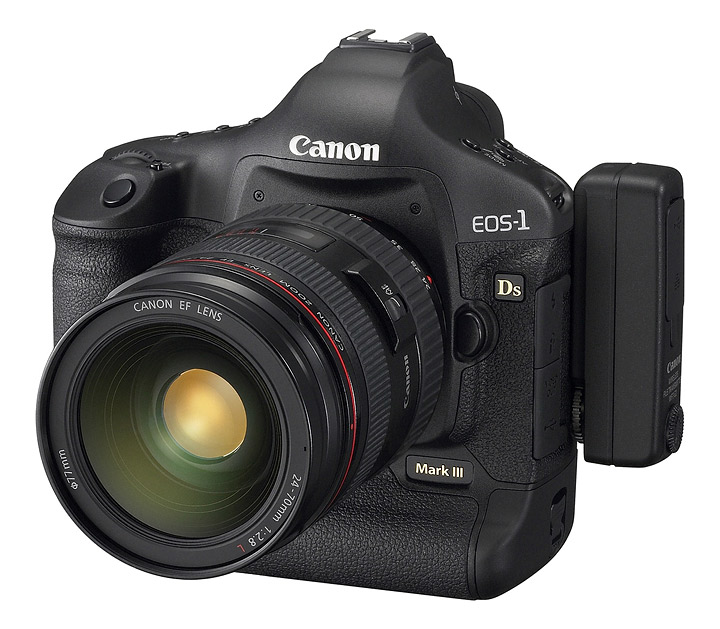
The Canon 1Ds3 has 17 custom functions that regards the autofocus - as I can expect from a professional body, you can fine-tune many aspect of the AF to customize the camera for your esigencies.
-
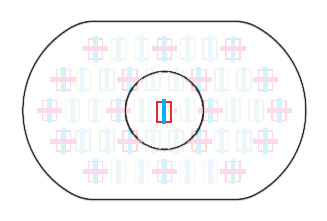
C.Fn III - 2 AI Servo Tracking Sensitivity: this CF allows to set the AI Servo sensitivity on a scale between -2 and +2. This CF is extremly important for nature photography! Let's make an example: you are photographing a birds in flight with the center AF point. You have managed to focus correctly on the bird, but due to its fast movements it is not easy to keep the AF point on your subject, and for some fraction of second the bird comes out of the AF point. Now, if the AI Servo sensitivity is set on a high value, the camera quickly focusses on the background; if, instead, you have set a low sensitivity, the camera waits more time before focussing on background, so you have a little more time to bring back the AF point on your subject.
�
The two animations above shows the effects of CF 3-2. With high sensitivity, as soon as the AF points moves out of the subject, the camera changes the focus; with low sensitivity, instead, the camera waits more time before changing the focus. I've set this CF on -2 (the lowest sensitivity), because it makes easier to follow the subject when I use the center AF point. On the other hand, with low sensitivity it is essential to begin with a correctly focussed subject - if you miss the subject and you focus on the background, with low sensitivity it is more difficult to move the focus on the right target. In this case, release the shutter, and press it again only when you have managed to bring the AF point on the subject.
-
C.Fn III - 8 AF Expansion With Selected Point : if you activate this custom function, the camera uses the AF points around the point you selected to help catching the subject. I still have to test in-depth this CFn - I'm going to report here the results when I'll have more experience with this setting.
C. Fn IV : Operation/Others
Some of these custom functions are useful to improve the interface and to adapt the camera to your shooting style. Here I described the settings that I have customized; the ones that I did not mention had been left on the default values.
-
C.Fn IV - 2 AF-ON/AE Lock Button Switch : I don't like a lot the AF-ON button, I prefer to use the larger AE Lock button for AF stop, so I have set this CF on 1:Enable, to switch the function of these two buttons.
-
C.Fn IV - 1 Shutter Burron/AF-ON Button : First, remember that after enabling the CF 4-2, this CF acts on the AE Lock button, instead of the AF-ON button. I have set this CF on 1:Metering+AF Start/AF Stop. In practice, with this setting when I half-press the shutter release button I activate metering and autofocus, while I can use the AE Lock button to stop the autofocus. This is very useful when I want to focus and re-compose: I press the shutter release to focus, then I keep pressed the AE Lock button and I compose the focus as I want.
Of couse, this technique makes sense only if you use AI-Servo, as I always do, while with One Shot it would be useless. Why I prefer I servo for all my photos? Simple: the technique of AI servo AF and AF lock is excellent for unpredictable subjects, that alternates quick action with static moments. If I used One Shot AF, I could focus easily on static subject, but I won't be prepared for action. With AI Servo + AF lock, instead, I can focus and recompose on the static subjects (like with One Shot), and when the action begins I just have to release the AF lock and let AI servo AF follow the subject.
-
C.Fn IV - 8 WB+Media/Image Size Setting : if you enable this CF (as I do), when you press the
button you can set the image size and some other parameters using the large LCD screen instead of the small rear LCD. I prefer to use the large LCD because it has a more intuitive and clear interface; the only downside is that is uses a little more battery than the small rear LCD, but since I use this function very few times (I switch to JPEG only when I take snapshots and for some tests), the difference in power consumption is truly negligible.
- C.Fn IV - 16 Live View Exposure Simulation : this is a very useful CF. By default, the live view always displays a correctly exposed preview of the image, regardeless of the exposure that you have set. If you enable this CF, instead, the live view adjust the brightness of the image to match the actually brightness of the photo - so, for example, if the exposure that you have selected gives an underexposed photo, the live view already shows a dark image. Even though it is not very accurate, it is very useful to get an approximative idea of the brightness of the photo. But there is more! If CF 4-16 is enabled, when you press the Info button during live view the camera displays an histogram in real time...the histograms allows to determine with precision if the exposure is correct, or if you need to adjust the exposure compensation. If you know how to read an histogram and you use live view with CF 4-16 active, you have the guarantee that your photos will be correctly exposed, without even the need of taking a test shot and checking the exposure! I always keep this CF on 1:Enable (simulates exposure).

 JuzaPhoto contains affiliate links from Amazon and Ebay and JuzaPhoto earn a commission in case of purchase through affiliate links.
