The Autofocus
The autofocus has been introduced more than two decades ago, and since then it has made enormous progresses. The first AF lenses had a very slow autofocus, that was useable just with static or very slow moving subjects: as you can imagine, it had a limited usefulness, but the manufacturers believed in this technology and continued to improve it. Today, the autofocus is fast, precise and very reliable, and it is almost essential for wildlife and action photography. But it is not enough to have a state-of-art technology to take great photos: you have to learn how to use AF to get the best of it.
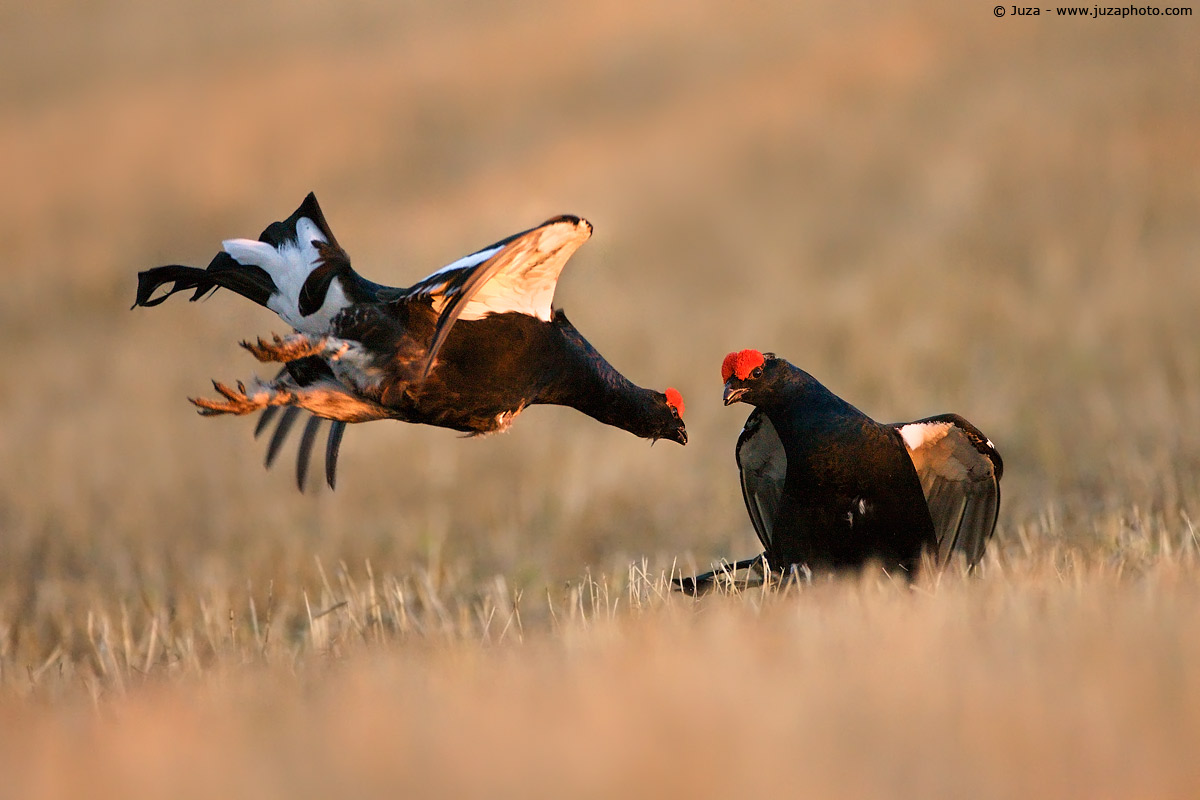
Canon EOS 1Ds Mark III, Canon EF 600 f/4 L IS USM, 1/1250 f/4, iso 3200, tripod. Finland. AI Servo (continuous) AF and center AF point where the key to get a razor sharp photo.
Choosing the Right Lenses
The are mainly two types of AF motor: the "traditional" motor and the "ultrasonic (USM)" motor. The traditional motor is used on the majority of cheap lenses; it is relatively slow and noisy. The USM motor is much better, but not every "USM" lens has actually an ultrasonic motor. Good lenses, as the Canon 300 f/4 L IS USM, have the "Ring-type USM" (the real USM), while many cheap and mid-range lenses, as the Canon 70-300 IS USM, have the "micro-USM", that has none of the advantages of the real USM: it is very similar to the traditional AF motor. If you don't have a good knowledge of lenses, it is difficult to tell if an USM lens has ring-type USM or micro-USM; the manufacturers are not very clear in this respect. If you are in doubt, ask on JuzaForum! :-)
The ring-type USM motor offers four important advantages:
- Speed: this is the fastest AF motor currently available. The speed varies from lens to lens, but overall the USM motor is really fast.
- Full Time Manual Focus: the FTM allows to focus manually in every moment, even if the focus switch is set on AF. It is very useful in many situations; for example in low light you can help the AF to recognize the subject by turning the focus ring close to the subject, then using the AF to fine tune the focus and to follow the subject. Moreover, there is no risk to damage the focus motor if you turn the focus ring when the focus switch is set on AF.
- Internal focusing: the lenses that have USM don't extend during focusing, nor they rotate the focus element.
- Silent operation: the USM motor is very silent; there is not risk to scare the subject with the noise of the AF motor.
Nowadays, I'd never buy a lens without ring-type USM motor, unless I plan to use it mainly in MF, for static subjects: for wildlife and action, the fast AF and FTM are almost essential!
Choosing the AF Area
All DSLRs have various AF areas; the number varies from 3-5 areas in the basic models to the 51 areas of the top-of-the-line Nikon D3 series.
You may think that all the areas are identical, but actually there are two types of AF areas: those with linear-type AF sensor and those with cross-type AF sensor. The linear AF sensor is able to detect only the horizontal detail, while the cross sensor can detect both horizontal and vertical detail. The areas with a cross sensor gives faster AF, and they are able to detect subject that would be problematic from linear sensors.
In the consumer DSLRs only the central AF area is a cross-type sensor; all the other areas are linear sensor. With slow lenses (i.e. the lenses that have a small aperture), all sensors operates as linear type. The professional SLRs have more sophisticated AF modules; usually they have 5-10 cross sensors, even though with slow lenses (f/5.6, f/8) many of these sensors turn into linear sensors. How to choose the right AF area? The are mainly three "strategies":
1 - Central area and AF lock: on every DSLR, the central area is the fastest and most reliable area. It is a good choice if you use an amateur camera or a lens with average AF, and it is the only choice if you use a lens with an effective maximum aperture of f/8, as the Canon 600 f/4 + 2.0x TC (note that only the 1 series camera can focus at f/8).
If you photograph a static subject, using the central AF area is a breeze. You just have to focus on the eye, lock the focus (if you are using AI Servo continuous AF), recompose and take the shot. For moving subject, focusing with the central area is more difficult: you don't have the time to lock the focus and recompose, so if you focus on the eye the subject will be centered in the frame, creating a static composition. You have two alternatives: you can frame the subject with some room all around, and crop the image to an off-center composition in post-processing, otherwise you can focus on the body of the subject instead of the eye. If you choose this option, pay attention to have enough depth of field to get the eye in focus; with some small subjects might be necessary to stop down to f/11 or smaller apertures.
2 - Off center area: if it is possible to get good AF even with an off-center area, you can choose the area according to your composition: for wildlife, choose the area where you want to place the eye of the subject. If you manage to place the area that you selected on the eye, there is no need to use the AF lock.
3 - Automatic Focus Point Selection (AFPS): the camera choose automatically one of the focus areas; it tries to follow the subject by changing the focus area every time that it is necessary. The exact behavior of AFPS varies depending by the camera; on Canon 1 series, the camera select the closest subject with readable contrast (in One Shot mode) or the subject identified by the central AF area (in AI Servo mode). AFPS is not as reliable as manual selection, but it is the ideal choice when you are trying to photograph a very active subject and you can't manage to center it with a single area.
Canon EOS 1Ds Mark III, Canon EF 300 f/2.8 L IS USM, Canon 1.4x TC, 1/1250 f/4, iso 3200, handheld. Costa Rica. I used the focus limiter to reduce the chances of misfocused image...but even the best techniques and great equipment don't make miracles with super fast moving subjects in dim light: I got about 8-10 truly sharp photos out of 600 shots.
Single VS Continuous: One Shot AF and AI Servo AF
Other than choosing a focus point, you have to choose between One Shot AF (i.e. single AF) and AI Servo AF (i.e. continuous AF). There are some major differences between the two AF modes.
One Shot is a good choice for stationary subjects. It focuses on the subject, then it looks the AF until you keep half-pressed the shutter release. It is possible to take the photo only when the subject is in sharp focus. One Shoot is slightly more precise than AI Servo, and it is a bit more sensitive in low light, but it is not recommended for moving subjects: if the subject has moved after the focusing, you have to release completely the shutter release, and then half-press it again, to repeat the AF operation.
I use
AI Servo for the majority of my images. AI Servo continues to focus as long as you keep half-pressed the shutter release. It is possible to take the photo even when the camera consider the subject "out of focus" - this is a very useful option, since sometimes the camera is wrong. AI Servo works well for moving subjects, but if you photograph a static subject with the technique of "focus on the eye and re-compose", you have to lock the focus with the AF lock button, otherwise the camera re-focuses as soon as the subject exits from the selected AF area.
Some cameras offers also a third AF mode, called "AI Focus" (where AI means "Artificial Intelligence" system), that chooses automatically between One Shot and AI Servo. I'd suggest to avoid it, since it is better to not delegate to the camera such important choice.
What Influences AF Speed?
Other than the AF motor of the lens, there are many variables that determine the AF speed. Knowing them allows to improve your AF technique and to avoid common misconceptions.
While the lens motor could be compared to the muscles, the camera is the "brain". As you can expect, professional cameras have more advanced AF systems than consumer cameras; the same lens gives faster AF with a 1D than with a 500D. Every new generation of cameras has a slightly more advanced AF; the Canon 1D/1Ds MarkII were the first cameras to have two dedicated CPUs (Central Processing Unit) for AF operations, one for calculation and the other to control the AF motor.
The
teleconverters reduce the brightness of the lens by 1 or 2 stops, and they reduce the AF speed, too. The Canon 1.4x TC II reduces the AF speed by nearly 50%, while the Canon 2.0x TC II reduces the AF speed by 75%.
The
brightness of the lens (that is the maximum f/stop) influences considerably the AF speed in low light, and it determines the configuration of the AF module in every light condition, as explained in the previous paragraphs. Faster (brighter) lenses usually gives faster AF and less bright lenses: for example, the 300 f/2.8 gives faster AF than the 300 f/4.
The
focal length and the minimum focusing distance are other important variables. With a long lens, when something is out of focus it is really blurred, and often it is completely unrecognizable, while with short lenses the subject is rarely so out of focus to be completely blurred. Of course, for the camera/lens it takes more time to find and focus a completely out-of-focus subject than a slightly OOF one. Moreover, if the lens has a short minimum focusing distance, the AF is slower because the AF motor has to search the focus between a wide range of distances. This explains why a macro lens as the 180mm Macro (that has a focusing range of 0.45m-infinity) has slower AF than a 70-200 lens (that has a focusing range of 1.5m-infinity).
The
light level strongly influences AF. In low light, the AF gets slower, because it is more difficult to "analyze" the subject's detail. In very low light or in complete darkness, the AF can not find the subject, unless you use a flash with AF-assist beam (as the Canon 580EX). This beam consist in a striped pattern that allows to create some contrast on the subject, even in the darkness, and it allows to focus inside the beam range. Of course, when you take the shot the beam turns off and you won't see any patter in the photo.
The AF needs some subject
contrast to achieve the focus. Low contrast subjects, as a wall, skin or a single-color dress can foul the autofocus because it doesn't see enough detail the determine if the subject is in focus. When you are trying to photograph these subject, you can either focus on the edge (if it is in the same plane of focus) or focus manually.
The AF Lock Buttons
When I photograph wildlife, I always use AI servo, that is continuous AF: the camera continues to focus as long as you half-press the shutter release. If the subject fall outside the focus area, the camera will focus on the next thing that coincides with the area: how it is possible to make off-center compositions?
Of course, you can select an off-center area that coincides with the subject, but it is not the fastest way to work, in particular if the subject often changes its position in the frame. Moreover, the off-center areas are not as fast and sensitive as the center area, and at certain apertures (f/8 on the Canon 1 series) the central area is the only active one.
If you use mainly the center area, the AF lock is essential. As the name says, this button locks the autofocus as long as you keep it pressed; on the Canon cameras it is identified by the star symbol. You can focus on the eye of the subject with the center sensor (or with your selected AF area), then you can recompose the photo as you like, without worrying about autofocus.
The technique of AI servo AF and AF lock is excellent for unpredictable subjects, that alternates quick action with static moments. If you used One Shot AF, you could focus easily on static subject, but you won't be prepared for action. With AI Servo + AF lock, instead, you can focus and recompose on the static subjects (likely One Shot), and when the action begins you just have to release the AF lock and let AI servo AF follow the subject.
Remember that the star button has multiple functions and it is customizable; the default function is "Exposure Lock", not AF Lock. To use it as AF lock, set the custom function "4: Shutter button / AE lock button" on "2: AF/AF lock, no AE lock" (the shutter button activates AF; the star button stops AF, the exposure lock is not available).
The professional tele lenses, as the 300 f/2.8, 400 f/2.8 and 600 f/4, have four AF lock buttons on the lens barrel; they works exactly in the same way of the AF lock on the camera. Depending by your shooting style, you may prefer the lens AF lock or the camera AF lock; personally, I find the button on the camera more intuitive and more easy to reach than the ones on the lens, in particular when working on a tripod.
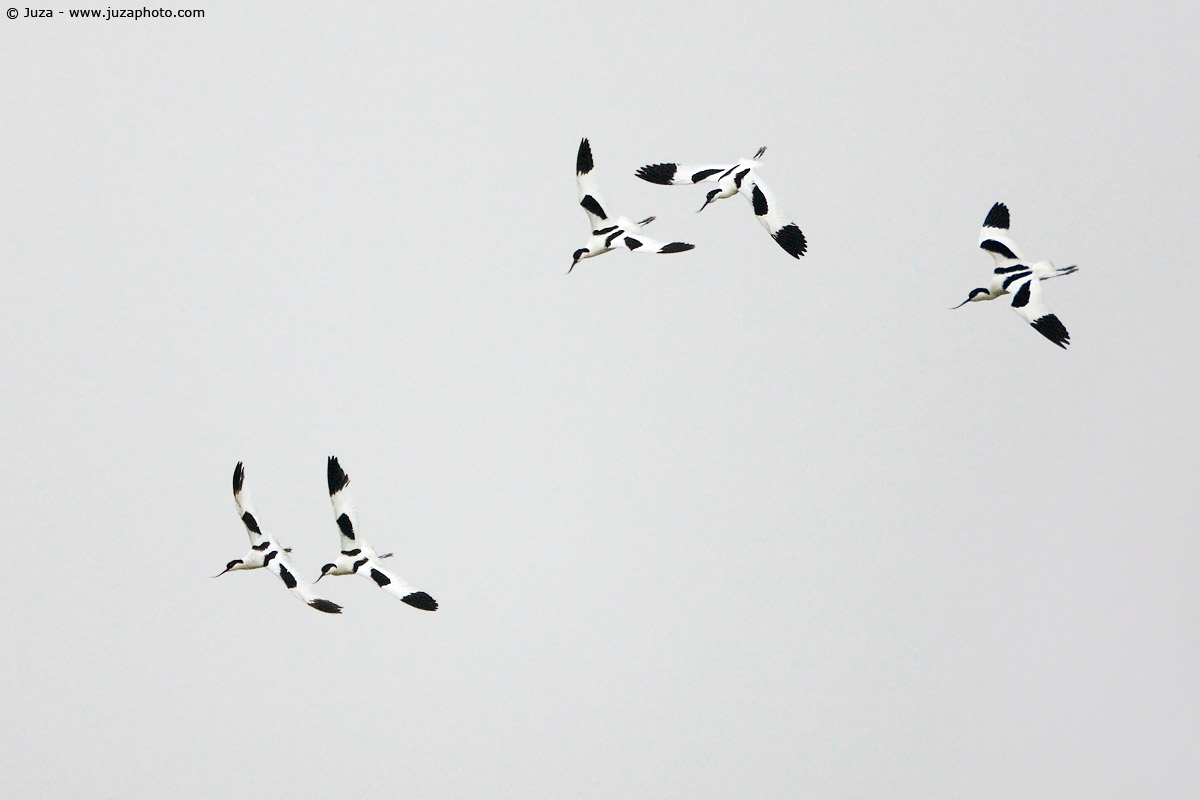
Canon 1DsIII, Canon EF 600mm f/4 L IS USM, Canon 1.4x TC, 1/4000 f/5.6, iso 1600, handheld. Texel, Netherlands. Here I used automatic focus point selection to focus on the small avocets against the grey sky.
Focus Limiter and Focus Preset
The
focus limiter allows to reduce the focus range, so it gives faster AF, because the camera has to search the focus between a shorter range of distances. It is very useful with super-tele lenses, where it allows to get a very noticeable improvement in AF speed. On the other hand, I have lost more than one shot because a bird landed close to the camera when I had set the focus limiter on the longest distances.
I suggest to use the focus limiter only when you are pretty sure that the subject will move into a restricted range of distances; with very active subjects, I prefer to have the entire AF range to avoid losing unique opportunities when I'm in a hurry.
The
Focus Preset is a feature found in the top professional lenses, as the 300 f/2.8 or the Canon 600 f/4 L IS (which control panel is shown in this image). The FP switch works together with the "SET" button and the focus preset ring. The focus preset allows to memorize a distance, and to come back instantly to this distance when you turn the FP ring. To use the focus preset, set the switch on "I" (active) or "((" (active, with beep). Focus on the distance that you want to memorize and press the the SET button. Now, you can instantly come back to this distance turning the FP ring; if you have activated the FP in "((" the lens emits a little beep when the focus is achieved.
This function is very useful when you photograph subjects at very different distances: for example, you are photographing a pair of egrets far away, but you know that a kingfisher might perch in every instant on the branch 10 meters in front of you. Set the focus on the branch, save the distance and then come back photographing the egrets. When the kingfisher finally arrives on the branch, turn the FP ring, and the lens will focus immediately on the right distance.
Tips and Techniques
Where to focus: when you photograph an animal, you should focus on the eyes! If the eye is out of focus, the photo loses the 90% of its value. If the subject has very little contrast, you can try to focus on the edges.
Shutter release: don't "mash" the shutter release. To achieve the focus in the shortest time, half-press the shutter release, and continue to focus during the action. In this way, when you press down the shutter release the subject is already in focus. If, instead, you mash the shutter release, the camera will take the photo without having the time to focus properly (in AI Servo), or it will lock up the shutter release until the autofocus has found the subject (in One Shot). Remember that keeping the shutter release half-pressed for long times reduces considerably the battery life, so take with you one or more spare batteries.
Focus issues: even if your AF techniques are perfect, you might experience focus issues. Remember that the size of the AF sensors are slightly larger than the AF areas; if there is an zone with strong contrast very close to the selected focus area, the AF might focus on this zone instead on into the focus area. This is not a defect of the camera. Other than that, it is possible that the camera or the lens actually have backfocus or frontfocus issues: in this case, you have to determine if the problem is the camera or the lens, then you can send it to the manufacturer for re-calibration (or fix it yourself if you have a recent camera that includes focus calibration). To understand where is the problem, take some photos of a test target parallel to the camera (or a specific focus target) with various lenses. If all the images are out of focus, it is likely that the camera has focus issues. If only some images are OOF, it may be a problem of only one lens.
Focus lock for action: if you know that the subject is going to move into a certain focus plane, you can pre-focus on the estimated focus plane, lock the focus and keep it locked during the action. I have used this technique with very good results to take photos of birds that takes flight from a perch: I focus on the bird when it is perched, I lock the focus and when the bird takes flight I press the shutter release, keeping locked the AF. If the bird moves parallel to the camera, it will be in sharp focus; if I didn't lock the AF, instead, it is likely that the AF would have focused on background, since it is very difficult to keep the subject into the focus area. This technique is particularly useful with consumer cameras that have average AF.


 JuzaPhoto contains affiliate links from Amazon and Ebay and JuzaPhoto earn a commission in case of purchase through affiliate links.