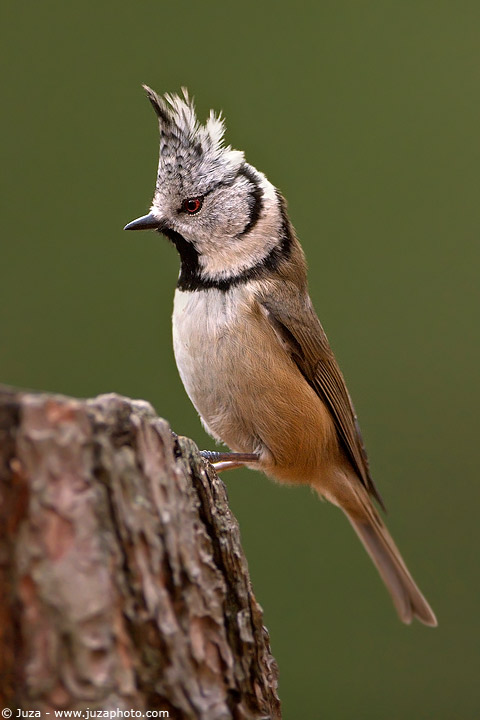
Canon EOS 20D, Canon EF 600mm f/4 L IS USM, 1/160 f/4, iso 800, tripod. Engadin, Switzerland. The last weekend of October I've come back in Roseg Valley (Engading, Switzerland) with three fellow photographers: Daniela, Marco and Francesco. It was a dark, cloudy day, but as soon as we arrived to the Koncertplatz, we were greeted by an amazingly beautiful vision...dozens of tits, other birds and squirrels were all around us!
As soon as I looked into viewfinder, I realized that it was going to be a "difficult" day. The shutter speed was 1/40 f/5.6...way too long to stop the motion of fast moving animals as the tits. I was going to use my brand new Canon 100-400 for handheld photography, but after viewing the results of a couple of test shots I switched to the 600 f/4 IS to get a one stop brighter aperture, even though I knew that the depth of field would have been razor thin at f/4. Other than that, I raised the ISO sensitivity from 400 to 800 to get another stop of shutter speed, and I mounted the lens on the sturdy Gitzo 1548 tripod with Wimberley head.
I put few peanuts on the ground and I placed the 600 f/4 at nearly 10-12 meters of distance. The minimum focussing distance of the Canon 600 f/4 is much shorter - 5.5 meters - but I preferred to frame the subject with some empty room all around, to compensate for the lack of depth of field at f/4. Remember that the width of the framing influences the depth - a large framing gives more depth of field than a tighter framing. This photo is a crop of nearly 50% of the full image, and the depth of field is just enough to have the head and the body in focus (the tail is already a bit out of focus, even though it does not detract from the photo). If I had moved the lens closer to the bird to get this composition directly in-camera, the DOF wouldn't have been enough to get an acceptable photo. Of course, it is always a compromise - by framing the subject "wider than necessary" and cropping you get more depth, but you lose resolution: you always have to evaluate what is the best strategy to get good results from the situation. Here, my choice proved to be successful - the depth of field is just enough, and the photo, that is nearly a 3.5 megapixel crop from the 8.2 megapixel file of my 20D, gives excellent prints, thanks to the excellent sharpness of the 600 f/4. The sharpness of the photo matters much more than megapixel - a very sharp 3-4 megapixel photo gives better prints than a soft 8 megapixel photo.
I toke hundreds of shots to increase the oddies of having at least one good photo - indeed, many images were soft due to the slow shutter speed or focus errors (a f/4 the focus must be perfect, even a small imprecision gives a completely out of focus photo). When I downloaded the RAW files on my computer, I did, as usual, a quick selection with Adobe Bridge to elimitate all the photos that have clear focus or exposure errors, then I checked the remaining files with Photoshop, observing the images at 100%, and I kept only the photos that were perfectly sharp and well exposed. I processed this photo with the usual adjustments of contrast and saturation, and I applied some noise reduction on background to eliminate the noise.
Replies and comments
What do you think about this article?
Do you want to tell your opinion, ask questions to the author, or simply congratulate on a particularly interesting article?
You can join the discussion by joining JuzaPhoto, it is easy and free!
There is more: by registering you can create your personal page, publish photos, receive comments, join discussions and you can use all the features of JuzaPhoto.
With more than 260000 members, there is space for everyone, from the beginner to the professional.

 JuzaPhoto contains affiliate links from Amazon and Ebay and JuzaPhoto earn a commission in case of purchase through affiliate links.
