Noise reduction with Photoshop CC
Noise reduction with Photoshop CC, text and photos by
Juza. Published on 07 Ottobre 2014; 1 replies, 15971 views.
Even though cameras (slowly) keep getting better at high ISO, there will always be a point where you need noise reduction to improve image quality. Photoshop and Adobe Camera RAW currently offer some of the best tools for noise reduction, and a careful noise reduction can greatly improve the photos. Remember that while it is possible to reduce the noise, it is not possible to correct the blur created by an excessively slow shutter speed: thus, don't hesitate to use high ISO when it is necessary.
Noise reduction with Adobe Camera RAW (vs Photoshop)
Both Camera RAW and Photoshop offer a noise reduction tool, but the one of Camera RAW is more easy to use and more effective. Here you can see a quick comparison: the first crop is taken from a ISO 12800 photo and it has no noise reduction, the second crop show the results of PS noise reduction and the third is the result of ACR noise reduction.


The last crop (ACR) is clearly better: it has a more natural look and less noise. For photos taken at ISO up to 800 the difference between ACR NR and PS NR is very small, but from ISO 1600 ACR is better. For this reason, currently I do noise reduction directly in Camera RAW during RAW conversion, if it is necessary.
After zooming in at 100%, I begin by moving the Color slider in the Noise Reduction tab of ACR, until the chroma noise disappear. Usually a value around 10-15 is enough; for photos taken at extremely high ISO it may be necessary to go up to 25. Don't use excessively high values, otherwise the colors become dull. I leave the Color Detail and the Color Smoothness sliders on the default value, that is 50.
When the chroma noise has been removed, I try to remove or reduce the luminance noise, that is the grain. Depending by the image, I use a Luminance value between 5 and 30 (values above 20 should be used only for very high ISO photos).
I leave both the Luminance Detail and Luminance Contrast on the default values, that are 50 for Luminance Detail and 0 for Luminance Contrast. In some photos it is possible to eliminate completely the grain, while in other images it can be reduced but it is still visible. Remember that reducing noise also reduces detail: don't use an excessive reduction! The noise reduction is an useful tool, but you should learn to use it properly. A common error is to apply an excessive noise reduction; the resulting image is noise free but it has lost a lot of detail and it has a "plastic", artificial look. I am quite "conservative" with noise reduction; it is better to leave a little of noise that to get an over processed image.
In the "Detail" tab of Camera RAW there are also some sharpening tools; I don't recommend them (I keep all them on 0) because the Smart Sharpen of Photoshop is more effective.
Advanced Noise Reduction with Layer Mask
Sometimes, the first noise reduction done in Camera RAW is not enough, in particular for out of focus areas. To get a very clean image without losing subject detail, you can use again the noise reduction coupled with Layer Mask. With the Layer Mask, it is possible to apply the noise reduction only on the background, or to apply different levels of noise reduction on the subject and on the background.
In the past you had to use the Noise Reduction of Photoshop for this technique, but now with Photoshop CC it is possible to use every filter of Camera RAW as a Photoshop filter, so nowadays I always use the NR tool of Camera RAW.
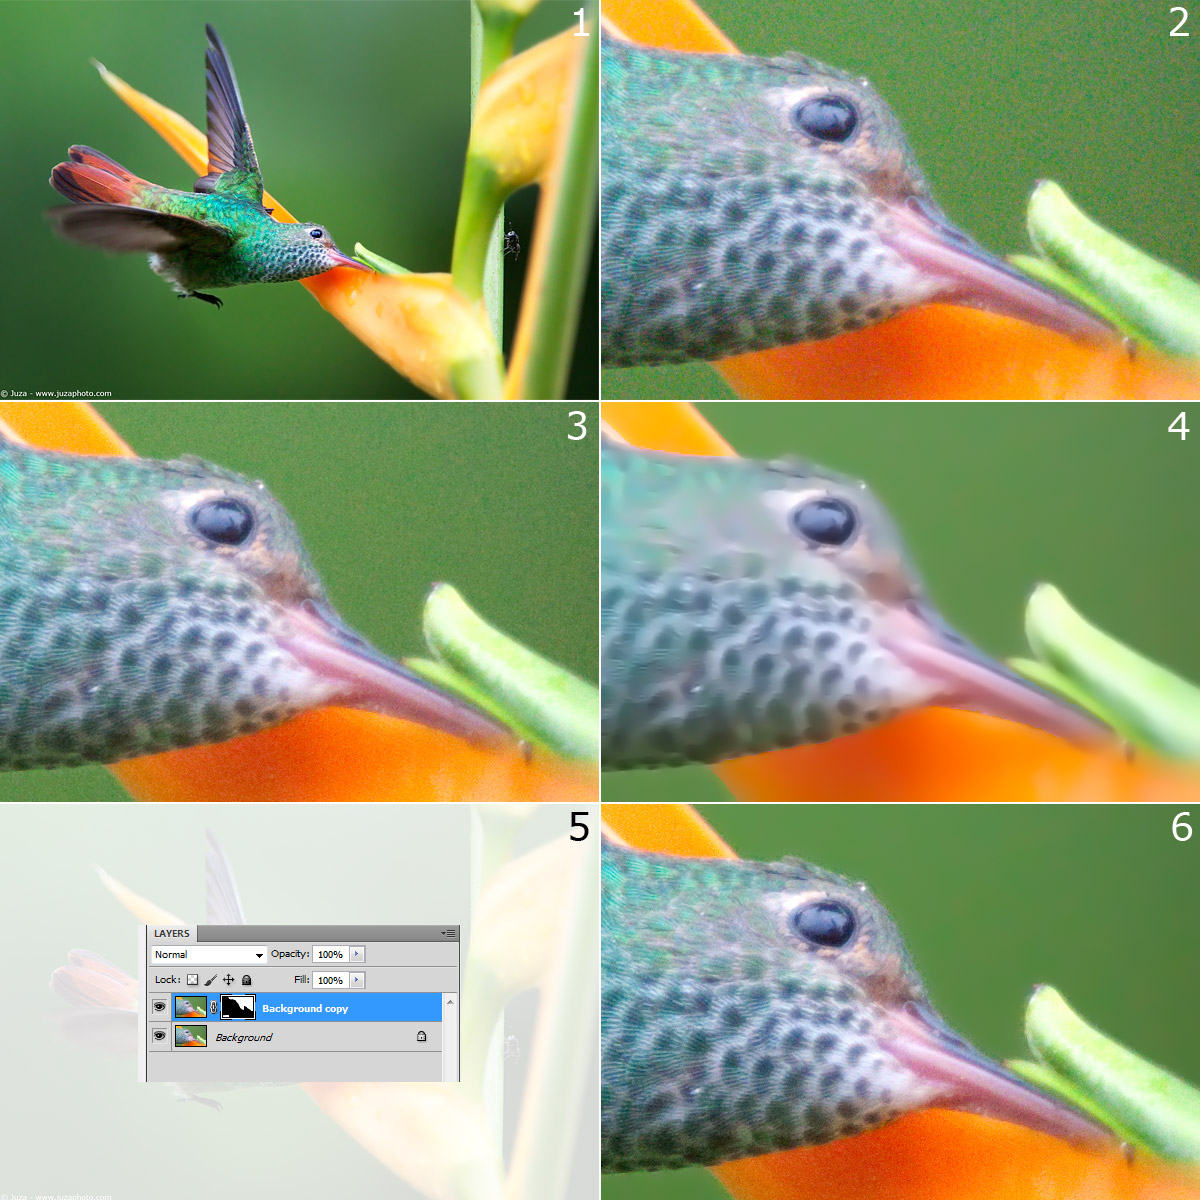
The image 2 is a crop from the photo 1, without any adjustment other than the basic enhancements of brightness and contrast. The photo has been taken at ISO 1600 so there is some noise, in particular in the out of focus background.
In crop 3, I applied a slight noise reduction on the entire image using Adobe Camera RAW. The photo looks relatively good - the color noise has disappeared, but there is still some luminance noise. The colors looks slightly less saturate than in previous crop, due to the color noise reduction, but the difference is very slight and the detail is still excellent. It would be possible to print this photo with excellent results, the noise would be barely visible even in large prints. That said, if you want a 100% noise-free file, it is possible to enhance even more the photo, with a selective noise reduction on background.
The first step is to duplicate the background layer (Layer>Duplicate Layer), to create a copy of the image. Now, you have the original image, in the first layer (Layer 1), that remains untouched, while you can apply a strong noise reduction on the copy (Layer 1 Copy). To remove completely the noise, apply again the noise reduction (Filter >
Camera RAW Filter) with very aggressive settings (Luminance on 40 or higher, until the image is completely noise free) to the Layer 1 Copy.
The photo becomes very clean, noise-free, but of course the detail is completely smudged (crop 4): to get a good result, you have to apply such strong noise reduction only on the out of focus areas, as the background. Apply the Layer Mask (Layer>Layer Mask>Hide All) to Layer 1 Copy, and click on the Brush Tool. The Layer Mask is one of the most powerful and versatile tools of Photoshop - if you don't know well what it is and how it works, I recommend to read the article "Layers and Layer Mask".
Now, you have to "paint" on the areas where you want to apply the strong noise reduction. Usually, I select a relatively small brush (Diameter 50-100px, Hardness 80-90%) and I magnify the photo to 100% to follow precisely the borders of the subject. Remember than you don't have to touch the borders with the brush - otherwise they becomes a bit fuzzy. It is always better to leave few pixels between the border of the subject the the brush. In some images, you can do it quicker by using the Magic Wand to do an approximate selection of the background.
When I have finished the fine adjustments, I select a larger brush to apply the noise reduction on the rest of the background, and finally I flatten the layers with Layer>Flatten Image. The crop 5 is taken from the final image: the subject has kept its detail, while the background is nicely smooth and noise-free. This workflow takes a bit of time, so I recommend to use it only on your best images; if you have to edit a large number of photos you can get quite good results even with a moderate noise reduction applied on the entire image.
Replies and comments
What do you think about this article?
Do you want to tell your opinion, ask questions to the author, or simply congratulate on a particularly interesting article?
You can join the discussion by joining JuzaPhoto, it is easy and free!
There is more: by registering you can create your personal page, publish photos, receive comments, join discussions and you can use all the features of JuzaPhoto.
With more than 259000 members, there is space for everyone, from the beginner to the professional.
|
|
sent on 28 Aprile 2016 (23:28)
Same here..
In Camera RAW is better to do only a noise reduction. When the original image already is opened in Photoshop, grab the image again from the folder and drag it to the Ps icon on the start menu line. It will pop on the Camera RAW window again and there you can add as much luminance as you want. I have my settings changed, so my second grabbed image by default will open as a Smart Object ( it means - a separate layer too ), in the same Photoshop window, without harming the initial image. So, i don't need much to worry about applying a sharpening. I have a rasterized smart object, which will serve to me as a noise-free background. |

 JuzaPhoto contains affiliate links from Amazon and Ebay and JuzaPhoto earn a commission in case of purchase through affiliate links.

