What do you think about this photo?
Do you have questions or curiosities about this image? Do you want to ask something to the author, give him suggestions for improvement, or congratulate for a
photo that you really like?
You can do it by joining JuzaPhoto, it is easy and free!
There is more: by registering you can create your personal page, publish photos, receive comments and you can use all the features of JuzaPhoto.
With more than 260000members, there is space for everyone, from the beginner to the professional.
|
|
sent on 16 Gennaio 2012 (11:03) | This comment has been automatically translated (show/hide original)
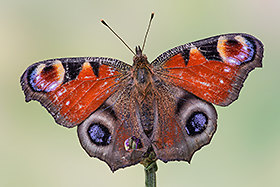
I tried to clone the lower part of the roost but the grain present in the background causes me many problems
especially in the reduction phase.
I did various tests but in the end there is a difference in the point at which I spoke.
even when I thought I could ESSECI, when saving for the web, the compression of the generated artifacts.
usually I have no problem with this but I do not know how.
any advice?
ho provato a clonare la parte bassa del posatoio ma la grana presente nello sfondo mi crea molti problemi
specialmente in fase di riduzione.
ho fatto varie prove ma alla fine si nota una differenza nel punto in cui sono intervenuto.
anche quando pensavo di esseci riuscito,al momento di salvare per il web,la compressione generava degli artefatti.
di solito non ho problemi ma con questa immagine non so come fare.
qualche consiglio?
|
|
|
sent on 16 Gennaio 2012 (11:08) | This comment has been automatically translated (show/hide original)
the different shades of the background does not help, then the beauty of the picture and his skill are not at all attacked by a piece of perch
for I see you have made the best choice
hello le diverse sfumature dello sfondo non aiutano e poi la bellezza della foto e la bravura dimostrata non sono minimamente intaccate da un pezzetto di posatoio
per il mio modo di vedere hai fatto la scelta migliore
ciao |
|
|
sent on 16 Gennaio 2012 (12:02) | This comment has been automatically translated (show/hide original)
Infas too good! thank you.
The choice I made was influenced by the lack of success of p.
otherwise I would have cloned that way.
there were nuances to stop, but those spots that can be seen in the lower left.
troppo buono Infas!grazie.
la scelta che ho fatto è stata condizionata dalla mancata riuscita della pp.
in caso contrario avrei clonato quella parte.
non sono state le sfumature a fermarmi ma quelle chiazze che si intravedono in basso a sx.
|
|
|
sent on 16 Gennaio 2012 (13:17) | This comment has been automatically translated (show/hide original)
Indeed, the patches are quite visible, but do not detract from the beauty butterfly which I think is recovered well and with great detail.
I like it!
HELLO Effettivamente le chiazze sono abbastanza visibili, non tolgono però bellezza alla farfalla che reputo ripresa bene e con ottimi dettagli.
Mi piace!
CIAO |
|
|
sent on 16 Gennaio 2012 (14:16) | This comment has been automatically translated (show/hide original)
thanks Maxspin73'm happy!
those spots, which in the original file there are usually generated when I reduce the web.
what it depends on, and above all ... how do I avoid them?
reduce it and then you step on it with the brush or Smudge? grazie Maxspin73 sono contento !
quelle chiazze,che nel file originale non ci sono ,solitamente si generano quando riduco per il web.
da cosa dipende e sopratutto...come faccio per evitarle?
riduco e poi ci passo sopra con il pennello o lo sfumino? |
|
|
sent on 16 Gennaio 2012 (15:14) | This comment has been automatically translated (show/hide original)
The butterfly and 'truly a masterpiece, which colors and light. Proceed to the grain so, at least I would like this:
First creates a transparent layer.
Then with the dropper select the color for medium
Then use a large brush sfumatissimo but with a 23% hardness
Then go to brush in the background, the transparent layer. Foul trouble to soil butterfly, indeed cover it on the edges, then to avoid artifacts.
Then select the butterfly, and adjusts the edges sfumali ritraili of 2 pixels.
Invert the selection.
Create layer mask
Then sweep 100% of any photo.
Then act on noise control, but only in the background and creates a mask for the butterfly.
Blandissimi noise control, 0.10% Action 10 maximum, but 95% of retail, with a radius of 10. Skim 3/4/5 times. Then merge levels.
Then save
Doppo sizing for the web that I know 1200px
Then reduce noise on all but blandissimo <br /> Then sharpening light, but repeated 2/3 times only on the butterfly and areas to focus and then another mask.
Then join and SAVE for web.
Having written all over it and I hope I've been clear La farfalla e' davvero un capolavoro, che colori e che luce. Per la grana procedi così, almeno io farei così:
Per prima cosa crea un livello trasparente.
Poi con il contagoccie seleziona il colore sfondo medio
Poi usa un pennello grande sfumatissimo ma con un 23% di durezza
Poi vai a pennellare sullo sfondo, sul livello trasparente. Fallo senza problemi di sporcare la farfalla, anzi coprila sui bordi, per evitare poi artefatti.
Poi seleziona la farfalla, regola i bordi sfumali e ritraili di 2 pixel.
Inverti la selezione.
Crea maschera di livello
Poi pennella al 100% su tutta la foto.
Poi agisci sul controllo rumore, ma solo sullo sfondo, quindi crea una maschera per la farfalla.
Controllo rumore blandissimi, 0,10% azione 10 massima, ma dettaglio 95%, con raggio 10. Passalo 3/4/5 volte. Poi unisci livelli.
Poi salvi
Doppo dimensiona per il web che so 1200px
Poi riduci rumore su tutto ma blandissimo
Poi maschera di contrasto leggerissima, ma ripetuta 2/3 volte solo sulla farfalla e zone a fuoco, quindi altra maschera.
Poi unisci e salv per web.
Spero di Avere scritto tutto e di essere stato chiaro |
|
|
sent on 16 Gennaio 2012 (15:52) | This comment has been automatically translated (show/hide original)
thanks Francis! are always generous in advice!
I'll try tonight and I hope to do everything right.
I tried to smooth the background creating different levels using a brush to cover the artifacts and blurring to make it homogeneous and there .. but then I was also successful in converting the web have gone out a lot of artifacts.
you never learn ;-)
grazie Francesco!!!sei sempre generoso in consigli!!
stasera ci provo e spero di riuscire a fare tutto bene.
avevo provato a levigare lo sfondo creando livelli diversi usando il pennello per coprire gli artefatti e sfuocando per rendere il tutto omogeneo..e ci ero anche riuscito ma poi nella conversione per il web sono usciti fuori una marea di artefatti.
non si finisce mai di imparare
|
|
|
sent on 16 Gennaio 2012 (16:52) | This comment has been automatically translated (show/hide original)
The subject is well taken, perhaps more decentralized left. Il soggetto risulta ben ripreso, forse decentrato più a sx. |
|
|
sent on 16 Gennaio 2012 (17:53) | This comment has been automatically translated (show/hide original)
thanks Pigi47
I will take it ;-) grazie Pigi47
ne terrò conto |
|
|
sent on 16 Gennaio 2012 (19:03) | This comment has been automatically translated (show/hide original)
A shot magnificent detail in the highlights and colors Congratulations! Uno scatto stupendo nelle luci dettaglio e colori Complimenti !! |
|
|
sent on 16 Gennaio 2012 (22:38) | This comment has been automatically translated (show/hide original)
Radeski thanks :-)
Lafrusta thanks :-)
I can recommend what to do in similar situations?
grazie Radeski
grazie Lafrusta
mi puoi consigliare cosa devo fare in situazioni simili?
|
|
|
sent on 16 Gennaio 2012 (23:01) | This comment has been automatically translated (show/hide original)
Beautiful light and colors. For help with everything you said Francis. Hello and congratulations ;-) Bellissima luce e colori. Per i consigli ti ha detto tutto Francesco. Ciao e complimenti |
|
|
sent on 16 Gennaio 2012 (23:11) | This comment has been automatically translated (show/hide original)
Tore thanks! ;-) grazie Tore! |
user1338
|
sent on 17 Gennaio 2012 (6:53) | This comment has been automatically translated (show/hide original)
The subject is very well lit and clear for the background you have already said,
compliments.
Hello. ;-) Il soggetto è ottimo ben illuminato e nitido per lo sfondo ti hanno gia detto,
complimenti.
Ciao. |
|
|
sent on 17 Gennaio 2012 (11:40) | This comment has been automatically translated (show/hide original)
thanks Dipi09
last night I did some tests with good results (thanks Francis!)
cmq I noticed that in some photos with the background with multiple colors in the reduction step,
are formed of spots precisely in areas with darker color.
now then I did not notice that I see them everywhere!
here the risk madhouse!! grazie Dipi09
ieri sera ho fatto delle prove con buoni risultati(grazie Francesco!)
cmq ho notato che in alcune foto che presentano lo sfondo con più colori,nella fase di riduzione,
si formano delle chiazze proprio nelle zone con colore più scuro.
ora poi che ci ho fatto caso le vedo dappertutto!!!

qui rischio il manicomio!!!!! |
|

Publish your advertisement on JuzaPhoto (info) |


 JuzaPhoto contains affiliate links from Amazon and Ebay and JuzaPhoto earn a commission in case of purchase through affiliate links.


 Resize to fit window