The Three Peaks of Lavaredo
The Three Peaks of Lavaredo, text and photos by
Juza. Published on 08 Giugno 2012; 1 replies, 5821 views.
Canon EOS 20D, Sigma 12-24mm f/4.5-5.6 EX DG HSM, 1/8 f/16, iso 100, tripod. Dolomites, Italy.
The post-processing is an essential component of landscape photography. Ansel Adams carefully processed each one of his prints in the traditional darkroom to produce the best results - and the modern digital technologies should not make you sloppy ;-)
You can not expect to get perfect images right out-of-the-camera: when you have taken a good landscape photo, you have made half of the work. A careful post-processing with the "modern darkroom" (Photoshop) is essential to bring out the best from the RAW file.
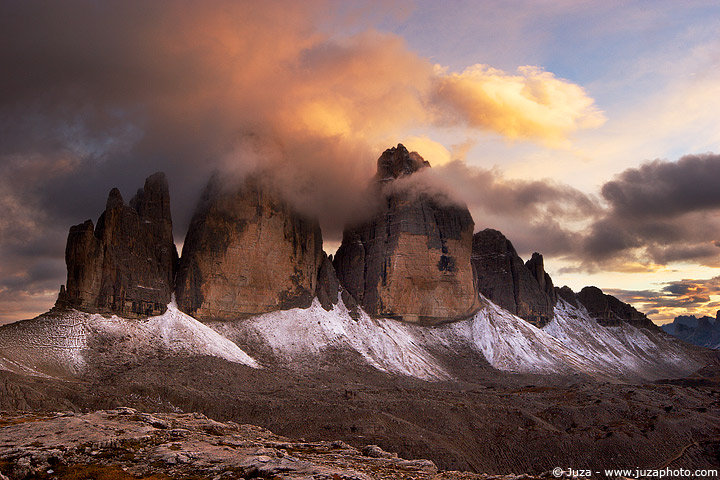
I've taken this photo during my Dolomites workshop...it was one of the most beautiful sunset that I've ever seen. The light painted the clouds of yellow and red, and a little of snow on the base of the peaks was the icing on the cake.
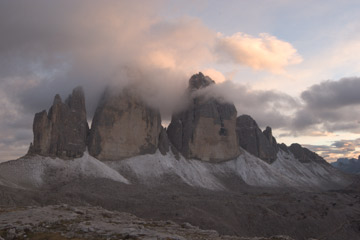
The image on the left side is the RAW file, just converted and resized for web. I converted the file with minimum contrast to get the maximum amoun of the detail - in this case, a single exposure was enough to capture the entire dynamic range of the scene, but it is necessary to post-processed the sky and the foreground as separated areas.
The colors in the converted file were a bit cold so the first thing that I did was to warm up the colors. I selected the Color Balance tool and I increased the percentages of yellow and red. Then, I created two copies of the image (right-click on the layer palette and select Duplicate Layer from the drop-down menu) to adjust the contrast: it was necessary to darken the sky and to brighten up the foreground.
I selected the "background" layer and I increased contrast and brightness with the Levels tool. The Levels are far more advanced than the Contrast/Brightness tool of the Contrast slider of Camera RAW - it is possible to make much finer adjustements of contrast.
To enhance the foreground, I moved a little the black slider towards the right, and I moved a lot the white slider towards the left, until the foreground area appeared well exposed. Of course, all the adjustements are done in 16-bit mode to avoid posterization and to make finer adjustments. The sky become almost completely white, but this is not a problem since this area will be processed in the second copy of the images.
I selected the "Background Copy" layer and I moved a lot the black slider towards the rigth, until the sky has beautiful intense colors and good contrast (the foreground become very dark but remember that there is the first copy of the image, processed for the foreground).
This copy of the image has been optimized for the foreground
This copy of the image has been optimized for the sky
When the different areas had been "optimized" it is necessary to blend them as if they were two different exposures.
Now there are to different copies of the image in the layer palette: I selected the "Background Copy" and I applyed the Layer Mask (Layer>Layer Mask>Hide All). With the layer mask it is possible to blend the layers: while it is not particularly difficult, many photographers often make bad blendings that results in artificial-looking photos. To get good results, you don't have to follow carefully the edges of each area - you have to use a very large and soft brush (for this image, I used a 900 pixels brush with Hardness 0%), to create a gradual transition between the two areas.
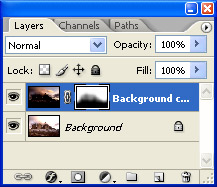
If you observe the small rectangle in the layer palette, you see how the mask works: the white areas on the mask represents the visible areas, while the black areas are the masked areas. With a little of work I blended the two areas, then I did the final adjustments of contrast, color and saturation.
Replies and comments
What do you think about this article?
Do you want to tell your opinion, ask questions to the author, or simply congratulate on a particularly interesting article?
You can join the discussion by joining JuzaPhoto, it is easy and free!
There is more: by registering you can create your personal page, publish photos, receive comments, join discussions and you can use all the features of JuzaPhoto.
With more than 260000 members, there is space for everyone, from the beginner to the professional.
|
|
sent on 03 Luglio 2017 (13:06)
Love the image, and many thanks for the description.
Hoping to go there this autumn. How does one get to this point? Does the cable car run, or is it a long hike? |


 JuzaPhoto contains affiliate links from Amazon and Ebay and JuzaPhoto earn a commission in case of purchase through affiliate links.

