Blue Tit and the Canon 500 f/4
Blue Tit and the Canon 500 f/4, text and photos by
Juza. Published on 07 Giugno 2012; 0 replies, 5389 views.
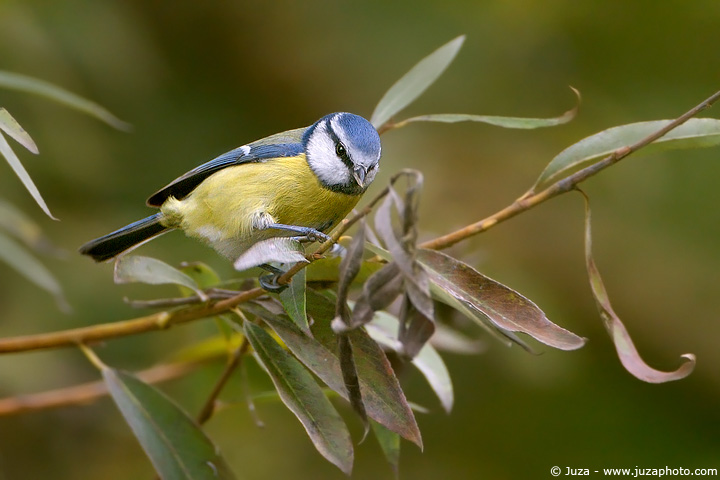
Canon EOS 20D, Canon EF 500mm f/4 L IS USM, 1/320 f/4, iso 800, handheld. Torrile, Italy.
Torrile (near Parma, Italy) is a great place for herons, egrets, ducks and many other water birds: I was pretty surprised when Carlo called me saying that there were many tits at less than ten meters from the hide. We grabbed the lenses - I was photographing with his Canon 500 f/4 L IS USM, while he had mine 600 f/4 IS with 1.4x TC - and we quickly moved from the main window of the hide, that shows the pond, to the smaller lateral window that looks towards the bushes and the woods. I was amazed to see some Blue Tits, Long-Tailed Tits and another species that I didn't manage to identify, all posed on a brach at few meters from us!
There was no time to move the tripod so we toke off the lenses from the head and we photographed handholding the lens: here, the weight and size of the 500mm made the difference from getting the shot or not. The 500 is noticeably lighter than the 600, and I was able to handhold it pretty easily and to get razor sharp photos at 1/320; or course, IS was active (Mode 1) and it helped a lot to avoid motion blur. If I had used the 600, I wouldn't have been able to avoid motion blur at this shutter speed - it is way more difficult to handhold steadily the 600, even if you are quite strong.
Another big difference between 500 and 600 is the size: the window of the hide was pretty small, it was already pretty tight for the 15 centimeters front element of the 500, and there was no way to frame the photo with the 600 (its front element has a diameter of 17cm) without having a small portion of the lens obscured by the frames of the window.
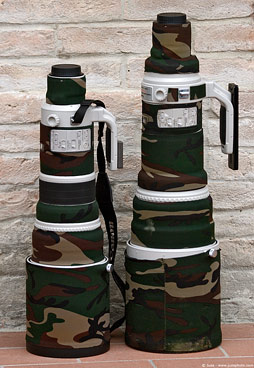
Side by side: the 500 f/4 and the 600 f/4. In practice, the difference is even more than what you might think from that photo. Of course, I'm not going to sell my 600 to get the 500, but I have to admit that is some situations the portability is more important than the reach: if you are undecided between 500 and 600, I'd recommend to try both of them before buying to judge which one is the best choice for your style of photography.
Other than the lenses, there are other factors that determine the success of a photo. As you can imagine from the caption, the light was dim - I had to shoot at f/4, even though usually for such small subjects I prefer to stop down to f/8 or f/11 to get some more depth of field. Other than that, I used ISO 800: with digital, don't hesitate to raise the ISO; Canon cameras are excellent even at these sensitivities, and with some Noise Reduction it is easy to get very clean photos. Years ago, with a film camera and Velvia, this photo would have been impossible...the shutter speed would have been 1/20!
The autofocus is very imporant and here I lost a great photo due to a focus error. I was photographing herons with AFPS and when I quickly turned towards the tits I forgot to switch the focus mode...result: I framed a beautiful Long-Tailed Tit, I pressed the shutter release and...the darn AFPS focussed on a leaf behind the bird!
As soon as I realized that I was in AFPS mode, I quickly switched to MFPS by selecting the center AF area, but the Long-Tailed Tit was already gone. This is one of the reasons that led me to use the manual AF point selection, even when AFPS could give good results: if the situation changes quickly and I have no time to adjust the AF mode, with AFPS it is likely that I'll lose the shot. When the subject is surrounded by leaves, branches or other animals, AFPS very often misses the subject: in these situations, I recommend to use exclusively MFPS.
The bad luck with the Long-Tailed Tit was partically compensated by this nice Blue Tit. Of course, here I was focussing with the center AF area: I placed the AF point on the head of the subject and the AF focussed without hesitations. I had time to take some bursts of 3-4 photos before it fly away.
Replies and comments
What do you think about this article?
Do you want to tell your opinion, ask questions to the author, or simply congratulate on a particularly interesting article?
You can join the discussion by joining JuzaPhoto, it is easy and free!
There is more: by registering you can create your personal page, publish photos, receive comments, join discussions and you can use all the features of JuzaPhoto.
With more than 259000 members, there is space for everyone, from the beginner to the professional.

 JuzaPhoto contains affiliate links from Amazon and Ebay and JuzaPhoto earn a commission in case of purchase through affiliate links.
