Layers and Layer Mask
Layers and Layer Mask, text and photos by
Juza. Published on 23 Ottobre 2014; 4 replies, 11118 views.
The layers are one of the most powerful and flexible tools of Photoshop: I often use layers for selective adjustments of color, contrast, noise reduction, etc, and for particular techniques as blended exposures. The layers are like paper sheets placed one upon the other. You can hide part of the content of a layer, or make it semi-transparent to see the content of the layer below. When you open a photo, there is only one layer (the "background") that contains the image. You can copy the entire image, part of the image, another photo or everything else on a second layer. You can create as many layers as you want, you can delete layers and you can adjust selectively the properties of every single layer.
The Layer Mask
The layers mask allows to show only part of the layer, using a simple mask and the Brush Tool. If you have never used the layer mask, you can learn how it works in few steps: it is much more straightforward than what you may think. Open an image (1) with Photoshop and paste another image (2) into a second layer.
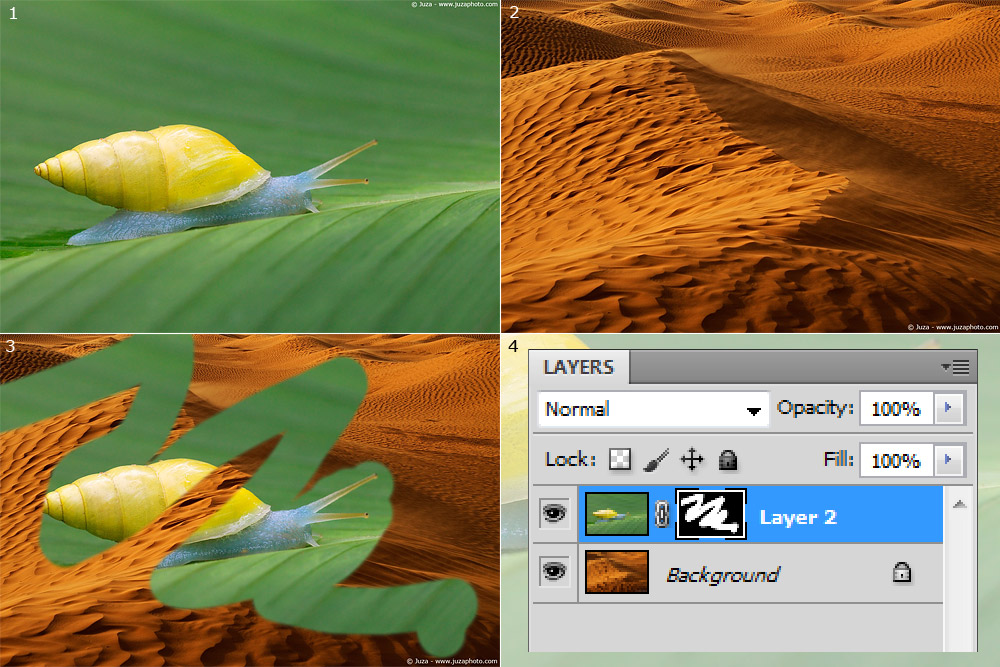
Select the layer "Layer 2", and click on the menu Layer > Add Layer Mask > Hide All to apply the layer mask. The Layer 2 becomes invisible, and a black box (that represents the mask) appears near the layer icon. Select the Brush tool: be sure that the color of the brush is set on white. Now, "paint" on the image: the areas that you paint are displayed in white into the small mask icon, and they reveal the masked image (steps 3-4).
What has it happened? With the brush, you have deleted part of the mask the hides the Layer 2. Now, you are using a white brush. Select the color black and paint again on the image: the areas that were revealed become again invisible. The white brush erases parts of the mask; the black brush re-build the erased areas. Re-select the color white, paint on the image and observe the alteration into the mask icon. Repeat the process until you firmly understand how the layer mask works. The next paragraphs illustrates some of the many applications of the Layer Mask.
Blended exposures to expand the dynamic range
With layers and layer mask, you can blend two or more photos to create a single image with extremely wide dynamic range: I often use this technique for sunrise and sunsets, it gives spectacular results! The majority of DSLRs has a dynamic range of 7-8 stops: even though it is very good, in some situations it is not enough. Blending exposures allows to capture even the most difficult scenes, without limits of dynamic range.
The first step of the technique consists in taking multiple exposures of your subject. Place the camera on the tripod and take one or more photos of the same scene varying the shutter speed; one photo should be exposed for the brighter areas of the scene and the other frame for the darker areas. Use the histogram to check the exposure.
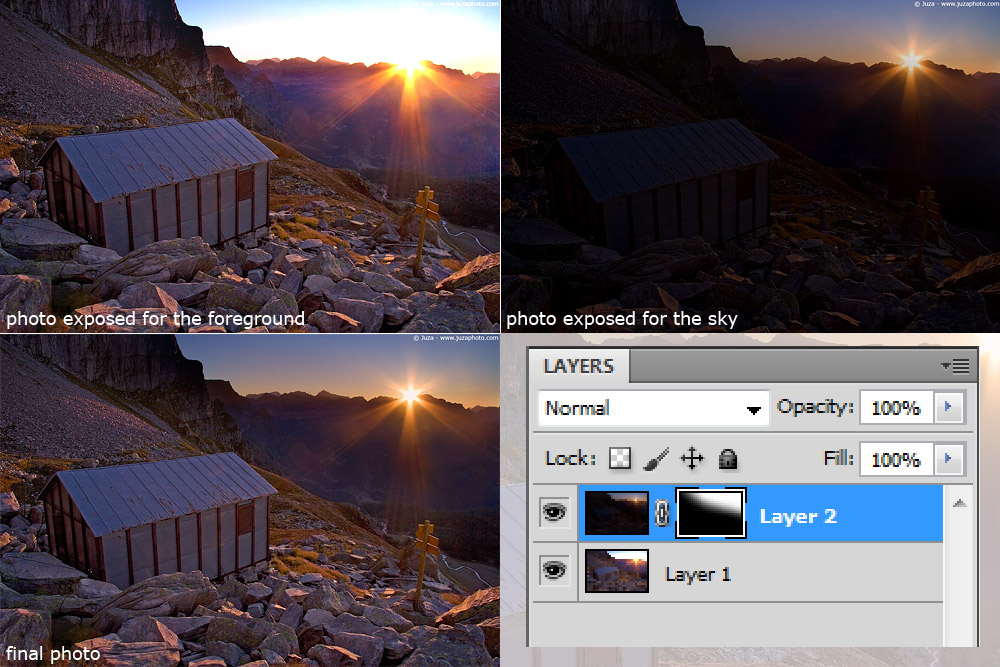
The first photo is exposed for the darker areas (the foreground), while the second photo is exposed for the brightest areas (the sun and the sky). The camera was mounted on a tripod and the parameters (aperture, white balance, iso, etc..) were the same for every image; I changed only the shutter speed.
Open the RAW files with Adobe Camera RAW with the same parameters; do not apply any exposure correction. Use the image exposed for the dark areas as background, and place the other image into a second layer. With the layer mask, you can reveal only the correctly exposed areas of each image. A large (500, 1000px or more) brush, with hardness 0, is ideal to create a smooth and natural transition between areas of different brightness.
Selective sharpening
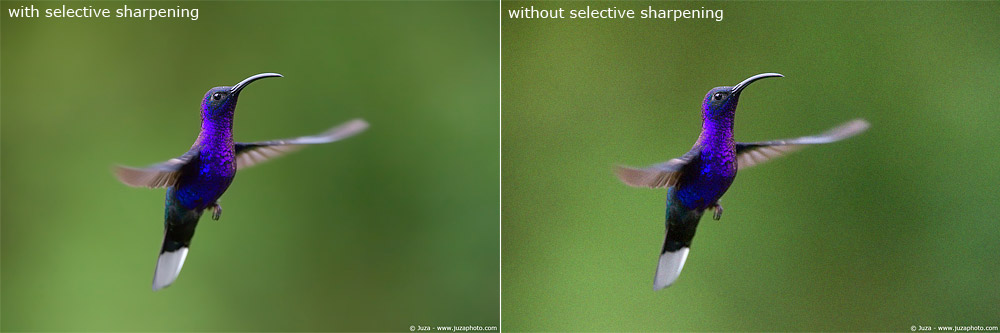
When the photo has large out of focus areas, I always use the Layer Mask to apply sharpening only on the subject. This technique is particularly useful for photos taken at high ISO, both for full size files and web-sized images. If you apply the sharpening on the entire photo, the noise into background becomes clearly visible. To get the best results, instead, I create a copy of the photo on a second layer (right-click on the layer palette and select "duplicate layer" from the drop-down menu). I apply the Smart Sharpen on the copy, while I apply a strong noise reduction on the background, than I apply the layer mask on the copy. With the paintbrush, I reveal only the sharp areas of the photo (the subject): the result is a razor sharp subject against a smooth, noise free background.
Other selective adjustments
Usually, the adjustments of contrast, saturation, color, etc. are applied on the entire image, but in some cases you may prefer to apply them only on a particular area. With the layer mask, you can brighten up only a particular area of the photo (for example the shadows in a landscape); you can increase the contrast only where you want to give more punch to the image (e.g. on the wings of a butterfly), you can exaggerate the effects of light....the only limit is you creativity!
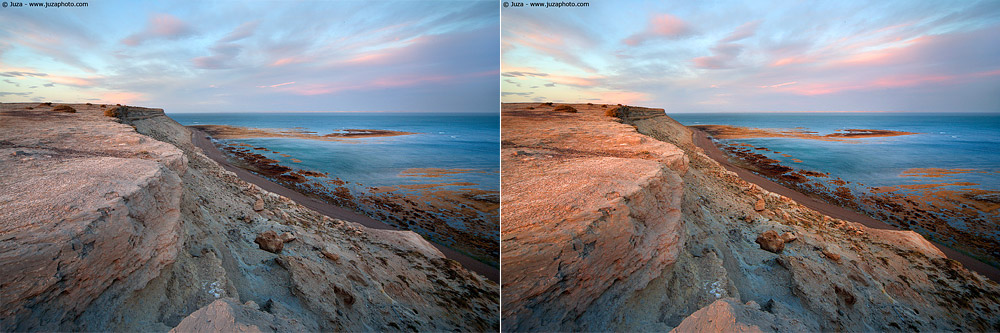
The two photos above are an example of selective adjustments with layer mask. Here, I wanted to increase the contrast between the warm light of sunset and the blue tones of the shadows. I've made a copy of the image on a second layer, then I increased the contrast with an S curve, and I warmed up the color with Color Balance. I applied the Layer Mask "Hide All" and I used the white brush to apply the effect only on the sunlit areas, without affecting the shadows, that retained their natural blue cast.
Replies and comments
What do you think about this article?
Do you want to tell your opinion, ask questions to the author, or simply congratulate on a particularly interesting article?
You can join the discussion by joining JuzaPhoto, it is easy and free!
There is more: by registering you can create your personal page, publish photos, receive comments, join discussions and you can use all the features of JuzaPhoto.
With more than 259000 members, there is space for everyone, from the beginner to the professional.
|
|
sent on 24 Dicembre 2014 (17:49)
Thanks a lot Juza! 
I`m not a big fan o post-production but with this article l`ve lerned some new tricks wich are faster, easier and more effective. |
|
|
sent on 23 Settembre 2015 (17:33)
Great Article! |
|
|
sent on 28 Aprile 2016 (23:04)
“ Selective sharpening.. I apply the Smart Sharpen on the copy „
This is what the Filter menu is created for.
Create a layer, go from "Normal" to "Linear light" from the layer's dropdown menu, get to the top menu bar and find Filters/Other/High Pass, set the radius to 0,9 or 1,2, depending on what size is the sensor and click ok. Then, depending on the type of shoot, add a layer mask to this particular layer and select inverse. Or, in case like a hummingbird on a pure background, just grab a magic wand, select the entire background area ( doesn't matter how rough it is going to be selected, you'll fix it later ) and with marching ants colony, press the add layer mask button. Then press the Inverse on mask options and voila! the bird is sharp! All soft edges, or, the entire bird, apart from the eyes or a few feathers, can be removed from selection by using brush tool.
I do more complicated sharpening. I select the colors separately or use the highlights, midtones or shadows only on single layer. Or even more complicated - two out of three or three out of five selections. It gives a clean result when printing quality is required quite high.
When it comes to the noise reduction, the best way is Lightroom luminance option. In this case the background post-processed copy is being dragged into a Photoshop as a Smart Object or just a copy.
For those, who have only a Photoshop, there is a filter gallery with massive amount of blur filters. I normally do Gaussian blur on the selection i mentioned above - a layer mask with a particular background selection. Then comes the part, where a layer mask options Density and Feather are involved.
Plus, there is a layer option bar too, called a Layer Style. To create a natural looking blur there is one option with the little sliders on the section Blend If: ( Gray by default ) By holding down ALT ( sorry, MAC users...  i guess, it is a Command key for Yous! ), split the arrow triangle and move it towards black or, vice versa, if manipulate the black arrow.. and see, what happens with the image.. It is a shoot-blind method, not always usable, but almost always it creates a nice smooth blur, not touching the edges of the non-selected areas. This is also a method to play with creative filters, that applies only to specific color gamma. i guess, it is a Command key for Yous! ), split the arrow triangle and move it towards black or, vice versa, if manipulate the black arrow.. and see, what happens with the image.. It is a shoot-blind method, not always usable, but almost always it creates a nice smooth blur, not touching the edges of the non-selected areas. This is also a method to play with creative filters, that applies only to specific color gamma. |
|
|
sent on 30 Luglio 2018 (18:46)
thanks sir |

 JuzaPhoto contains affiliate links from Amazon and Ebay and JuzaPhoto earn a commission in case of purchase through affiliate links.


