JuzaPhoto uses technical cookies and third-part cookies to provide the service and to make possible login, choice of background color and other settings (
click here for more info).
By continuing to browse the site you confirm that you have read your options regarding cookies and that you have read and accepted the
Terms of service and Privacy.
You can change in every moment your cookies preferences from the page
Cookie Preferences, that can be reached from every page of the website with the link that you find at the bottom of the page; you can also set your preferences directly here
Correcting CA, Distortion and Vignetting
Distortion, vignetting, chromatic aberration - all these aberrations were a serious problem with film. With digital cameras and Photoshop, they are no longer an issue: you can correct almost every aberration easily and effectively. The only two optical flaws that can no be corrected are flare and lack of sharpness - it is important to choose sharp lenses, because even the powerful sharpening tools of PS won't turn a super cheap 70-300 f/4-5.-5.6 into a 300 f/2.8 :-)
You don't need to correct the lens aberrations on every photo: the majority of professional lenses - e.g. 180 Macro, 600 f/4 - are so good that there isn't any appreciable aberration. Nevertheless, some optical designs - in particular wide angles - are particularly complex, and there are often minor aberrations even in hi-end lenses as the Canon 16-35 f/2.8 L II and the Canon 24-105 L IS. When CA, distortion and vignetting are annoying, you can easily correct them with PS.
Correcting Chromatic Aberration
A perfect lens should focus all the wavelengths (i.e. colors) into the same plane and with the same magnification; if, instead, the lens focuses the various wavelengths in different planes of focus, or with different magnifications, it creates the chromatic aberration. The visible effects of CA are green and magenta halos around the borders of the objects.
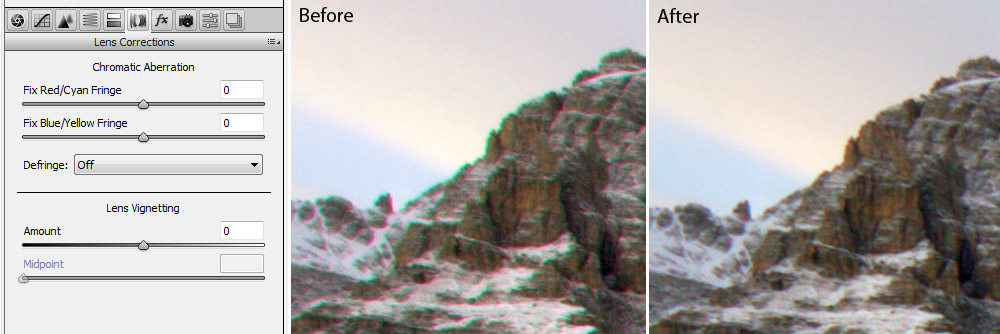
The Chromatic Aberration is the plague of super zoom and wide angle lenses. Even the best wide angle zooms have a bit of CA - the Canon 24-105 L is an example of an excellent lens that shows some CA, at the shortest focal lengths. If the CA is just 1-2 pixels wide (as in the case of 24-105), it is very difficult to notice it in prints, unless you print really large. The super zooms (e.g. 18-250), instead, have strong CA, sometimes even 5-6 pixel wide, that is noticeable even in small prints.
If your image shows some CA, this is the first thing that you have to correct. Both Adobe Camera RAW (the RAW conversion plug-in of Photoshop) and Adobe Photoshop itself offer CA correction tools, but the CA correction of Camera RAW works really well, while the CA correction of PS is not as effective. How it is possible that two similar functions of the same programs gives such different results goes beyond my imagination, but so it is ;-)
Double click on your RAW file to open it in the Camera RAW window. Set all the sliders on neutral values, as explained in the "Introduction to Adobe Photoshop" article. To correct CA, click on the "Lens Correction" tab: there are two sliders to fix red/cyan fringe and and blue/yellow fringe. Zoom on the image to view the detail at 100%, and move the sliders until the CA disappear. Now, you just have to click on "Open" to open the CA-free image with Photoshop and to continue with your usual workflow.
Distortion Correction
The majority of wide angle and zoom lenses have some distortion (straight lines are rendered as curves); in some cases the distortion can be noticeable, but don't worry: it is easily fixed. There are two types of distortion, "barrel" (typical of wide angles) and "pincushion" (typical of tele lenses). You can easily correct even the strongest distortions - it is actually possible to correct even fish-eye lenses. The price to pay is a slight loss of sharpness but, except for the most extreme corrections, this loss is barely noticeable.
Click on the menu Filter > Lens Correction (of Filter > Distort > Lens Correction, if you have Photoshop CS4 or an older version). The "Lens Correction" window has the usual navigation tools, a preview of the image and many controls. It is possible to display a grid, that may help to evaluate the amount of distortion.
The Remove Distortion tool is very intuitive and easy to use. If the image has barrel distortion, you just have to move the slider to the right until the lines are straight; if it has pincushion, move it to the left. As already said, this tool doesn't lower visibly the image quality, the corrected image is almost as sharp as the original one. The only real issue is that it crops slightly the photo, usually you lose 10-40 pixels from the borders (the amount of cropping depends from the intensity of correction). The cropping is done automatically for barrel correction, while you have to crop "manually" when you apply pincushion correction.
Vignetting Correction
The vignetting consist in a light fall off towards the edges of the frame. If the lens has a strong vignetting, the corners looks quite darker than the center of the image. Usually, the vignetting is more visible in wide-angle lenses and full-frame sensors: that said, the vignetting is not a big problem, since it can be fixed very quickly and easily.
The Vignette tab has two controls: Amount and Midpoint. Amount defines how much to lighten the corners of the image; Midpoint defines the width of the corners (i.e. the width of the area that will be lightened). Try different settings until the vignetting has been eliminated. It is not always necessary to eliminate vignetting: sometimes, I prefer to leave vignetting, because it can actually add to the mood of the photo.


 JuzaPhoto contains affiliate links from Amazon and Ebay and JuzaPhoto earn a commission in case of purchase through affiliate links.