Wildlife Photography
The animals are the most technically challenging branch of nature photography. To take good fauna photos, it is not enough to have a good artistic and compositional knowledge: you have to know well the your subject and your equipment.
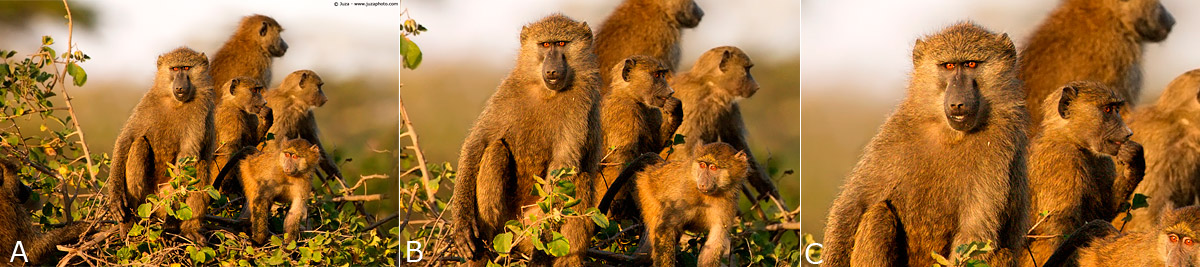
The composition
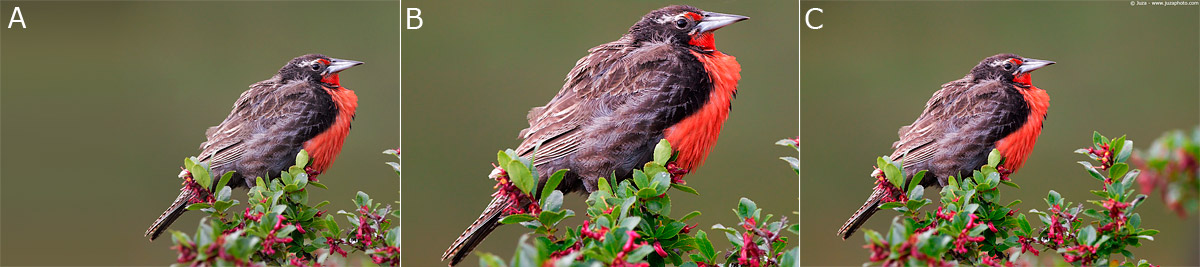
Composing the photo of an animal is quite easy, but you have to remember some simple compositional rules. You should avoid excessively tight compositions (example B), otherwise the subject looks trapped. It is important to leave some empty "room for movement" to give a more dynamic and active look to the photo. This empty area should be placed in front of the subject to create a pleasing and well balanced composition (example C); if you leave empty room behind the subject, it seems that the animal is leaving the photo (example A).
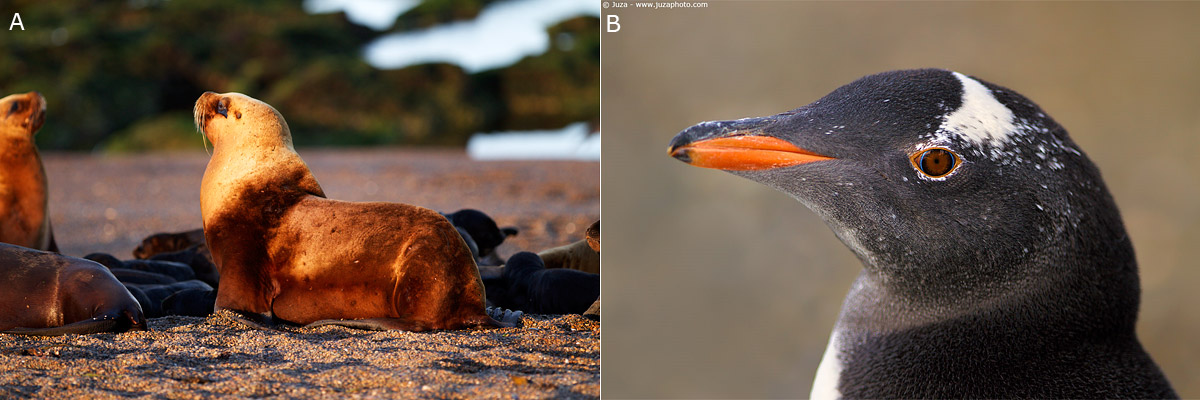
The head turn
Another simple "rule" to get nice photos is to photograph the subject when it is coming towards you, or at least when it is parallel to you, or when it is looking at you. These two photos illustrates that rule. Photo A is sharp and well exposed, but the subject faced away detracts a lot from the photo. In photo B, instead, the subject faced towards you creates a much more "intimate" image, an overall the result is much better.
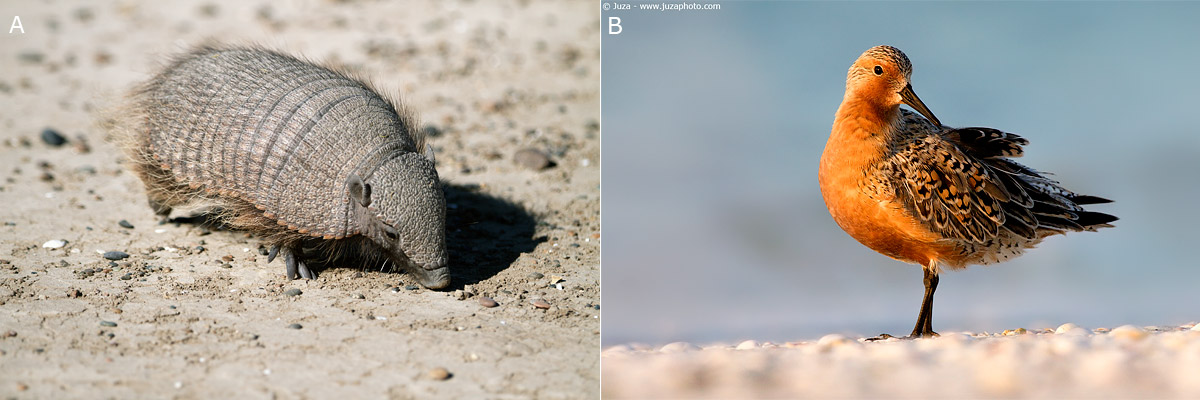
The angle of view
One of the most common errors of beginners is to take photos of animal and plants from the eye level of the photographer, i.e. 160-170cm. Generally, the resulting photos have an "high to low" perspective and a very amateurish look (example A). If you want to improve your photos, you have to get low: the camera should be at the same level (height) of the eye of the subject, of even lower.
To be able to get low enough, you need a tripod with a short central column. The column of the majority of tripods is way too long, but often you can substitute it with a shorter column. With the tripod's legs wide open and a short column, you can place the camera at 20-30 centimeters from the ground. The photos taken at the same height of the subject's eye have a very natural perspective and they give the impression of being side by side with the subject. Moreover, shooting from a low angle makes easier to get a clean background.
Another advantage of low height is that it makes easier to photograph animals: a raised human figure scares the majority of animals, instead if you stay down on the ground you can get closer without scaring your subject.
Sometimes, when you want to get lower than the subject, or when you are photographing very small subjects, even the minimum height of 20-30cm is too much. In this case, the only way to get the desired angle is to place the camera directly on the ground. Placing the camera on the ground you can take truly amazing photos (example B), even though it is more difficult to look into the viewfinder and to compose the image (in these situations, an angle-finder could be useful). Other than that, you have to use a fast shutter speed to eliminate camera shake; otherwise, if you are photographing a still subject, you can use remote release of self-timer to avoid shake.
Aperture, shutter speed and ISO
The aperture is a very important variable, since it determine the depth of field, the look of the background and the shutter speed. For wildlife, the best aperture is usually the widest aperture, unless you have a good reason to use smaller apertures: a common error of many photographers is to use an unnecessary small aperture, that creates an unpleasing background and gives a slow speed. For large animals (e.g. a lion, an eagle) you have enough depth of field to get the entire body in focus even at f/2.8, if they are parallel to sensor plane. For smaller animals (e.g. a duck, a goose) I'd suggest to use f/4 or f/5.6. I'd recommend to stop down to f/8 or f/11 only for very small subject, as a tit or a robin.
Of course, if you need much depth of field to get two or more animals in focus, it might be necessary to stop down to f/16 or f/22, but I suggest to use such aperture only in the rare cases where they are truly necessary. What is the right shutter speed? If you subject is still, you can use even very slow speeds as 1/30 or 1/50, but it won't happen often to photograph an animal that stays still. If your subject is moving slowly, you need at least a speed between 1/125 and 1/250. For subject in fast movement, you need a shutter speed of 1/500 - 1/1000 or faster. These are "generic" values; with experience you will learn how to determine the shutter speed needed for every particular situation.
The possibility of raising the ISO value is an extraordinary help to get the needed shutter speed. I won't hesitate to raise the ISO to 400 or even 800 to get the necessary shutter speed. One of the reasons that led me to choose the Canon system is indeed the availability of quite noise-free high ISO settings: with a Canon camera, you can routinely shoot at 400 or 800 and get excellent image quality.
Teleconverters
The teleconverters allow to multiply the focal length by 1.4x or 2x, and they are a great help for wildlife photography. That said, they have both pros and cons, and you need to know them well to get good results.
A teleconverter is essentially an optical system that magnifies the central portion of the image captured by the lens. The practical result is that you get more magnification, but you lose a little of sharpness and 1 or 2 stops of light. If you want to get good photos using a teleconverter, you have to couple it with a good lens, that has "sharpness to spare": if you add a TC to a zoom lens, the image quality is excessively degraded. Even top quality zoom lenses, as the 70-200 f/2.8, gives poor results with the TC.
The 1.4x TC is widely considered the best TC, because it doesn't reduce too much the image quality. You can use it to transform a 300mm f/2.8 into a 420mm f/4, or a 600mm f/4 into a 840mm f/5.6. You lose one stop of light, but the sharpness remains very good even of the widest aperture.
The 2.0x TC is more controversial. You can use it to transform a 300mm f/2.8 into a 600mm f/5.6, or a 600 f/4 into a 1200 f/8. The increase of magnification is huge, but you lose two stops of light. Remember that all Canon cameras, except the 1 series bodies, will autofocus only with an effective aperture of f/5.6 or brighter, so if your lens becomes an f/8 you lose AF.
An even more pressing issue is the loss of sharpness. I do not recommend to shoot wide open when you use a 2x TC, unless it is strictly necessary, because there is a noticeable softening. Even a top quality lens as the Canon 600 f/4 IS, when used with the 2x TC, is a bit soft wide open (i.e. at f/8). On the other hand, if you stop down by 1 or 2 stop (i.e. to f11 or f16, with 600 IS + 2X) you get a good sharpness.
I'd suggest to use the 2x TC when you really need the maximum reach and there is enough light to stop down to f/11.
The teleconverters does not change the minimum focusing distance: for example, the 600 f/4 has a focusing distance of 5.5 meters, and if you add the 2x TC it becomes a 1200 f/8 with the same focusing distance of 5.5 mt. This is a great plus for small subjects: with the bare 600 you have a macro ratio of 0.12x, with the 2x you get 0.24x, i.e. 1:4. This is an excellent magnification for small birds, butterflies and flowers.
The depth of field depends by the actual (effective) aperture. A 300 f/2.8 + 2x becomes a 600 f/5.6, and when you use it wide open you get exactly the same depth of field of a 600 f/5.6 (not the depth of field of f/2.8).
The flash
The flash is widely used in wildlife photography to improve the natural light. There are three situations where the flash is very useful:
- The ideal light is the sunrise/sunset light, but often you have to photography animals even during the day: the flash can balance the harsh light; it brightens up the shadows, reducing the contrast and increasing the visible detail. This technique is called "fill flash" right because the flash "fills" the shadows. To use fill flash, set the flash compensation on a value between -1.0 and -2.3 stops: it is necessary to used a negative value because the flash should "complement" the ambient light, it must not overpower the natural light, otherwise the photo gets an "artificial" look.
- When you photograph a back- lightened subject, it is often necessary to use a little of flash to brighten up the detail. You must be very careful, since it is necessary to keep the beautiful back- lightened look of the subject. Use a flash compensation between -2.0 stops and -2.7 stops to get the best results. Always check the photo in the LCD screen of the camera to be sure that the flash didn't overpower the natural light.
- When the sky is overcast, or the subject is in full shade, the contrast is greatly reduced. This is an ideal situation, since it allows to capture beautifully the colors and the detail, but sometimes the contrast gets really too low. In this case, a little of flash helps to create light shadows and to give more "pop" to the photo. I'd suggest to try a value between -1.0 and -2.0.
Reducing, or enhancing, the contrast is not the only purpose of flash. Another great advantage of flash is that it creates the catchlight, that is a small reflection of the flash that appears in the eye of the subject. This reflection gives a more "active" and fresh look to the subject.
If you photograph often distant subjects, you need a powerful flash (don't even think to use the in-camera flash!). Currently, the best flashes are the 580 EX (for Canon) and the SB-800 (for Nikon): these units have an high guide number, but sometimes even these professional flashes are not enough. Luckily, there is a simple and cheap way to increase by 2-3 stops the reach of your flash: the Better Beamer. The BB is a Fresnel lens that can be attached in front of the flash; it concentrates the light, increasing the reach. You can buy a better beamer from various websites for nearly $40; I'd recommend to get your from the NPN Shop. There are four models for different flashes, so pay attention to get the right one.


 JuzaPhoto contains affiliate links from Amazon and Ebay and JuzaPhoto earn a commission in case of purchase through affiliate links.