You have just purchased your first DSLR, and you are not happy by the result that you get? Even tough it takes some time to improve, there are some things that can immediately help your photography - in this article, I have listed five suggestions that I consider very important to improve your results!
Read the camera manual
Many photographers - sometimes even professionals - don't fulfill the potential of their cameras because they don't know how to use properly some features, or they don't even know that some features exists. When I buy a new camera, I always read the entire manual - of course, I'd be able to use the camera even without reading the manual, but I'd miss many useful things.
Other than that, if you don't know well your camera you may think that it does not work or it has defects, while actually you are not using it properly. Some common complaints are:
The autofocus is not precise: even though there are few defective cameras that actually have focus problems, generally the 90% of focus errors are due to the photographer. Read carefully the pages about AF and learn how to use it; pay attention to center the subject (or the area where you want to focus) into the selected AF point. Other than that, remember that AF is not perfect - you can not expect to get always sharp photos, in particular if you photograph a fast moving subject.
The images have color cast (or "my friend's camera gives better colors"): usually the color cast are a consequence of white balance errors; personally, I always use Auto White Balance and I don't care at all about color casts, because when I convert the RAW files I can adjust the white balance to get perfect colors. Another complaint that I hear often is "that Canon/Nikon/ett camera gives much better colors than mine". All DSLRs currently in production gives good colors; what really matters is not the camera, but the post processing - if you process well your RAW files, you can get excellent colors with any camera.
The photos are soft: many photographers that have switched to a DSLR from a compact cameras think that the photos are soft. The reason is that compact cameras often use a strong in-camera sharpening, while DSLRs generally apply less processing to the photos; this is a positive thing, since a less processed photo has less artifacts and it is more "customizable" by the photographer. You can get a perfect sharpness by shooting in RAW and with good post-processing techniques; of course, you need also good lenses and good techniques (the photo must be properly focused, and you have to use a tripod or a fast shutter speed to avoid blur).
The photos are underexposed: some cameras actually tend to underexpose by 0.3 or 0.7 stops, if you use them in complete automatism. I recommend to spend some time learn the basis of exposure, in particular the use of histogram. The histogram is a very useful tool, once you know how to read it you will be able to get always properly exposed images.
A DSLR is a very versatile and powerful tool, and the time that you spend reading the manual will be repaid by great images.
Understand composition, light and background
To master the technical and the artistic side of photography, I recommend to read the articles in the Nature Photography section. But if you don't know where to begin, try to remember there essential guidelines:
Composition: don't place the subject (or the horizon line) right in the center of the frame: centered images often have a "static" look. Instead, you should try asymmetrical compositions: if your subject is a flower or an animal, put more room in front of it than behind it; if you are photographing a landscape, frame 2/3 of earth and 1/3 of sky (or vise-versa); and so on.
Wildlife - angle of view: one of the most common errors of beginners is to take photos of animal and plants from the eye level of the photographer, that results in a "high to low" perspective and a very amateurish look. If you want to improve your photos, you have to get low: the camera should be at the same height of the eye of the subject, or even lower.
Light: the light changes during the day. At early morning or at late afternoon there is the better light for photos; a warm, "sweet" light. The central hours of the day, instead have a white, harsh light: they are far from ideal for photos.
Background: the background is a very important element of an image: usually, it should be as clean as possible, otherwise it distracts the attention from the subject. The easiest way to get a pleasing background is to use a long focal length and a wide aperture.
Learn from other photographers
One of the best ways to improve your photos is to receive suggestions and critiques from other photographers, and to analyze their images. I suggest to join a nature photography forum, where you can post your images and receive useful feedback; you can also view and comment the images of other photographers. This is a fantastic opportunity to learn and to know other nature lovers! If you are not a member yet, I highly recommend to join the
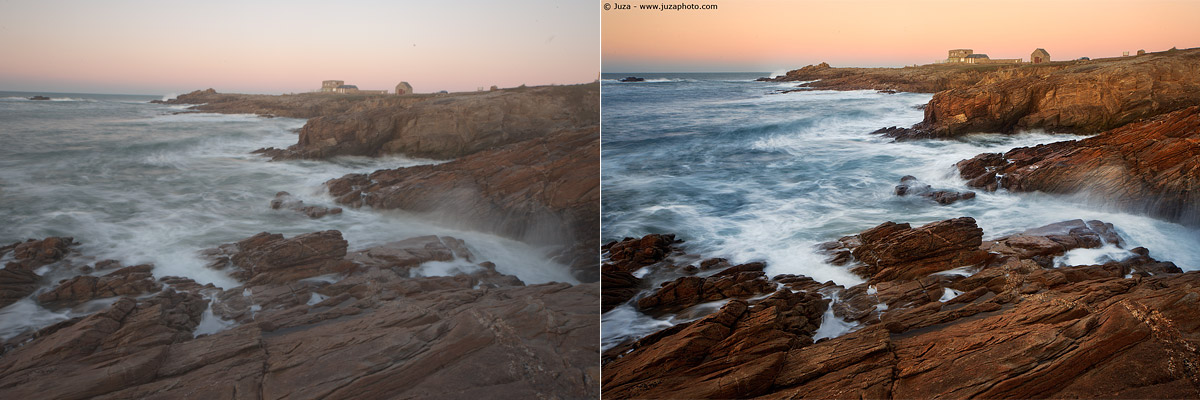
Before and after: a good post processing makes a big difference.
Learn how to post-process your photos
Good post-processing techniques are essential to get the best results. I know many photographers - even professionals - that have very poor post-processing techniques, so they are not able to optimize images that otherwise would be fantastic. I suggest to get Adobe Photoshop (or Photoshop Elements if you have a tight budget) and to learn how to use it for nature photos - many PS techniques are described here on JuzaPhoto, and there are many other websites that explains how to use PS.
Use the right equipment
If you have a limited budget, I recommend to invest in lenses, instead of buying an expensive camera: a cheap Canon 500D with a good lens gives better results than a Canon 1DsIII with a poor lens!
Which are the "good" lenses? A cheap 70-300mm zoom lens costs about $250 and it is lighter and more versatile than a 300mm f/2.8 lens, that costs ten times as much ($3,000-$4,000). Nevertheless, a professional is willing to spend that much to get the bulky, fixed focal 300 f/2.8 : why? Both the lenses reach the focal length of 300mm, so you get exactly the same magnification, but the images taken with the 300 f/2.8 are sharp and rich of details, while the images taken with the 70-300 are much softer. Other than that, the pro lens has faster AF, IS and better built quality.
Of course, this is an extreme example; you don't have to spend an exaggerate amount of money, there are also many affordable good quality lenses. Nowadays, even some cheap lenses, as the Canon 18-55 IS ($150), have very good image quality: if you are interested in a lens and you want to know if it is worth the price, I'd suggest to read the reviews you can find on JuzaPhoto and on many other websites, and to ask on the forum to receive owners opinions.
Other than lenses, another thing that can make a big difference is the tripod. The tripod is a great help to get sharp images. If you handhold the camera, many times you need to use wide apertures or high iso to get a shutter speed fast enough to freeze hand shake; often resulting in insufficient depth of field or poor image quality due to noise.
With the tripod, instead, your only concern are the subject movements; other than that, you have the freedom to choose the shutter speed and the aperture that you prefer; you can use the lowest ISO setting, too. The result are sharp, noise free images.


 JuzaPhoto contains affiliate links from Amazon and Ebay and JuzaPhoto earn a commission in case of purchase through affiliate links.