What do you think about this photo?Do you have questions or curiosities about this image? Do you want to ask something to the author, give him suggestions for improvement, or congratulate for a photo that you really like?
You can do it by joining JuzaPhoto, it is easy and free!
There is more: by registering you can create your personal page, publish photos, receive comments and you can use all the features of JuzaPhoto. With more than 242000 members, there is space for everyone, from the beginner to the professional.
| sent on August 21, 2012 (14:57) | This comment has been automatically translated (show/hide original)
Bravo! Very beautiful!
I got myself the Samyang. This evening I'm going to try it! Bravo ! Molto bella !
Ho preso anch'io il Samyang. Questa sera vado a provarlo ! |
| sent on August 21, 2012 (21:17) | This comment has been automatically translated (show/hide original)
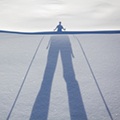
Thank you! Although for me it is a bit 'too clear on the first floor, you can see in some places interventions in ps ..
The Samyang for me it has great value for money, you just have to figure out where the hyperfocal objective signs are not very precise. In any case, should be around 2.5 to 3 m ... Ti ringrazio! Anche se per me è un po' troppo chiaro il primo piano, si vedono in certi punti gli interventi in ps..
Il samyang per me ha un ottimo rapporto prezzo qualità, devi solo capire dove ha l'iperfocale, le indicazioni sull'obiettivo non sono molto precise. In ogni caso dovrebbe essere intorno ai 2,5-3 mt ... |
| sent on August 28, 2012 (3:29) | This comment has been automatically translated (show/hide original)
Hello Daniel, very particular effect of the rays of the sun, the spectacular six points.
Hello:-P Ciao Daniele, molto particolare l'effetto dei raggi del sole, spettacolare le sei punte.
Ciao |
| sent on August 28, 2012 (8:15) | This comment has been automatically translated (show/hide original)
Thank you very much Albano Grazie mille Albano |
| sent on August 29, 2012 (15:50) | This comment has been automatically translated (show/hide original)
Great shot and beautiful lights Daniele!
Paul Bellissimo scatto e bellissime luci Daniele!
Paolo |
| sent on August 29, 2012 (16:35) | This comment has been automatically translated (show/hide original)
Thank you Paul! Grazie mille Paolo! |
| sent on September 10, 2012 (19:49) | This comment has been automatically translated (show/hide original)
Beautiful lights and colors, I like it a lot.
Dario Bellissime luci e colori, mi piace molto.
Dario |
| sent on September 11, 2012 (17:30) | This comment has been automatically translated (show/hide original)
Thank you very much Dario! Grazie mille Dario! |
| sent on January 04, 2013 (13:01) | This comment has been automatically translated (show/hide original)
Very very beautiful, congratulations. Hello, Evelina Molto molto bella, complimenti. Ciao,Evelina |
| sent on January 04, 2013 (14:25) | This comment has been automatically translated (show/hide original)
Evelina Hello, thank you for the changeover and compliments! Ciao Evelina, ti ringrazio del passaggio e dei complimenti! |
| sent on January 06, 2013 (21:33) | This comment has been automatically translated (show/hide original)
Very nice, although I'm not very fond of HDR ... you tried to do a manual fusion of the shots? Molto bella,anche se non sono molto amante degli HDR...hai provato a fare una fusione manuale degli scatti? |
| sent on January 07, 2013 (8:13) | This comment has been automatically translated (show/hide original)
Hello 66tasca,
Meanwhile, thank you for passing and for the advice.
I looked the file and this shot is the fusion of two shots (with times of 1/15 and 1/60) in three areas of the image (the rocks in the foreground, the background hills and sky) in both shots I used a Cokin filter the sloping GND8.
But I do not understand what you mean by merging manual shots ... Ciao 66tasca,
intanto ti ringrazio per il passaggio e per il consiglio.
Ho riguardato il file e questo scatto è la fusione di due scatti (con tempi di 1/15 e 1/60) in tre aree dell'immagine (le roccie in primo piano, le colline di sfondo e il cielo); in entrambi gli scatti ho usato un filtro digradante GND8 della Cokin.
Non capisco però cosa intendi per fusione manuale degli scatti... |
| sent on January 07, 2013 (19:32) | This comment has been automatically translated (show/hide original)
I read that it was made in HDR right? If so I've tried to use programs to generate HDR automatically, but the results I have never entusiasmato.Mi are so informative manual fusion of two or more shots with different exposures made in post produzione.Consiste to copy a photo over the other and then with the layer mask to display the detail you need with the brush ... easier to do than to give a brief explanation dirsi.Ti :
The sensors cameras today have a wide dynamic range as that of the eye
human, but only a range of 7-8 stop of brightness.
In landscape photography of sunrises and sunsets this is not enough to represent all the
brightness of the scene and the great contrast between the foreground Scuro and the bright background.
To solve this problem using the technique of double exposure in practice are taken
from the same point, using a tripod, two images with different exposures, one
correct for the highlights and one correct for dark areas.
Open the two images in PS and pasting each other. For example you want to copy the
second image on the first open. Working on the second image Select> All
then Edit> Copy, then go to the first image Edit> Paste
Now apply a layer mask Menu> Layer> Layer Mask (Layer Mask)>
Hide All (Hide All)
With a white brush hardness 0, size large> 150 and nuanced, isthe area to be painted
appear. In the border areas you can use a much broader brush> 250 and nuanced, with
opacity 60-70% to give a soft transition between the dark part of the image of the first plane and
that of the background light.
When finished level (Layer)> Unique Level (Flatten Image)
This method using Photoshop ... Ho letto che è stata fatta in HDR giusto?Se è così ho provato anch'io ad usare i vari programmi per generare HDR in automatico,ma i risultati non mi hanno mai entusiasmato.Mi sono quindi informato sulla fusione manuale di due o più scatti con esposizioni diverse fatta in post produzione.Consiste nel copiare una foto sopra l'altra e poi con la maschera di livello far comparire il dettaglio che ti interessa con il pennello...più facile a farsi che a dirsi.Ti dò una breve spiegazione:
I sensori delle attuali fotocamere non hanno una gamma dinamica ampia come quella dell'occhio
umano, ma solo una gamma di 7-8 stop di luminosità.
Nella fotografia di paesaggio di albe e tramonti questa non è sufficiente per rappresentare tutta la
luminosità della scena ed il grande contrasto fra il primo piano scuro e lo sfondo molto luminoso.
Per risolvere questo problema si usa la tecnica delle doppie esposizioni, in pratica vengono scattate
dallo stesso punto, usando un treppiede, due immagini, con valori di esposizione diversi, uno
corretto per le alte luci ed uno corretto per le zone buie.
Si aprono le due immagini in PS e si incollano una sull'altra. Per esempio si vuole copiare la
seconda immagine aperta sulla prima. Si interviene sulla seconda immagine Seleziona>Tutto
poi Modifica>Copia, quindi si va sulla prima immagine Modifica>Incolla
Ora si applica una maschera di livello Menù> Livello>Maschera di Livello (Layer Mask)>
Nascondi Tutto (Hide All)
Con un pennello bianco durezza 0, dimensioni ampie >150 e sfumato, si dipinge sull'area da far
comparire. Nelle zone di confine si può usare un pennello molto più ampio >250 e sfumato, con
opacità 60-70% per dare una transizione sfumata fra la parte dell'immagine del primo piano scura e
quella dello sfondo luminosa.
Quando finito Livello (Layer)>Unico Livello (Flatten Image)
Questo metodo usando Photoshop... |
| sent on January 08, 2013 (13:25) | This comment has been automatically translated (show/hide original)
Hello 66tasca,
I read with great attention your articulate explanation of this I thank you very much!
In fact, to create the HDR of this image, I used more or less the technique you described using Photoshop and that I had just explained in my previous comment ... :-|
The transition points between the three areas of the image, however, are not perfect (eg. Between the rock in the foreground and the hills behind there is a difference in brightness unnatural) ... it will be because it was one of the first HDR I tried to do ...
If necessary, try to redo the work of post production starting from the raw file ... ;-) Ciao 66tasca,
ho letto con molta attenzione la tua articolata spiegazione e, di questo te ne ringrazio molto!
In effetti, per creare l'HDR di questa immagine, ho usato più o meno la tecnica che hai descritto usando Photoshop e questo non l'avevo proprio esplicitato nel mio commento precedente... 
I punti di transizione tra le tre aree dell'immagine, però, non sono perfetti (per es. tra la roccia in primo piano e le colline retrostanti c'è una differenza di luminosità poco naturale)... sarà perchè è stata uno dei primi HDR che ho provato a fare...
Eventualmente provo a rifare il lavoro di post produzione partendo dai file raw... |
| sent on January 08, 2013 (22:33) | This comment has been automatically translated (show/hide original)
To be the first arms with the double exposure you get on far better than me, so with this technique are the beginning and I still have much to learn ... reading your explanation in fact I was convinced that you had created a HDR automatically :-| I just posted me too in the comment of a photo landscapes processed in this manner, let me know if there is something wrong.
Hello Per essere alla prime armi con la doppia esposizione te la cavi sicuramente meglio di me,anch'io con questa tecnica sono agli inizi e ho ancora molto da imparare...leggendo la tua spiegazione in effetti ero convinto che avevi generato un HDR in automaticoHo appena postato pure io nell'area commento dei paesaggi una foto elaborata in questa maniera,fammi sapere se c'è qualcosa che non va.
Ciao |
| sent on January 09, 2013 (14:40) | This comment has been automatically translated (show/hide original)
Hello,
thanks for the ride! I left my comment on the pictures you've shown ... Ciao,
grazie mille per il passaggio! Ho lasciato il mio commento sulla foto che mi hai indicato... |
| sent on March 10, 2013 (21:23) | This comment has been automatically translated (show/hide original)
Quoto the above, and I might add also the possibility 'in post-production to use the dodge or burn, which often are useful they reveal parts excessively underexposed and vice versa without using the HDR function that often generates images that are too contrived.
Apart from this I congratulate you for that anyway mmagine and 'managed very well.
A greeting. :-) Quoto quanto sopra, e mi permetto di aggiungere anche la possibilita' in post-produzione di usare le funzioni SCHERMA e BRUCIA che spesso si rivelano utili ne rivelare parti eccessivamente sottoesposte e viceversa senza utilizzare la funzione HDR che spesso genera immagini troppo artefatte.
A prescindere da questo ti faccio i miei complimenti per l'mmagine che comunque e' riuscita molto bene.
Un saluto.  |
| sent on March 11, 2013 (8:12) | This comment has been automatically translated (show/hide original)
Hello Marcello, thanks again for the transition and for the compliments!
The functions dodging and burning is better than me the studies carefully, do not use them nearly ever ... :-|
Daniele Ciao Marcello, grazie ancora per il passaggio e per i complimenti!
Le funzioni scherma e brucia è meglio che me le studi con cura, non le uso quasi mai...
Daniele |
| sent on March 11, 2013 (8:24) | This comment has been automatically translated (show/hide original)
The feeling 'a nice bit of flash on the first floor. Now you have to think if 'this is the result you wanted to achieve. ;-) La sensazione e' di un bel colpo di flash sul primo piano. Ora devi pensare se e' questo il risultato che volevi ottenere. |
| sent on March 11, 2013 (14:25) | This comment has been automatically translated (show/hide original)
Thanks Max for the ride.
In fact, the result was not what I wanted to achieve ... there is room for improvement! Grazie Max per il passaggio.
In effetti non era proprio quello il risultato che volevo ottenere... c'è margine di miglioramento! |
|

Publish your advertisement on JuzaPhoto (info) |


 JuzaPhoto contains affiliate links from Amazon and Ebay and JuzaPhoto earn a commission in case of purchase through affiliate links.


 12.2 MEGAPIXEL
 Resize to fit window