JuzaPhoto uses technical cookies and third-part cookies to provide the service and to make possible login, choice of background color and other settings (click here for more info).
By continuing to browse the site you confirm that you have read your options regarding cookies and that you have read and accepted the Terms of service and Privacy.
You can change in every moment your cookies preferences from the page Cookie Preferences, that can be reached from every page of the website with the link that you find at the bottom of the page; you can also set your preferences directly here
Macro photography with Plamp, text and photos by Juza. Published on June 08, 2012; 1 replies, 6815 views.
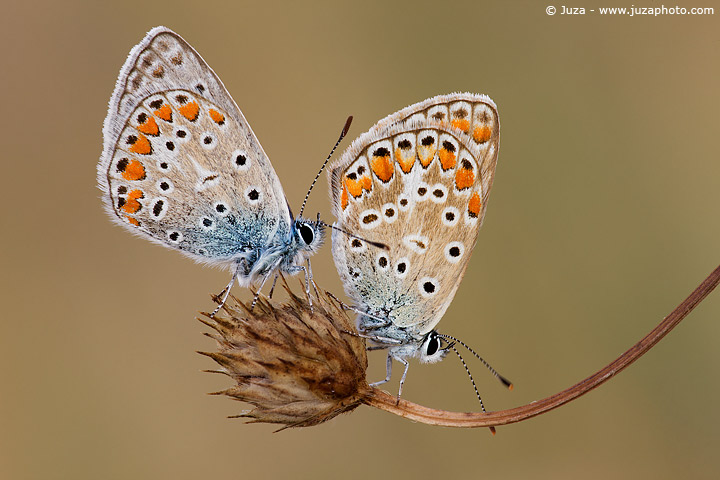
Canon EOS 1Ds MarkIII, Canon EF 180mm f/3.5 L USM, 0.5" f/16, iso 50, tripod. Bologna, Italy.
There are some simple and cheap accessories that can make an huge difference in your photography: the [url=http://www.tripodhead.com/products/plamp-main.cfm] Wimberley Plamp[/url] is one of the accessories. The Plamp help to fight to of the worst enemy of macro photographers: the wind and busy backgrounds! Indeed, the plamp is one of the main reasons that led me to abandon the use of 2x Teleconverter in macro photography.
I have taken this photo in a cold morning of September, in the grassfields near Bologna. I was wondering around with my friend Daniela in search of macro subject - in this season there are not many macro opportunities. We had almost decided to give up for that day when I have seen these two little butterflies. I have already many photos of this species - but it was the first time that I saw two of them, posed so gracefully on the same stem! I immediately grabbed the camera, and I mounted it on the tripod few meters out of the grassfield.
The two butterflies were surrounded by tall grass, and it would have been impossible to get a clean background in that position. Even a 360mm (180mm with 2x teleconverter) would have been useless, because at f/16 or f/22 the background would have been very distracting.
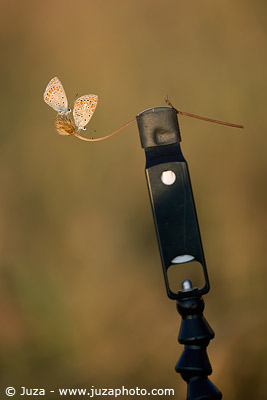
I mounted my secondary tripod - a very small Manfrotto 190 MF4 with only two sections - with the Plamp in front of the camera, then I cut the grass stem with the two butterflies and I clamped it in the Plamp, in a comfortable position where I could easily get a clean background with the bare 180mm lens, at every aperture. As always, I used a shissor to cut the grass, instead of trying to breack it with my hands - the shissor allows to cut the stem without creating strong vibrations, that may scare away the subject.
the Wimberley Plamp holds the step with the two butterflies portrayed in this article
As you can see in the photo above, the stem was clamped very close to the subject. Indeed, the shorter you cut the stem, the better - a short stem is much less prone to vibrations than a long stem; that way, with a short stem clamped close to the subject, I managed to eliminate the vibrations in spite of a slight breeze. Even though the 1DsIII is pretty good at high ISO, whenever possible I try to take my macro photos at the lowest sensitivity, so it is essential to have a still subject.
One of the most difficult thing in this photo was to get everything in focus. Even thought the two butterflies seems in the same plane, actuall the butterfly on the left was about 1-2 millimeters in front. At this magnification (close to 1:1), even one millimeter is an huge difference! If you want to get everything in focus, the first thing to do in these cases is to place the camera as parallel as possible to the subject. The Plamp helps a lot for this purpose, since it smaller clamp can be easily rotated.
I focused using live view: I placed the plane of focus between the two butterflies, and using the depth of field preview button I evaluated the results given by various aperture. f/16 turned out to be the widest aperture that gave enough depth of field, so I have chosen this aperture and I have take a dozen of photos (in macro photography, when there is a little of wind, I always take many shots to be sure that at least one is perfectly sharp).
Replies and comments
What do you think about this article?
Do you want to tell your opinion, ask questions to the author, or simply congratulate on a particularly interesting article? You can join the discussion by joining JuzaPhoto, it is easy and free!
There is more: by registering you can create your personal page, publish photos, receive comments, join discussions and you can use all the features of JuzaPhoto. With more than 253000 members, there is space for everyone, from the beginner to the professional.


 JuzaPhoto contains affiliate links from Amazon and Ebay and JuzaPhoto earn a commission in case of purchase through affiliate links.