Exposure and histogram
One of the great advantages of digital photography is the possibility to check the exposure immediately after the shot, thanks to the histogram and highlights screen. To take a perfectly exposed photo, there is no need to do complex calculations: I take a test shot with the settings suggested by the camera, I check the histogram and, if necessary, I set the exposure compensation on the proper value and I repeat the photo. Learning to use the basic exposure modes and the histogram requires just a little of patience and practice, but it gives complete control on the image.
Exposure modes
Every serious camera has four essential exposure modes: P, S, A, M (consumer cameras have also many useless "scene" modes).
P is the Program mode. The camera chooses both the aperture value and the shutter speed; you can choose an equivalent combination by turning the main dial. This is the simplest exposure mode, but I'd not recommend to use it, unless you have very little experience.
S (Tv on Canon cameras) is the Shutter Priority mode. You choose a shutter speed and the camera choose the appropriate aperture. Personally, I don't like the S mode because it doesn't give control on the depth of field; moreover, if you select an excessively fast shutter speed and there is not enough light, it is easy to get underexposed photos, in particular with "slow" lenses (e.g. f/5.6 lenses) that doesn't allow to use bright apertures to counterbalance the fast shutter speed.
A (Av on Canon cameras) is the Aperture Priority mode, and it is by far the most useful exposure mode: I use it for the 90% of my photos. You choose an aperture value and the camera choose the appropriate shutter speed. The A mode allows to control the depth of field; moreover, you can use the A mode to control even the shutter speed. If you need the fastest shutter speed that you can get at a given ISO for a given scene, you just have to select the widest aperture: the camera automatically selects the fastest shutter speed. (if the shutter speed is still too slow, you have to raise the ISO sensitivity: if you switch to S mode and you select a faster shutter speed, the photo will be underexposed, because the lens is already at the widest aperture and the camera is not able to counterbalance the shutter speed).
M is the Manual mode. It allows to choose both shutter speed and aperture; it can be very useful in particular situations, but it requires some experience. I use M mode for the 10% of my photos: it is very useful when the flash is the main light source and in particular situations as night photography. The Canon cameras have a limited exposure compensation range (+/- 3 stops, while Nikon cameras have +/- 5stops), so in some rare situations the only way to get the correct exposure is to switch in M mode. Other than that, the manual mode is useful when the subject is moving against a changing background.

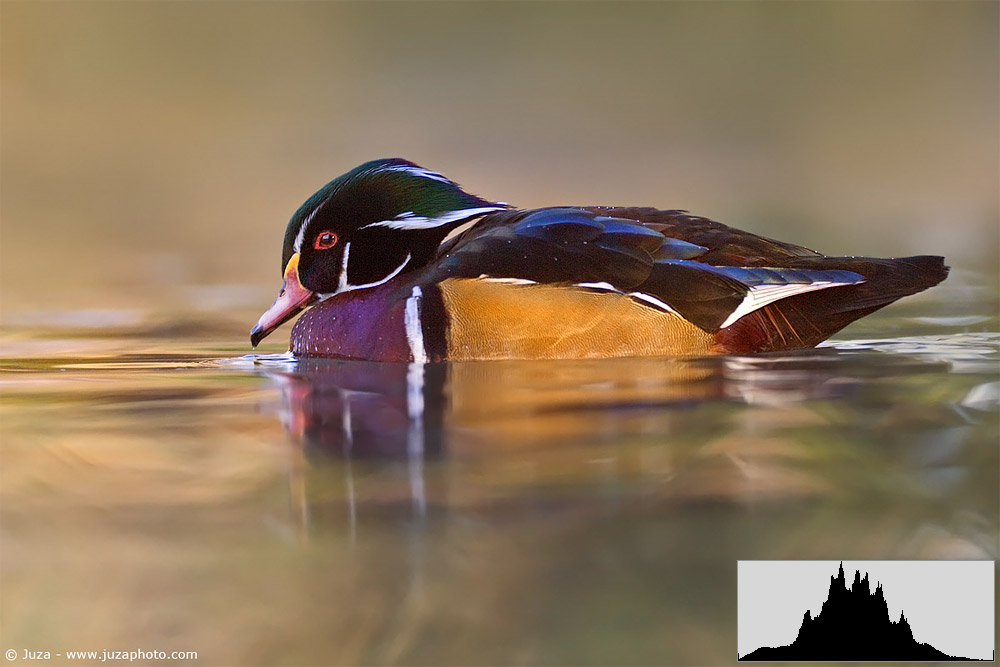
With the histogram and highlight screen, it is quite easy to expose properly even a difficult subject as white birds against a dark background. Here, I have used exposure compensation of -1 to preserve the highlights. Since the -1 setting gives 1 stop faster shutter speed, I lowered the ISO by 1 stop. You get the same shutter speed both at ISO 400 and ISO 200 @ -1, but the latter setting is a better choice in difficult situations as white birds against dark backgrounds, because it avoids the overexposure.
Metering modes
There are mainly three types of metering modes: Evaluative (also know as Matrix), Center-weighted and Spot. Spot mode uses only a very small area, usually correspondent to the selected AF area, to determine the exposure; Center-weighted, instead, uses the central area of the frame.
Evaluative metering analyzes the entire image to determine the exposure. I use always Evaluative; Spot and Center-weighted were the best choice with film, but with the advent of digital they are no longer so important. In fact, using Evaluative metering and checking the histogram you can determine the right exposure much faster than using spot metering.
Exposure compensation
The exposure compensation is essential to get correctly exposed photos. Even though the modern cameras have very advanced exposure meters, I rarely use the "default" exposure, I often use more or less exposure compensation to get the best results.
If you set the exposure compensation of a positive value, e.g. + 0.3 or +2, you increase the exposure and you brighten up the photo; if you set the EC on a negative value, e.g. - 0.3 or -2, you decrease the exposure and you darken the photo. Some cameras have a quite limited compensation range; for example, the Canon 500D allows to underexpose or overexpose just up to 2 stops. To overcome the limits of the camera, you have to switch to manual mode and choose the combination of shutter speed/aperture that gives the desired results.
Usually, I set the exposure compensation after reading the histogram: if the photo is overexposed I set the EC on a negative value, and vise versa. An alternative technique that I use when I photograph white subjects in difficult light condition, to preserve the highlights, is to set the EC on -1 and to lower the ISO sensitivity by 1 stop. This way, I get the same shutter speed, but there are less chances to overexpose the highlights: for example, for given scene and aperture both ISO 400 EC 0, or ISO 200 EC -1 gives the same shutter speed, but the latter setting helps more to avoid overexposed highlights. Of course, by underexposing by 1 stop the whites are properly exposed, but the midtones and the shadows might be quite dark.
The histogram
The LCD screen shows just an approximate preview of the image that does not allow to judge precisely the exposure: to determine if the image is correctly exposed, you have to use the histogram. The histogram is a graph that shows the brightness of the photo; every SLR camera offers the possibility to view the luminance histogram of the photo, and some cameras have even RGB histograms. In Canon cameras, the histogram is shown in the main photo review screen, together with a small preview of the photo and the exposure data.

The horizontal axis represents the level of brightness, from 0 (pure black) to 255 (pure white). The vertical axis represents the amount of pixels that have a determined brightness.
Learning to read the histogram displayed by your camera is quite simple: you just have to remember that the histogram should match the subject. For example, if you take a photo of a white subject, the histogram should be in the right area (brighter values); if it is in the left area the photo is underexposed because the white subject has been recorded as dark tones by the camera. For the same reason, a dark subject should create an histogram located mainly in the dark side; an subject of average brightness should create a centered histogram, and so on.When you look the histogram, it is very important to check if the graph touches an extremity (left or right side): in this case, the image is severely underexposed or overexposed and it has lost detail. Even when you photograph a very light or very dark subject, the histogram should never tough the edges, with few exceptions. I think that the best way to learn using the histogram is to observe the graph in various situations: here you can see some examples.
This photo shows a subject with average brightness. The photo is well exposed and the histogram, as expected, is relatively centered; the tonal range goes from black to white, but the majority of the image is composed by midtones. This is not an easy subject to expose - it is enough to overexpose or underexpose by 1 stop to lose some detail in the black or in the withes. Here, instead, the graph is close to to both the sides, but it does not touch any of them.

This is a completely overexposed photo. The dark areas are recorded as midtones, and the highlights are so overexposed that they have become a white area, without detail. The histogram, clipped on the right side, shows the loss of image data: this photo can not be recovered. If you get an histogram like that, set the exposure compensation a negative value (e.g. -1) and repeat the photo. If the dynamic range of the camera is not enough to record the scene, you have to use special techniques as blended exposures with Layers and Layer Mask.

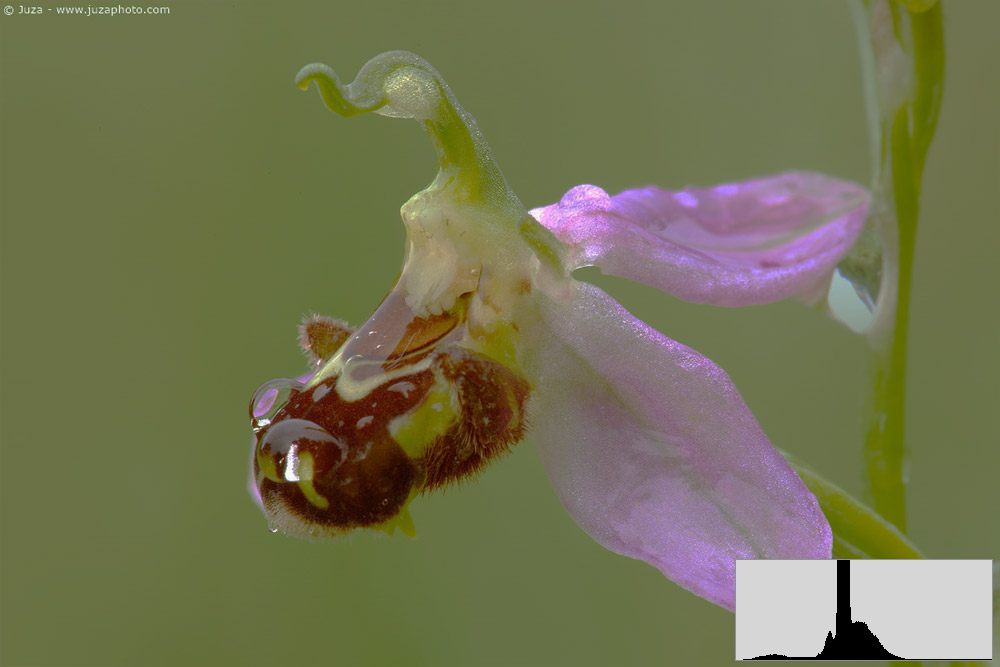
This is the classic "layer" image. In the histogram, there are four main peaks that represents the four layers of the photo; each layer has a slightly different brightness. Other than that, the histogram has a lot of empty room on both sides: it mean that the photo has low contrast. It would be pretty easy to increase the contrast with PS by dragging the white and the black point to the edges of the histogram, but here I preferred to maintain the low contrast of the scene, to create a soft, relaxing mood.
This is a night photo taken in Madagascar. The histogram is on the dark side, and here it means that the photo is correctly exposed, since it shows that a dark scene was recorded as dark tones. Even the clipped area on the left side, in this case, are not an error: it represents the black silhouette of the palm leaves.
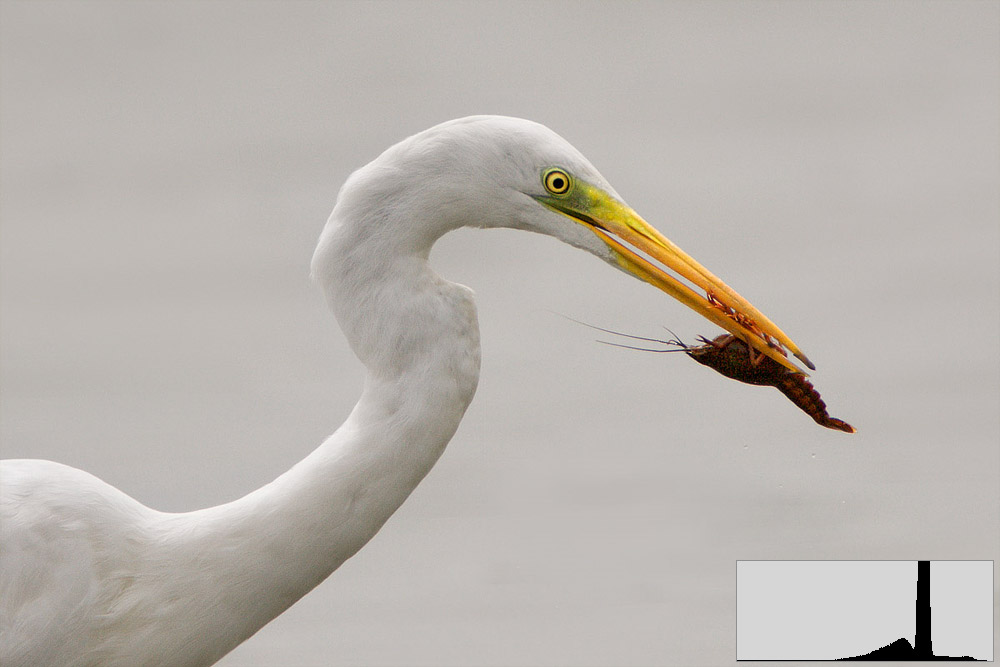
In this photo, I set the exposure to get the Great White Heron properly exposed: the exposure compensation was set on -1. If I had used the default exposure, the background would be brighter, but the white feathers of the bird would be overexposed. Here, instead, the background is almost completely back (some areas are actually pure black, as you can see by the histogram clipped on the dark side), but the subject is properly exposed. When you have a scene like this one, don't worry about the clipped blacks; you have to expose for the subject.

During my workshops, I'm often asked if a peak like this one represents a bad exposure. The answer is no: this photo is well exposed. You have to worry only when the graph is clipped on the sides; if it is clipped on the top, it just mean that the large majority of the photo has a certain level of brightness, and the peak would be too high to be displayed entirely in the small histogram window. In this case, the majority of the photo is constituted by light midtones.
This is a clearly underexposed photo. When you get an histogram like that, it mean that the photo is very underexposed, unless you are photographing a very dark subject. Here, instead, the caterpillar and the leaf were midtones, but they had been recorded as dark tones. It is still possible to recover the exposure, since the histogram is not clipped, but you would increase a lot the noise: in these situations, if it is possible, I recommend to set the exposure compensation on a positive value and to repeat the photo.
This photo looks "muddy" and flat because it lacks of contrast. The exposure is not bad - in these situations, you can do nothing to enhance the photo in-camera, you have to adjust the image with Photoshop, by dragging the white and black points close to the edges of the histogram, "trimming" the empty areas. It is easy to get histograms with empty areas (= lack of contrast) in foggy days, or when you photograph a subject in shade or soft light. By increasing the contrast with PS you get excellent colors and perfect exposure.
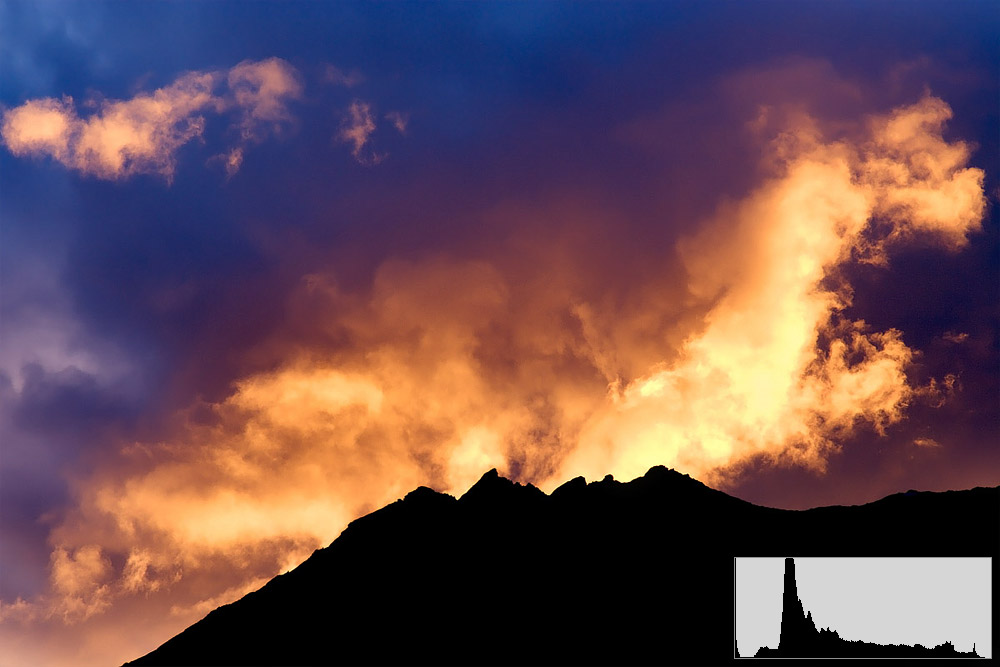
This photo has a wide tonal range, from pure black to almost white, so the histogram is spread on the entire graph. Note that the biggest peak of the histogram represents the dark blue sky, not the mountain - the black silhouette is a completely black (clipped) area, and it is represented by the thin and high peak on that is clipped the left side. This is the correct exposure to get the mountain as a silhouette; if you want to get some detail in the foreground in such contrasted scenes, instead, you have to use the blended exposures technique.

This photo is overexposed because the midtones of the subject had been recorded as light tones, but it can be easily rescued with Photoshop, since the histogram is not clipped. Actually, this exposure could be considered the "perfect exposure" for this subject - it is the brightest exposure that you can get without clipping the highlight. By correcting it with PS, you get less noise and more dynamic range than a photo that has been already "exposed properly" in-camera.
This photo, instead, is too overexposed to be corrected with PS. The petals of the flowers have become completely white, without detail. The histogram shows clearly the overexposure, since it is clipped on the right side (highlights). In the Highlights screen, the petals would blink as overexposed areas. You have to set the exposure compensation on a negative values and to repeat the photo.
This photo is exposed properly, since the bright subject (a white bird against a light grey background) has been recorded as light tones. The high peak represents the uniform background; as already said, it is not a problem if the histogram is clipped on the top, while it would be a problem if it was clipped on the left or right side.
The Highlights screen
The Highlights screen integrates the histogram. This screen shows a preview of the image: if there are blinking areas, the image is overexposed, and some areas are completely white and devoid of detail. If it is possible, you have to set the exposure compensation on a negative value and to repeat the shot.


 JuzaPhoto contains affiliate links from Amazon and Ebay and JuzaPhoto earn a commission in case of purchase through affiliate links.