Photographing the Aurora Borealis (Northern Lights)

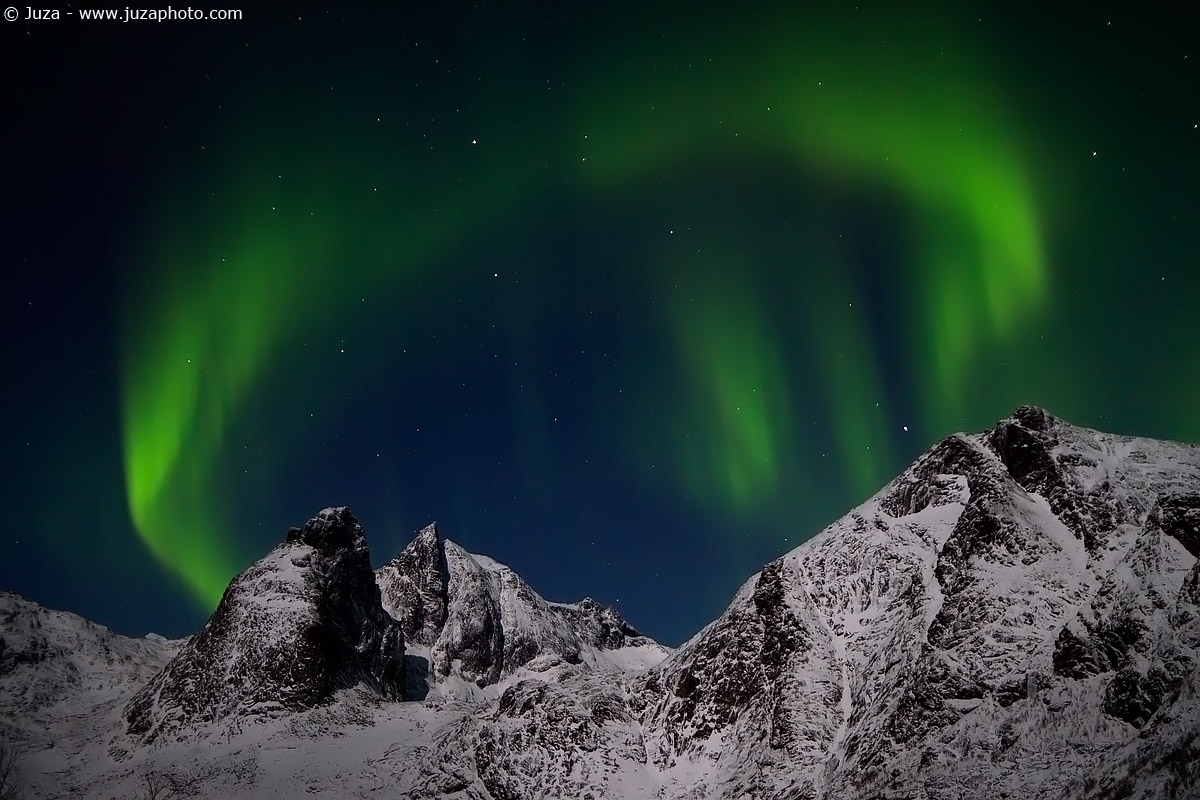
Canon 7D, Sigma 20mm f/1.8 EX DG, 2.5" f/1.8, iso 800, tripod. Norway.
Northern lights have always fascinated me, but until now I had never had the opportunity to take photos of this phenomenon. In early 2012, I did a photo trip in Norway with good results: in this article I'm going to describe my experience and suggestions about this kind of photography.
The essential thing is th location: you can see the aurora only in the extreme north or south of the planet. In Europe, the northern areas of Norway, Sweden and Finland offer good possibilities too see it. I have chosen Norway, and in particular Lofoten Islands: they have marvelous landscapes and the climate is relatively mild thanks to the Gulf Current. Even in winter the temperature is few degrees under zero, far better than the -30 or -40 Celsius degrees that you may find inland. The coldest temperature ever recorder in Norway is -50 Celsius degrees, registered in 1914 at Roros.
I have chosen to do this trip by car, for various reasons. I like the experience of the long trip from Italy to Norway, I hate traveling by plane, and the car allows to save money by sharing costs with my travel-mates (Max, Niky, Domenico, Sandro). We used the Jeep Compass of my friend Max, since it has enough room for five persons and it offers a decent gas mileage (11/12 kilometers per liter). In Norway both unleaded and diesel cost about 2€ per liter, so the fuel is one of the main costs of the trip.
From the central Europe, you can reach the Lofoten through Norway or Sweden; the roads may be completely covered by ice or snow, so snow tires are essential (in these countries, studded tires are very common, too). In our trip, we spent about 6 days on the road between Italy and Norway, and 6 days to take photos of Lofoten and northern lights.
Norway is an extremely expensive country - everything costs about twice than in Italy, and three times more than USA. In winter, a room in a mid-range hotel costs about 150 € ; the only way to go cheaper is to sleep in hostels: even though they are much more expensive than hostels in other parts of the world, they are cheaper than the other options. The best price that I have found was 100 € for a 4-persons room. If you share the costs with several travel-mates, you can live with a moderate budget. Other than that, in many hostels you can use a kitchen: if possible, I recommend to bring all the food from home and to cook by yourself, it will help a lot to save money. Overall, for this trip I spent about 950 € (gas, food, hostel, etc)... with some attention, you can travel on a budget even in the super expensive Norway.
We have taken the ferry from Bodo, a nice small city on the coast. In about four hours the ferry reaches Moskenes, on the extreme south of Lofoten. These "islands" are actually a peninsula, since they are connected by many bridges and you can visit them without other ferries. Our hostel was at about 4 kilometers from Moskenes, in a small village called "A" (the last letter in the Norwegian alphabet: a good choice for the last village in Lofoten). Our hostel was above the "Torrkfisk Museum". There was not anybody else, so we had the entire hostel for us! The wooden rooms, the beautiful position and the good value make the hostel "
A Vandrerhjem" a great choice.
The best months to see the northern lights are the winter months. We have chosen the first half of January: there are about 17 hours of darkness, and in the remaining hours the sun never goes above the horizon. Usually it is easier to see the aurora in the central, darkest hours of the night, but we have seen it even at 9p.m. The length and the brightness depend by solar activity and essentially you have to find a good location and wait: the aurora may appear in any moment, and it may disappear in few seconds. The most beautiful aurora that I have seen lasted just a couple of minutes, after I waited for hours!
Canon 7D, Sigma 20mm f/1.8 EX DG, 2.5" f/1.8, iso 200, tripod. Norway.
When you choose the period for your trip, you must consider the presence or absence of the moon. With the moon, the landscape is enlightened so you have a better foreground, but it is difficult to get a silhouette and there are less stars. During our trip there was full moon; if I'll come back, I'm going to chose a week without moon, so I can take different photos.
The lens is essential: you need a bright lens, and of course a SLR with good high ISO helps, too. The aurora may be quite bright, but often it moves quickly and in few seconds it can move from a side of the sky to the other. If you use a long shutter speed, the aurora may appear as a green halo without detail. It is better to use a shutter speed of 4-5 seconds or less, or even 1" when the movements of the aurora are very fast. With the state of art of technology (Canon 1DX and Nikon D4) you wouldn't have problems to get such shutter speeds, even with a f/2.8 or f/4 lens, but if you have a camera that is far from stellar at high ISO, as my Canon 7D, you need a f/1.8 or f/1.4 lens. For all my photos of aurora borealis I have used the Sigma 20mm f/1.8: in has very poor image quality, but it has allowed me to take all the photos between ISO 400 and 800, without too much noise. This lens has a very reasonable price; if you want a better image quality, both Canon and Nikon offer great 24mm f/1.4, but the price is more than twice the Sigma lens.
You have to focus on a distant subject: if there is the moon, you can use the live view to focus on it; otherwise, in complete darkness, you need to try different settings near the longest focusing distance. Of course you need manual focus and you have to check often the results, since it is easy to get an out of focus image at apertures like f/1.4 or f/1.8.
You can use various techniques to overcome the limitations of lens and camera. In a photo where there was an interesting foreground but the image quality was very poor, I have taken a second sharper photo at f/4.5: during post processing, I have recovered the detail from the sharper shot, while keeping the bright sky from the f/1.8 exposure. In other photos, instead of taking a single image with a slow shutter speed that would result in a blurred aurora, I have taken many short exposures and I have blended them in a single photo to show the movement of the aurora during 7-8" without too much blur.
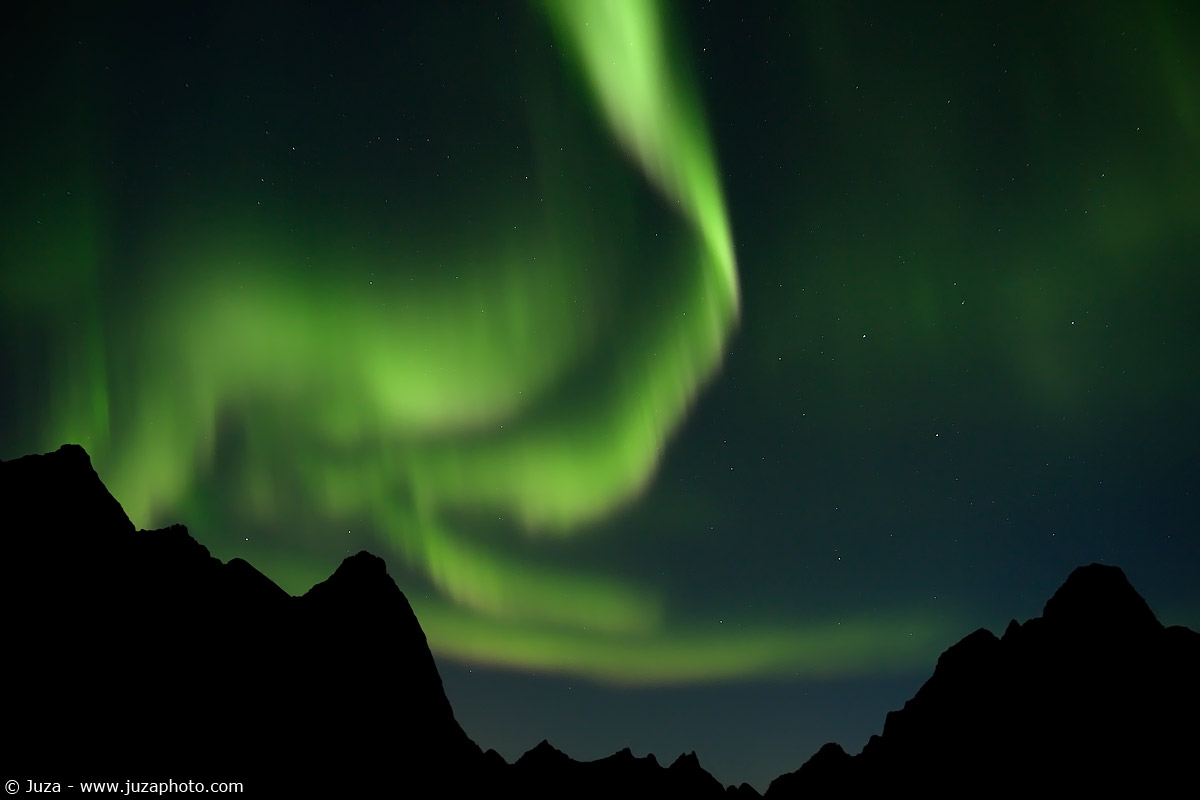
Canon 7D, Sigma 20mm f/1.8 EX DG, 3.2" f/2.2, iso 400, tripod. Reine, Norway.
The aurora keeps changing shape, so it is always better to take several photos so you can choose the best one (in alternative, you can create a fascinating time-lapse video).
What is the aurora borealis?
The aurora is created when charged particles coming from the sun (solar wind) hits the atoms in the upper layers of the atmosphere. When oxygen is released, it creates the classic green color of the aurora, while nitrogen creates more unusual blue or red auroras. These lights are generated at about 100 kilometers of altitude and they cover a wide area of the sky.
There may be aurora borealis at every hour, but during the day it is not visible due to the brightness of the Sun, while during the night it becomes visible. You can see it also in the southern hemisphere; only in exceptional cases it has reached temperate latitudes. Usually it appears near the poles because the particles of solar wind are attracted by the magnetism of Earth. For more in-depth informations about aurora, I recommend these links:
Aurora Borealis on Wikipedia,
Aurora FAQ,
time lapse video by TesoPhotography.
You can find a short term "aurora forecast" on the website
Aurora Forecast.


 JuzaPhoto contains affiliate links from Amazon and Ebay and JuzaPhoto earn a commission in case of purchase through affiliate links.